7 posts tagged with "sql"

View All Tags

· 3 min read
Jeffrey Aven

We were looking to implement a variant of the %sql magic command in Jupyter without using the default sqlalchemy module (in our case, just using psycopg2 to connect to a local server - a StackQL postrges wire protocol server).

Create the extension module

We named our extension and cell magic command stackql, so start by creating a file named stackql.py. We made this file in a directory name ext in the Jupyter working directory.

Write the magic extension

Magic commands can be line-based or cell-based or line-or-cell-based; in this example, we will use line-or-cell-based magic, meaning the decorator %stackql will be used to evaluate a line of code and the %%stackql decorator will be used to evaluate the entire contents of the cell it is used in.

The bare-bones class and function definitions required for this extension are described below:

Create a Magic Class

We will need to define a magics class, which we will use to define the magic commands. The class name is arbitrary, but it must be a subclass of IPython.core.magic.Magics. An example is below:

from IPython.core.magic import (Magics, magics_class, line_cell_magic)

@magics_class
class StackqlMagic(Magics):

@line_cell_magic
def stackql(self, line, cell=None):
if cell is None:
# do something with line
else:
# do something with cell
return results

Load and register the extension

To register the magic functions in the StackqlMagic class we created above, use a function named load_ipython_extension, like the following:

def load_ipython_extension(ipython):
ipython.register_magics(StackqlMagic)

Complete extension code

The complete code for our extension is shown here:

from __future__ import print_function
import pandas as pd
import psycopg2, json
from psycopg2.extras import RealDictCursor
from IPython.core.magic import (Magics, magics_class, line_cell_magic)
from io import StringIO
from string import Template

conn = psycopg2.connect("dbname=stackql user=stackql host=localhost port=5444")

@magics_class
class StackqlMagic(Magics):

def get_rendered_query(self, data):
t = Template(StringIO(data).read())
rendered = t.substitute(self.shell.user_ns)
return rendered

def run_query(self, query):
cur = conn.cursor(cursor_factory=RealDictCursor)
cur.execute(query)
rows = cur.fetchall()
cur.close()
return pd.read_json(json.dumps(rows))

@line_cell_magic
def stackql(self, line, cell=None):
if cell is None:
results = self.run_query(self.get_rendered_query(line))
else:
results = self.run_query(self.get_rendered_query(cell))
return results

def load_ipython_extension(ipython):
ipython.register_magics(StackqlMagic)

Load the magic extension

To use our extension, we need to use the %load_ext magic command referencing the extension we created.

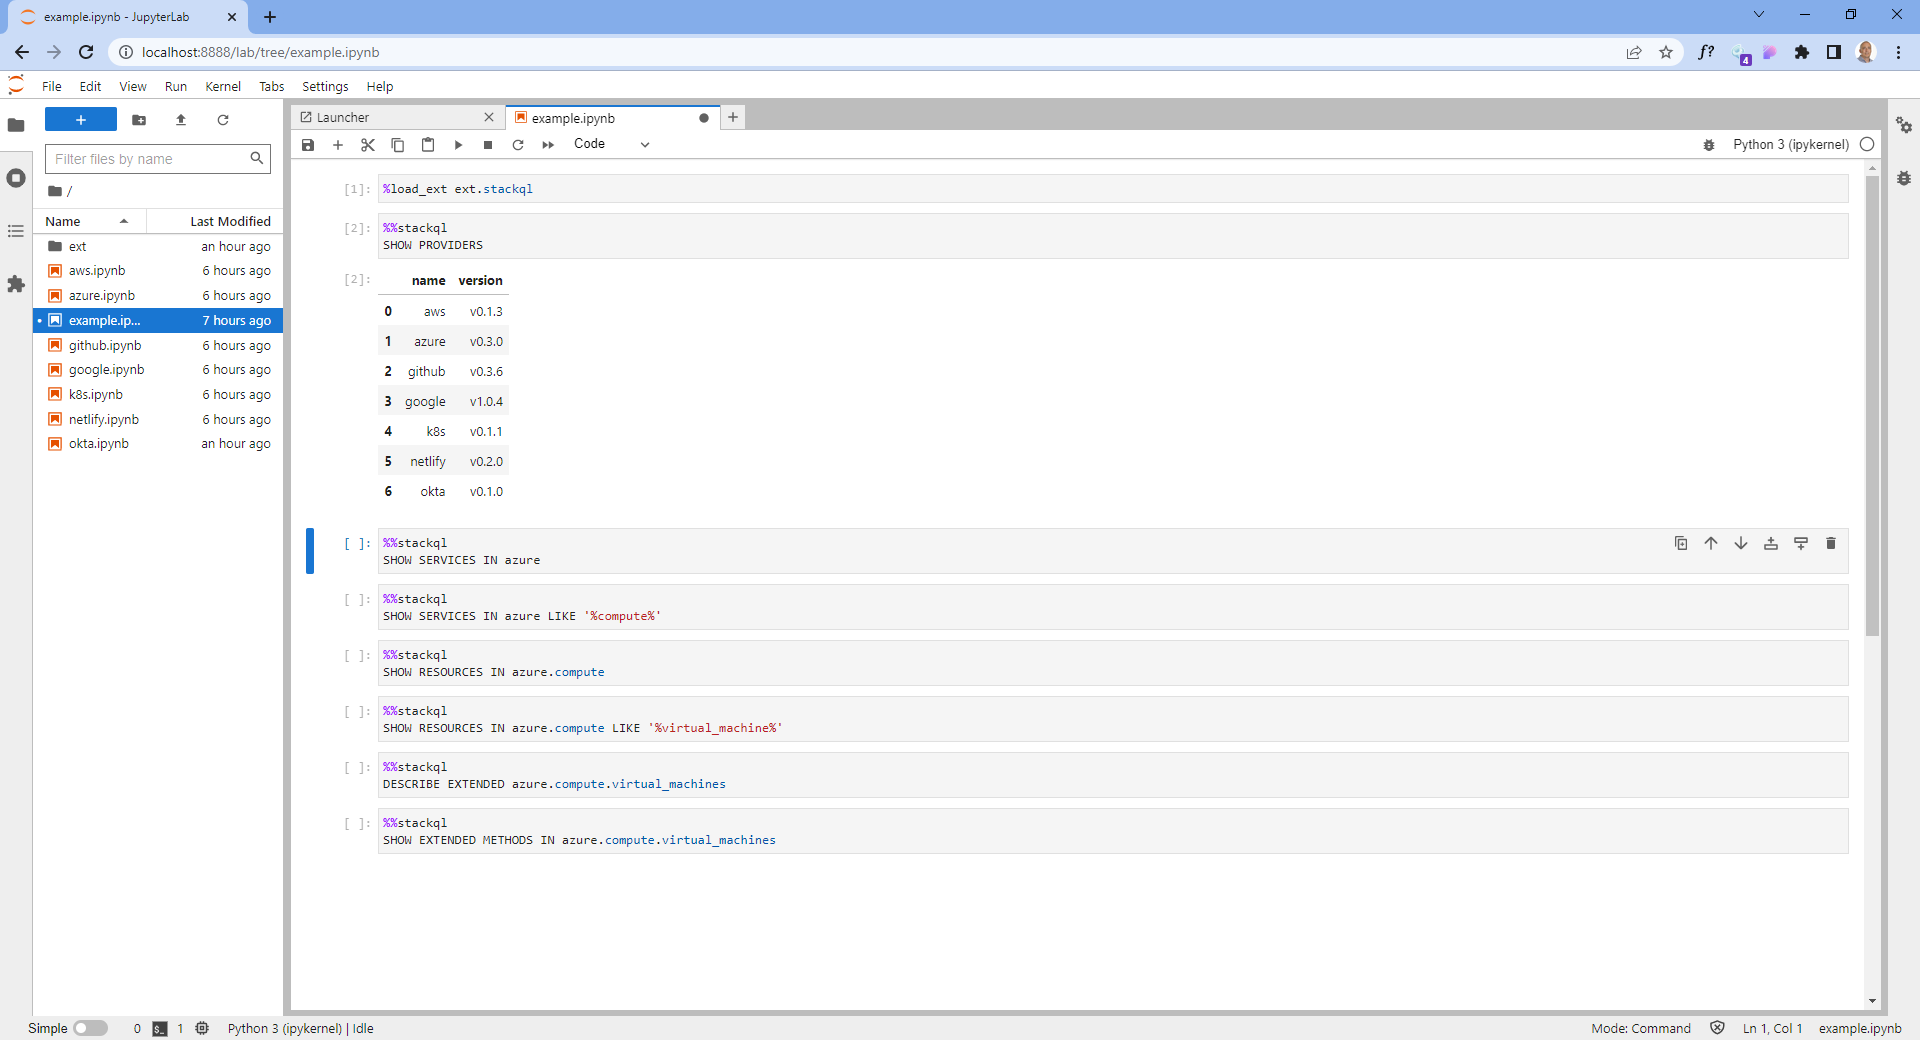
%load_ext ext.stackql

Note that since our extension was a file named stackql.py in a directory named ext we reference it using ext.stackql.

Use the magic function in a cell

To use the magic function in a cell (operating on all contents of the cell), we use the %% decorator, like:

%%stackql
SHOW SERVICES IN azure

Use the magic function on a line

To use the magic function on a line, we use the % decorator, like:

%stackql DESCRIBE aws.ec2.instances
Using Variable Expansion

In our example, we implemented variable expansion using the "batteries included" String templating capabilities in Python3. This allows for variables to be set globally in our notebooks and then used in our queries. For example, we can set a variable in a cell like:

project = 'stackql-demo'
zone = 'australia-southeast1-a'

Then use those variables in our queries like:

%%stackql
SELECT status, count(*) as num_instances
FROM google.compute.instances
WHERE project = '$project'
AND zone = '$zone'
GROUP BY status

An example is shown here:

Using a Custom Jupyter Magic Command

The complete code can be found at stackql/stackql-jupyter-demo.

if you have enjoyed this post, please consider buying me a coffee ☕ to help me keep writing!
· 6 min read
Jeffrey Aven

DBT (or Data Build Tool) is a modern data transformation tool born in the cloud/DevOps era. It's a great project which much has been written about; I will try to give as brief an overview as possible.

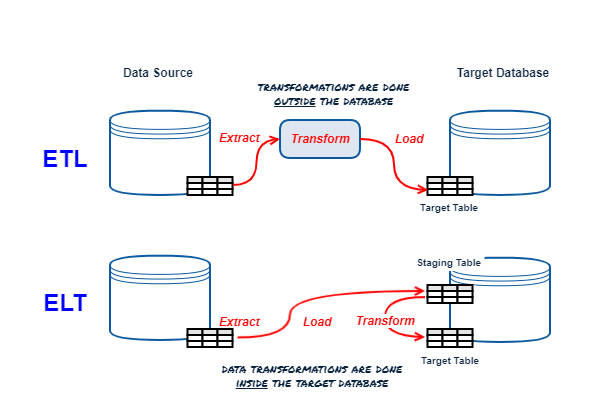
ETL vs ELT Refresher

A quick refresher on ELT vs ETL before we discuss DBT. I have created an infographic for this...

ETL vs ELT

Summary

DBT is an open-source command line tool written in Python from DBT Labs (formerly Fishtown Analytics).

DBT is designed to manage data transformations while applying software engineering best practices (including version control, automated testing, reviews, approvals, etc). Its modern software engineering and cloud-first design goals separate it from its old-school ETL/ELT predecessors.

DBT is an ELT tool focusing on the T(ransform) only, the E(xtract) and L(oad) are up to you (there are plenty of tools that specialize in this).

At its core DBT is a templating engine using Jinja (Python templating engine); it generates templates that represent SQL commands to create, replace or update objects in your database (the “T” in ELT), then oversees the execution of the templated commands. The work is "pushed down" to the underlying database containing the source and target objects and data.

Models

The concept most integral to DBT is the Model. A Model is simply a representation of a transform (or set of transforms) to a dataset, resulting in a target object (which could be a table or tables in a datamart). A model is expressed as a SELECT statement stored in a .sql file in your dbt project (well get to that in a minute).

Suppose we want to create a denormalized fact table for commits to store in a datamart in BigQuery. This is what a model file might look like (using the BigQuery SQL dialect and referencing objects that should exist and be accessible at runtime when we execute the model).

{{ config(materialized='table') }}

with commits as (
SELECT
SUBSTR(commit, 0, 13) as commit_short_sha,
committer.name as commiter_name,
committer.date as commit_date,
message,
repo_name
FROM `bigquery-public-data.github_repos.sample_commits` c
)

select * from commits

Models are created as views by default, but you can materialize these as tables where needed.

You configure connectivity to the target database using adapters (software libraries provided by dbt in the case of most mainstream databases) and profiles (which contain details around authentication, databases/datasets, schemas etc).

DBT Project

A DBT project is simply a folder containing your models and some other configuration data. You can initialize this by running dbt init from your desired project directory. In its most basic form, the structure looks like this:

models/
├─ your_model.sql
├─ schema.yml
dbt_project.yml

Your models can be created under subfolders for organization. schema.yml is an optional file that contains tests for columns, can also include descriptions for documentation. The dbt_project.yml file is the main entry point for the dbt program, it contains the configuration for the project, including which profile to use. Profiles (stored in a file called profiles.yml store all of the necessary connectivity information for your target database platform. By default dbt init creates this file a .dbt folder under your home directory.

info

You could store this with your project (be careful not to commit secrets like database credentials to source control). If you store it in any other directory than the default, you will need to tell dbt where it can find this file using the --profiles-dir argument of any dbt command, see here for more information.

To confirm your project is ship shape, run dbt parse; if there are no errors, you are good to proceed running and testing your models.

Running DBT Models

To run your models, simply run the following command from the directory containing your dbt_project.yml file (typically the root of your project folder):

Model deployed! Let's test it:

This will run all of the tests associated with your model(s) - in this case, not null and unique tests defined in the schema.yml file. That's it, deployed and tested.

Other Stuff

There is some other stuff in DBT you should be aware of, like seeds, snapshots, analyses, macros, and more but our five minutes is up 😃. We can discuss these next time; you are up and running with the basics of DBT now, get transforming!

if you have enjoyed this post, please consider buying me a coffee ☕ to help me keep writing!
· 3 min read
Yuncheng Yang

It is common to have a remote and dispersed team these days. As face to face meetings are less common and with geographically dispersed development teams not possible, it is challenging to have a clear picture of where your team is.

GitHub provides useful data to help us understand your development team's workload and progress. StackQL has an official GitHub provider which allows you to access this data using SQL.

info

StackQL is an open source project which enables you to query, analyze and interact with cloud and SaaS provider resources using SQL, see stackql.io

In this example we will use the pystackql Python package (Python wrapper for StackQL) along with a Jupyter Notebook to retrieve data from GitHub using SQL, then sink the data into a cloud native data warehouse for long term storage and analytics at scale, in this example we have used BigQuery.

Step by Step Guide

This guide will walk you through the steps involved in capturing and analyzing developer data using StackQL, Python, Jupyter and BigQuery.

1. Create GitHub Personal Access Token

You will need to create a Personal Access Token in GitHub for a user which has access to the org or orgs in GitHub you will be analyzing. Follow this guide to create your GitHub token and store it somewhere safe.

2. Setup your Jupyter Notebook

You need to set up your Jupyter environment, you can either use the Docker, see stackql/stackql-jupyter-demo or:

  1. Create your Jupyter project
  2. Download and install StackQL
  3. Clone the pystackql repo

3. Setup StackQL Authentication to GitHub

You can find instructions on how to use your personal access token to authenticate to GitHub here. The following example shows how to do this in a Jupyter notebook cell using pystackql.

4. Retrieve data

Next, we will use StackQL SQL queries to get commits, pull requests and pull request reviews, then we will aggregate by usernames of contributors. You can use JOIN semantics in StackQL to do this as well.

Get Contributors, Commits, Pull Requests and Reviews

In the following cell we will query data from GitHub using StackQL:

Aggregate Data By Username

Now we will aggregate the data by each contributor, see the following example:

5. Store the Data in BigQuery

After the transformation of data, we will then upload it to BigQuery. First, we will store the data as a new line delimited json file, making the uploading process much easier and handling the nested schema better, as shown in the following cell:

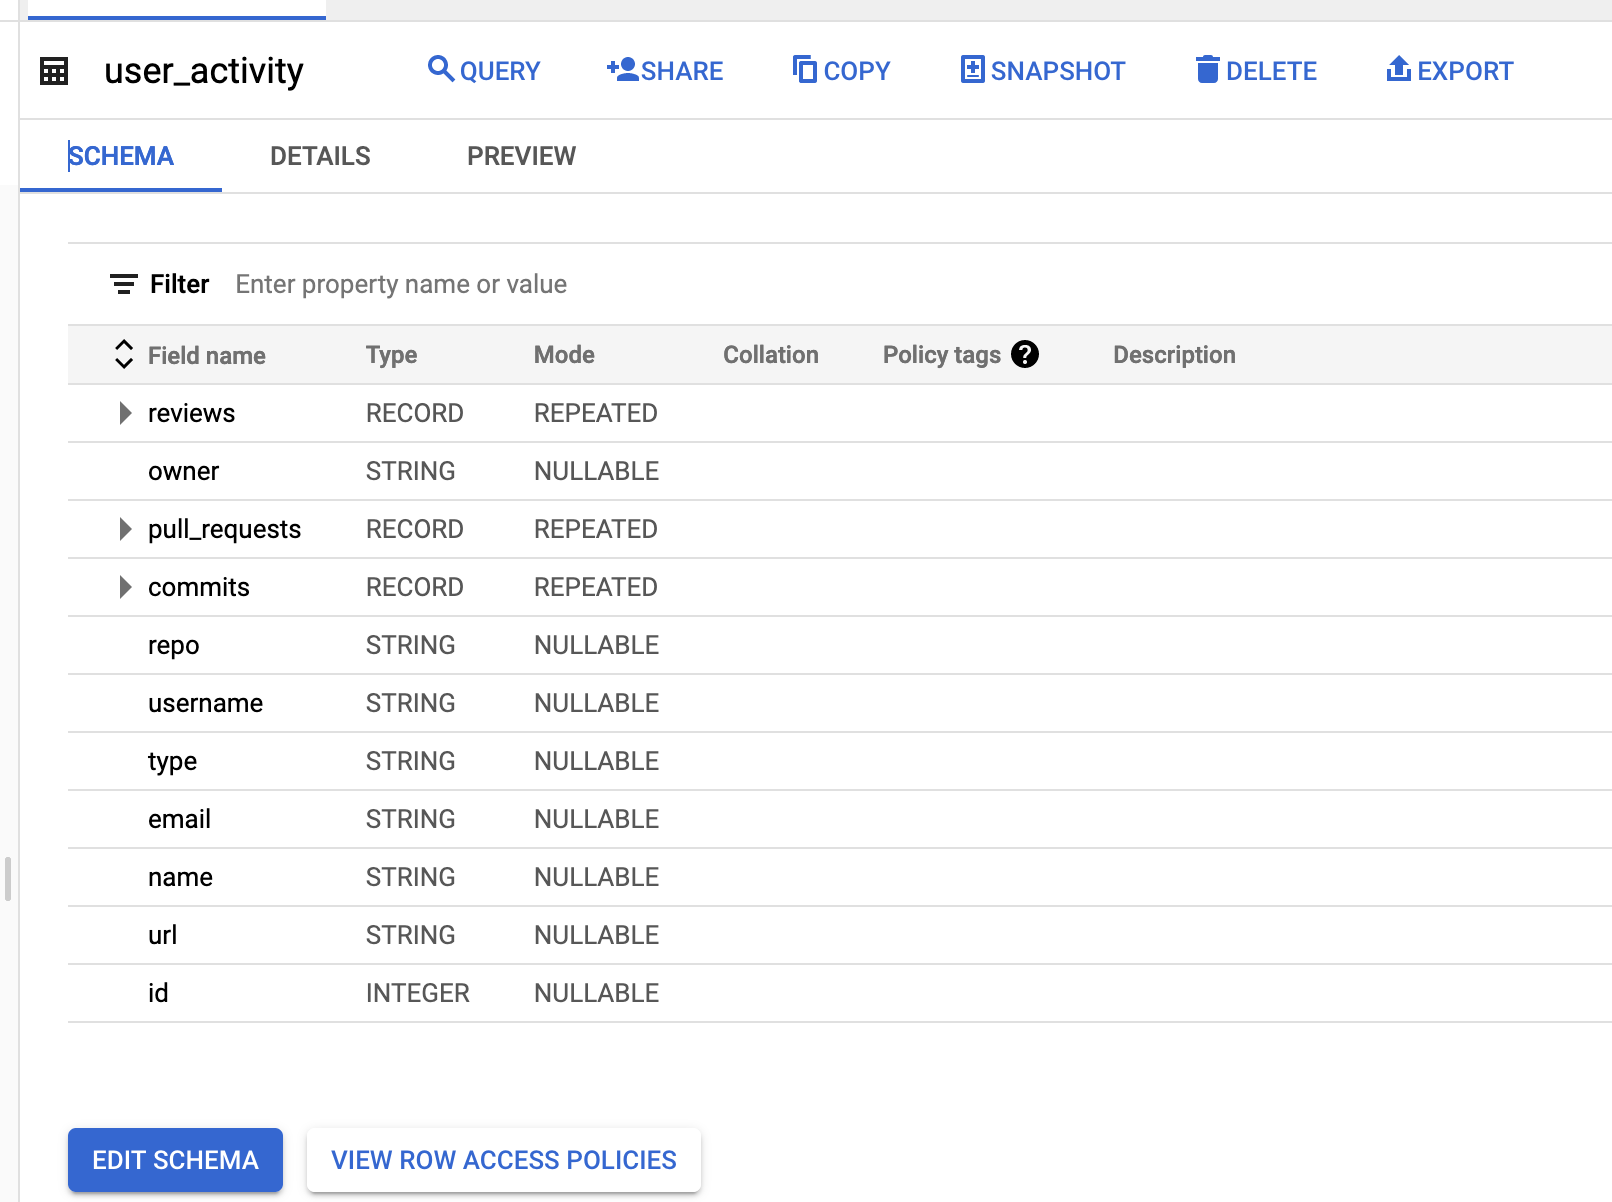
Now we can see the table on BigQuery as shown here:

BigQuery User Activity Table

From here you can use the same process to append data to the table and use BigQuery to perform analytics at scale on the data.

info

The complete notebook for this article can be accessed at FabioYyc/stackql-github-notebook-bq

· 3 min read
Yuncheng Yang

This article demonstrates how to use the Snowflake REST API to retrieve data for a web application using TypeScript, in this case we are using keypair authentication with Snowflake.

Overview

Snowflake’s SQL API allows you to access snowflake objects using SQL via a REST API request, this allows for easy integration with your applications and deployment pipelines. You can use the API to execute most DDL and DML statements.

There are some limitations you need to be aware of however, for example interactions with stages (using PUT and GET aren’t supported via the Snowflake API) or stored procedure operations (using CALL), you can read more on this here.

Endpoints

There are three endpoints provided:

  • /api/v2/statements/
  • /api/v2/statement/<statementHandle>
  • /api/v2/statements/<statementHandle/cancel

We will be looking at the first two in this article.

Authentication Methods

There are two types of Authentication methods for the API, OAuth and Key Pair. For OAuth method, you can choose to use X-Snowflake-Authorization-Token-Type header, if this header is not present, Snowflake assumes that the token in the Authorization header is an OAuth token. For Key Pair method, the JWT token will be in the Authorization header as Bearer <your token>.

Let’s walk through how to generate and use the JWT.

Generating the JWT

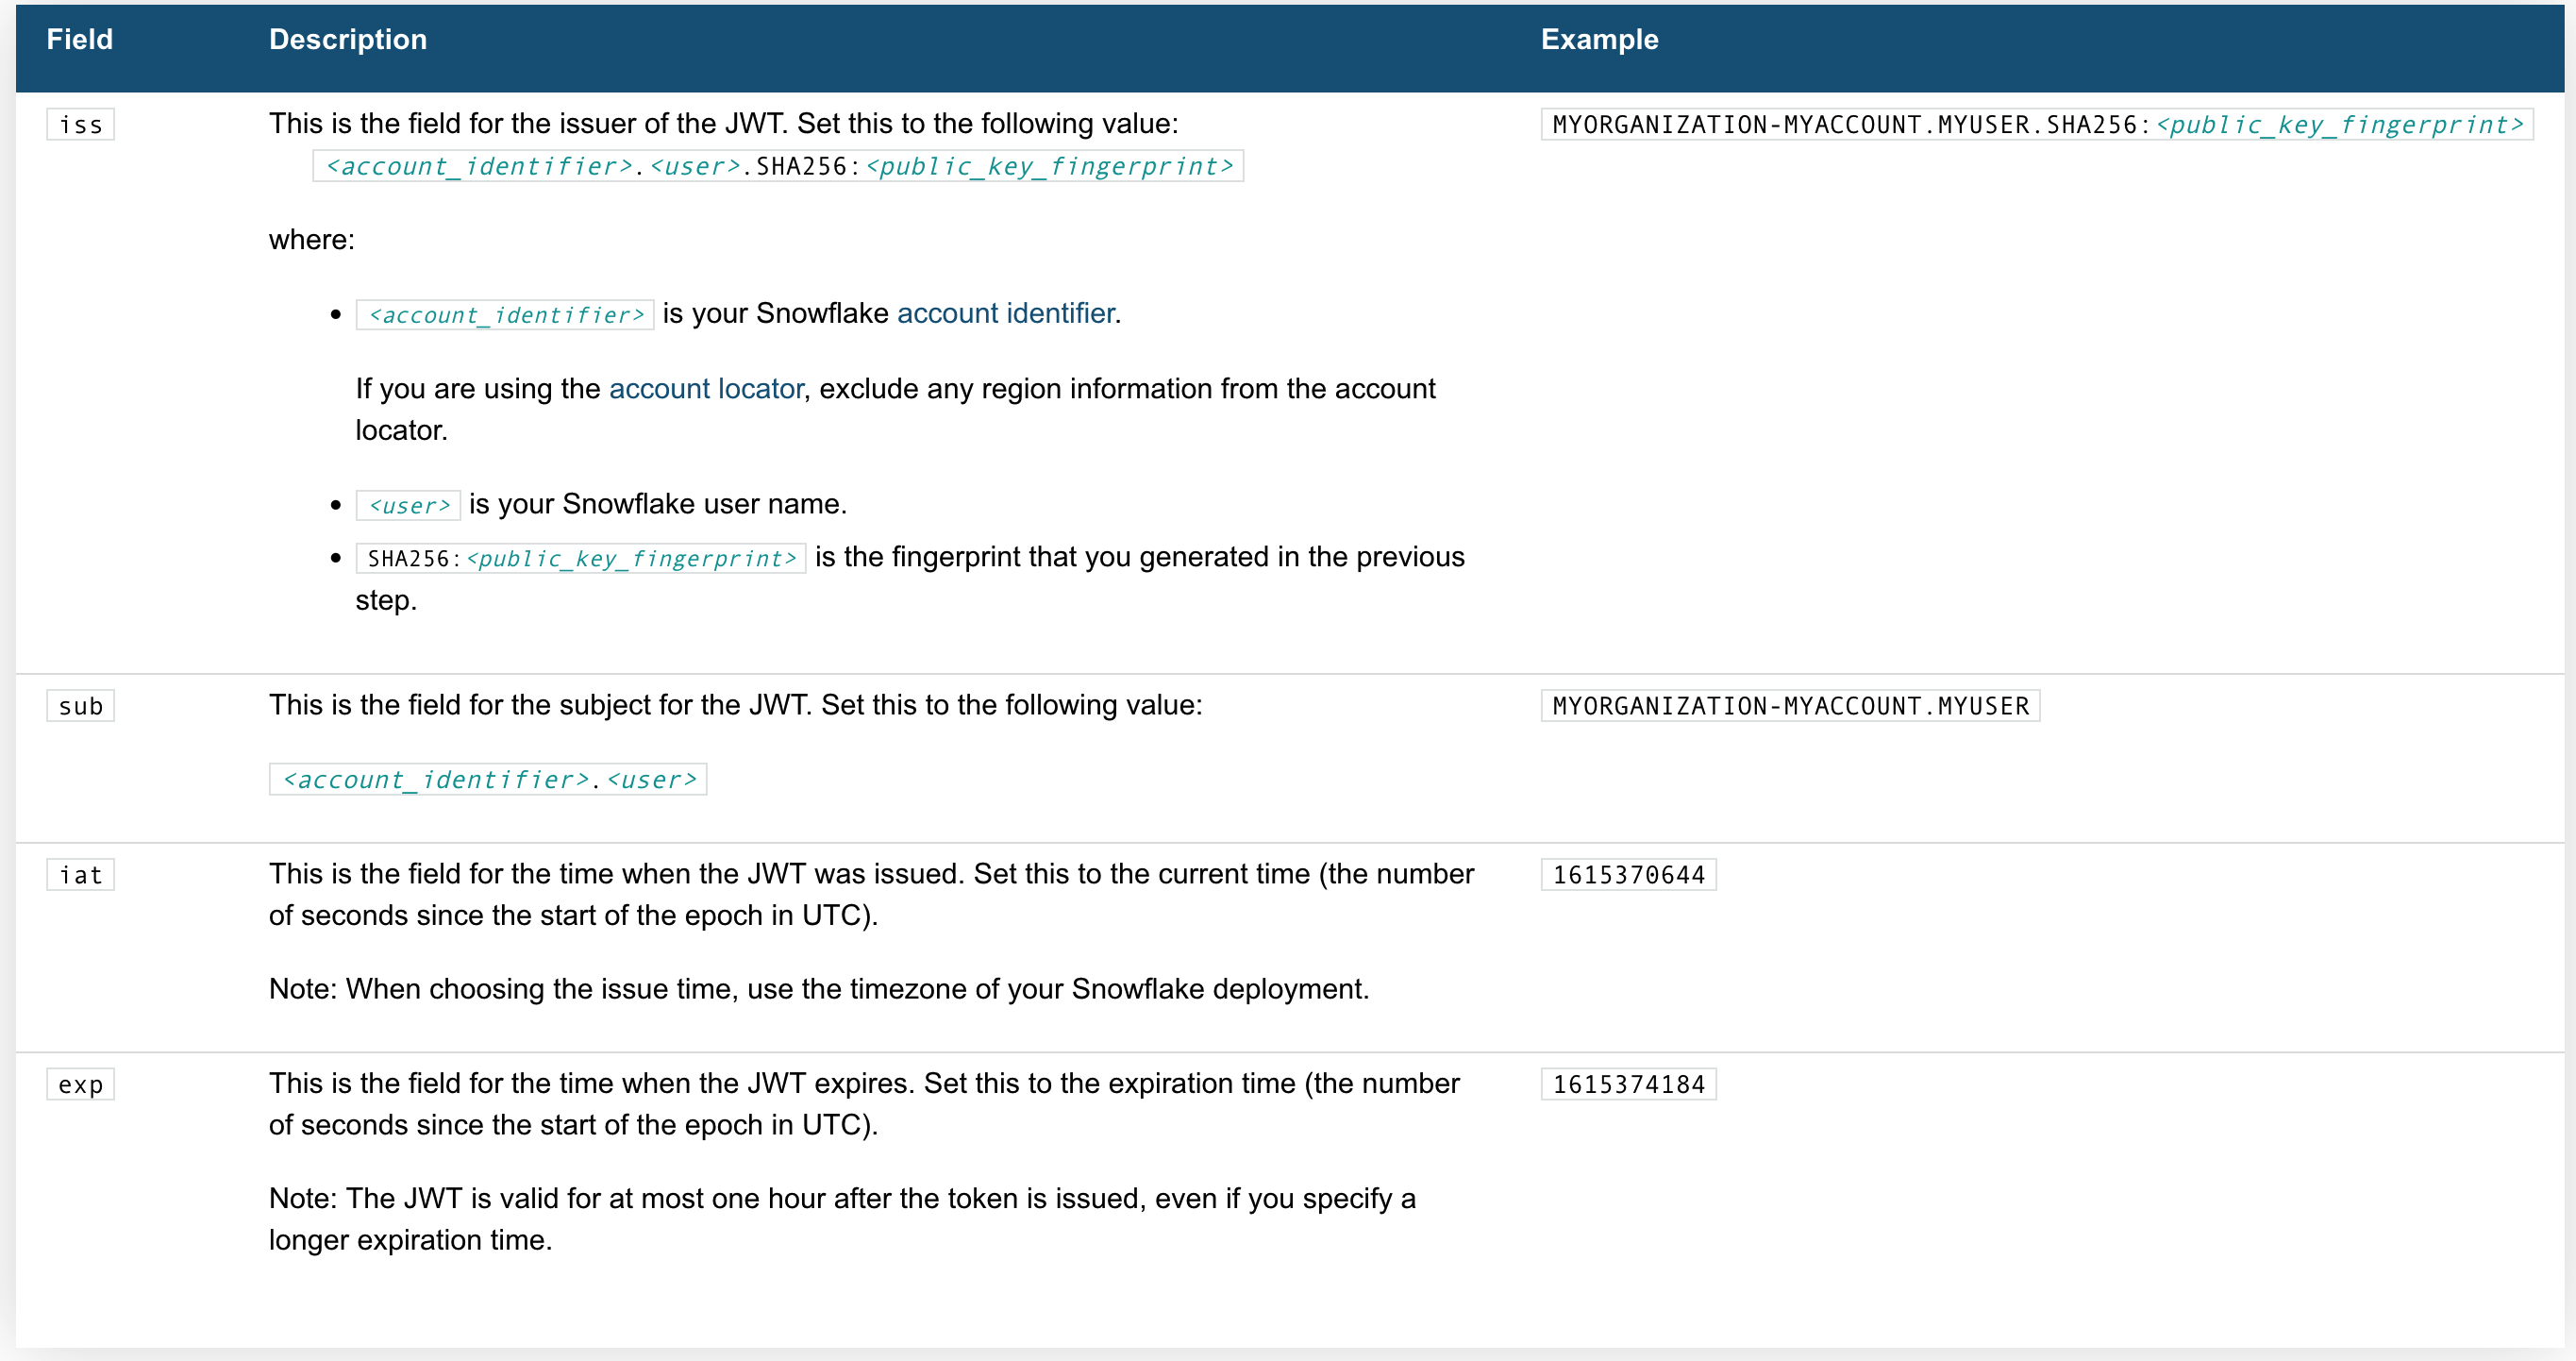
Here's whats needed:

Snowflake JWT

the Code

Request Body

Now we need a request body:

Submitting the Request

We will need to include the region and account identifier, for instance if your account identifier includes a region (e.g. xy12345.us-east2.aws.snowflakecomputing.com).

Response Handling

When making a SELECT query, there are three things worth noting:

  1. rowType fields in the resultSetMetaData represent the columns
  2. data without column names is in the format of string[][]
  3. partitionInfo is an array of object representing different partitions

For more information see Handling Responses from the SQL API - Snowflake Documentation.

Parsing data

Here is a Typescript code snippet demonstrating parsing return data:

Handling multiple partitions

Large result sets are paginated into partitions, each partition is a set of rows.

note

Note that the pages (referred to as partitions) are NOT based on row count, instead they are based on the compressed batch size, so they will not be uniform in terms of the number of rows.

To get a partition, send a GET request with Url https://<accountIdentifier>.snowflakecomputing.com/api/v2/statements/?partition=<partitionId>.

Thanks!

· 4 min read
Jeffrey Aven

Structured Streaming in Spark provides a powerful framework for stream processing an analysis, such as streaming transformations, stateful streaming or sliding window operations.

Kafka is a common streaming source and sink for Spark Streaming and Structured Streaming operations. However, there may be situations where a data warehouse (such as Snowflake) is a more appropriate target for streaming operations, especially where there is a reporting or long-term storage requirement on the data derived from the streaming source.

This article will demonstrate just how easy this is to implement using Python.

Design

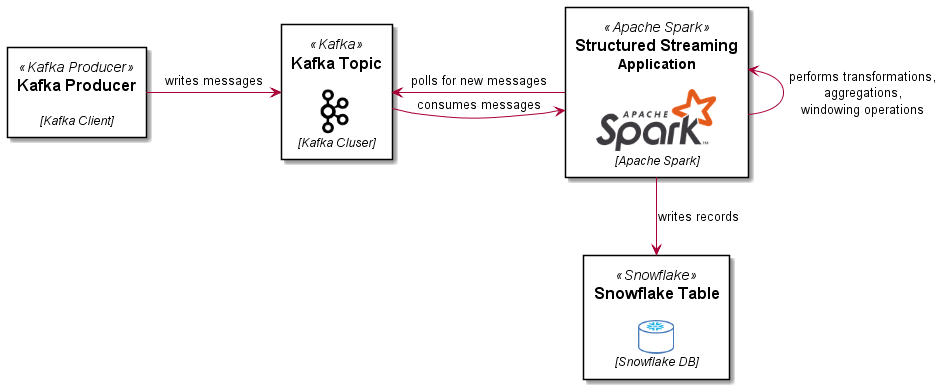
The following diagram illustrates the ingestion design for this example:

Spark Structured Streaming using Kafka and Snowflake

Snowflake Setup

Some prerequisites for Snowflake:

  1. You will need to create a user (or use an existing user), in either case the user will need to be identified by a private key. You will need to generate a key pair as follows:
openssl genrsa 2048 | openssl pkcs8 -topk8 -inform PEM -out rsa_key.p8 -nocrypt
openssl rsa -in rsa_key.p8 -pubout -out rsa_key.pub

copy the contents of the rsa_key.pub file, remove the -----BEGIN PUBLIC KEY----- and -----END PUBLIC KEY----- strings, then remove the line breaks to form one string, use this string as the RSA_PUBLIC_KEY in a CREATE USER or ALTER USER statement in Snowflake, like:

ALTER USER youruser SET RSA_PUBLIC_KEY='MIIBI...';
  1. Now setup the target database, schema and table you will use to write out your stream data (the schema for the table must match the schema for the Data Stream you will use the DataStreamWriter to emit records to Snowflake

The user you will be using (that you setup the key pair authentication for) will need to be assigned a default role to which the appropriate write permissions are granted to the target objects in Snowflake. You will also need to designate a virtual warehouse (which your user must have USAGE permissions to.

The Code

Now that we have the objects and user setup in Snowflake, we can construct our Spark application.

First, you will need to start your Spark session (either using pyspark or spark-submit) including the packages that Spark will need to connect to Kafka and to Snowflake.

The Snowflake packages include a JDBC driver and the Snowflake Connector for Spark, see Snowflake Connector for Spark.

An example is shown here (package versions may vary depending upon the version of Spark you are using):

pyspark \
--packages \
net.snowflake:snowflake-jdbc:3.13.14,\
net.snowflake:spark-snowflake_2.12:2.10.0-spark_3.1,\
org.apache.spark:spark-sql-kafka-0-10_2.12:3.2.1

Now that we have a spark session with the necessary packages, lets go...

# import any required functions, set the checkpoint directory, and log level (optional)
from pyspark.sql.functions import split
spark.sparkContext.setLogLevel("ERROR")
spark.conf.set("spark.sql.streaming.checkpointLocation", "file:///tmp")

setup connection options for Snowflake by creating an sfOptions dictionary

sfOptions = {
"sfURL" : sfUrl,
"sfUser" : "avensolutions",
"pem_private_key": private_key,
"sfDatabase" : "SPARK_SNOWFLAKE_DEMO",
"sfSchema" : "PUBLIC",
"sfWarehouse" : "COMPUTE_WH",
"streaming_stage" : "mystage"
}

set a variable for the Snowflake Spark connector

SNOWFLAKE_SOURCE_NAME = "net.snowflake.spark.snowflake"

read messages from Kafka:

lines = spark \
.readStream \
.format("kafka") \
.option("kafka.bootstrap.servers", "kafkabroker:9092") \
.option("subscribe", "weblogs") \
.load()

perform necessary transformations (the fields and data types in the resultant data structure must match the target table you created in Snowflake:

log_recs = lines.select(
split(lines.value.cast("string"), " ").alias("data")
)

log_data = log_recs.selectExpr(
"CAST(data[0] as string) as date",
"CAST(data[1] as string) as time",
"CAST(data[2] as string) as c_ip",
"CAST(data[3] as string) as cs_username",
"CAST(data[4] as string) as s_sitename",
"CAST(data[5] as string) as s_computername",
"CAST(data[6] as string) as s_ip",
"CAST(data[7] as int) as s_port",
"CAST(data[8] as string) as cs_method",
"CAST(data[9] as string) as cs_uri_stem",
"CAST(data[10] as string) as cs_uri_query",
"CAST(data[11] as int) as sc_status",
"CAST(data[12] as int) as time_taken",
"CAST(data[13] as string) as cs_version",
"CAST(data[14] as string) as cs_host",
"CAST(data[15] as string) as User_Agent",
"CAST(data[16] as string) as Referer",
)

write to Snowflake!

query = log_data\
.writeStream\
.format(SNOWFLAKE_SOURCE_NAME) \
.options(**sfOptions) \
.option("dbtable", "WEB_LOGS") \
.trigger(processingTime='30 seconds') \
.start()

query.awaitTermination()
info

Note that I have included the processingTime trigger of 30 seconds (this is akin to the batchInterval in the DStream API), you should tune this to get a balance between batch sizes to ingest into Snowflake (which will benefit from larger batches) and latency.

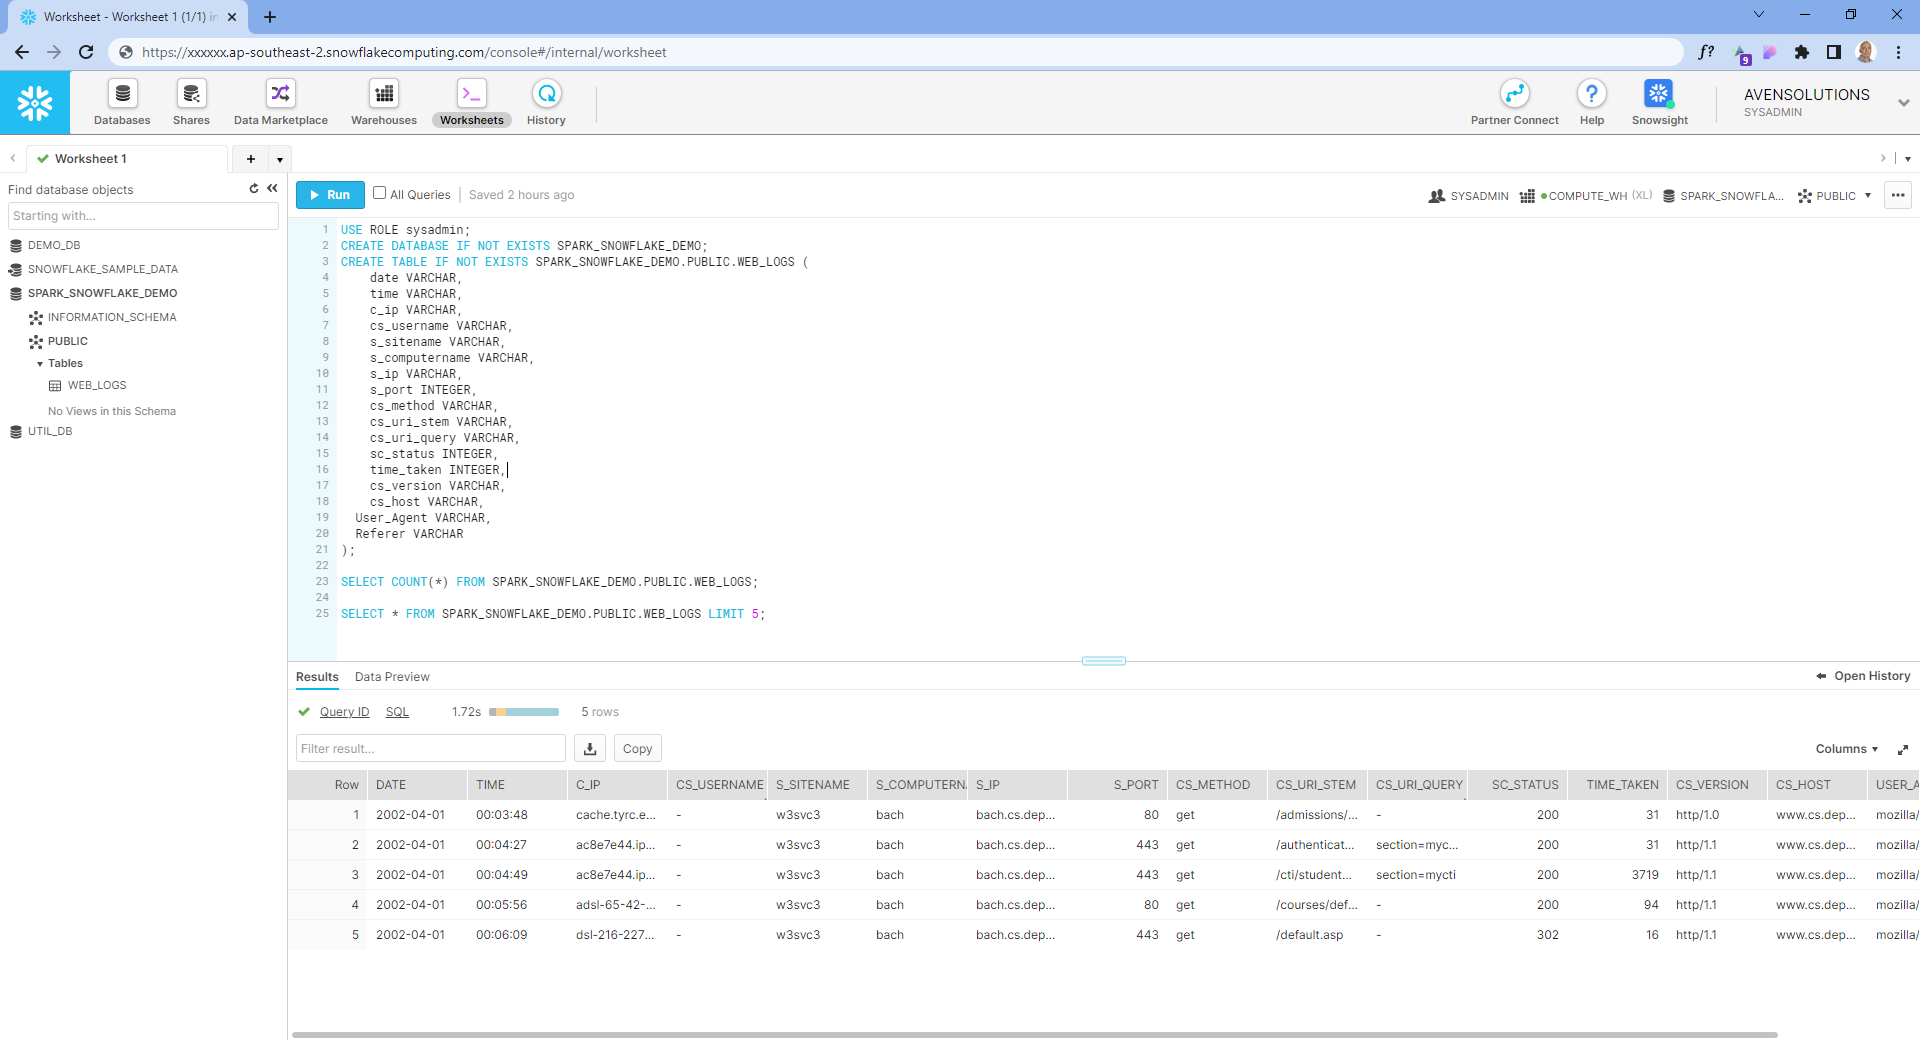
The Results

Spark Structured Streaming into Snowflake

Enjoy!

if you have enjoyed this post, please consider buying me a coffee ☕ to help me keep writing!