4 posts tagged with "ci-cd"

View All Tags

· 8 min read
Chris Ottinger

Container images provide an ideal software packaging solution for DataOps and python based data pipeline workloads. Containers enable Data Scientists and Data Engineers to incorporate the latest packages and libraries without the issues associated with introducing breaking changes into shared environments. A Data Engineer or Data Scienctist can quickly release new functionality with the best tools available.

Container images provide safer developer environments but as the number of container images used for production workloads grow, a maintenance challenge can emerge. Whether using pip or poetry to manage python packages and dependencies, updating a container definition requires edits to the explicit package versions as well as to the pinned or locked versions of the package dependencies. This process can be error prone without automation and a repeatable CICD workflow.

A workflow pattern based on docker buildkit / moby buildkit multi-stage builds provides an approach that maintains all the build specifications in a single Dockerfile, while build tools like make provide a simple and consistent interface into the container build stages. The data pipeline challenges addresses with a multi-stage build pattern include:

  • automating lifecycle management of the Python packages used by data pipelines
  • integrating smoke testing of container images to weed out compatibility issues early
  • simplifying the developer experience with tools like make that can be used both locally and in CI/CD pipelines

The Dockerfile contains the definitions of the different target build stages and order of execution from one stage to the next. The Makefile wraps the Dockerfile build targets into a standard set of workflow activities, following a similar to $ config && make && make install

The DataOps Container Lifecycle Workflow

A typical dataops/gitops style workflow for maintaining container images includes actions in the local environment to define the required packages and produce the pinned dependency poetry.lock file or requirements.txt packages list containing the full set of pinned dependent packages.

Given and existing project in a remote git repository with a CI/CD pipeline defined, the following workflow would be used to update package versions and dependencies:

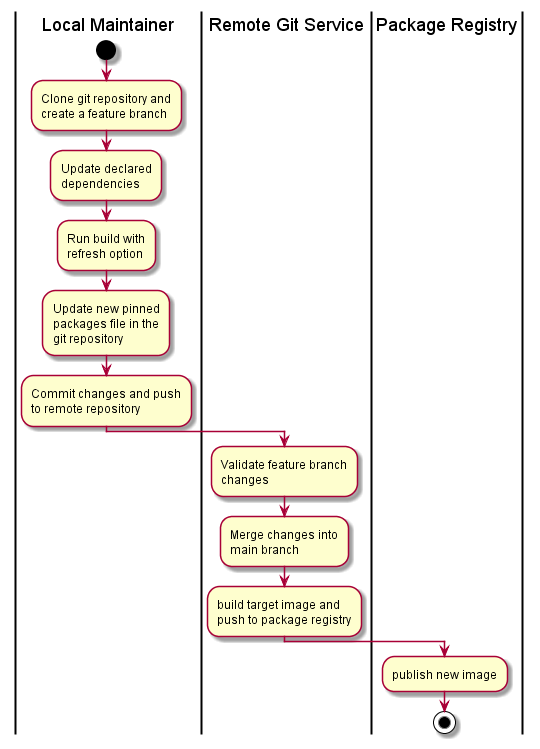
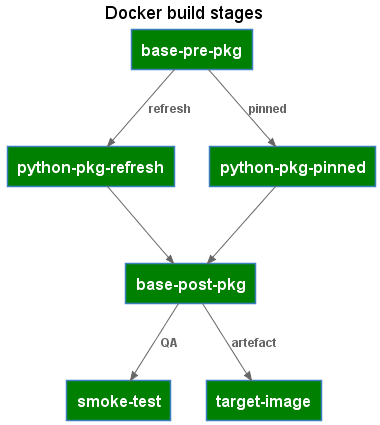
Multi-stage build workflow

The image maintainer selects the packages to update or refresh using a local development environment, working from a feature branch. This includes performing an image smoke-test to validate the changes within the container image.

Once refreshed image has been validated, the lock file or full pinned package list is commited back to the repository and pushed to the remote repository. The CI/CD pipeline performs a trial build and conducts smoke testing. On merge into the main branch, the target image is built, re-validated, and pushed to the container image registry.

The multi-stage build pattern can support both defining both the declared packages for an environment as well as the dependent packages, but poetry splits the two into distinct files, a pyproject.toml file containing the declated packages and a poetry.lock file that contains the full set of declared and dependent packages, including pinned versions. pip supports loading packages from different files, but requires a convention for which requirements file contains the declared packages and while contains the full set of pinned package versions produced by pip freeze. The example code repo contains examples using both pip and poetry.

The following example uses poetry in a python:3.8 base image to illustrate managing the dependencies and version pinning of python packages.

Multi-stage Dockerfile

The Dockerfile defines the build stages used for both local refresh and by the CICD pipelines to build the target image.

Dockerfile Stages

The Dockerfile makes use of the docker build arguments feature to pass in whether the build should refresh package versions or build the image from pinned packages.

Build Stage: base-pre-pkg

Any image setup and pre-python package installation steps. For poetry, this includes setting the config option to skip the creation of a virtual environment as the container already provides the required isolation.

ARG PYTHON_PKG_VERSIONS=pinned
FROM python:3.8 as base-pre-pkg

RUN install -d /src && \
pip install --no-cache-dir poetry==1.1.13 && \
poetry config virtualenvs.create false
WORKDIR /src

Build Stage: python-pkg-refresh

The steps to generate a poetry.lock file containing the pinned package versions.

FROM base-pre-pkg as python-pkg-refresh
COPY pyproject.toml poetry.lock /src/
RUN poetry update && \
poetry install

Build Stage: python-pkg-pinned

The steps to install packages using the pinned package versions.

FROM base-pre-pkg as python-pkg-pinned
COPY pyproject.toml poetry.lock /src/
RUN poetry install

Build Stage: base-post-pkg

A consolidation build target that can refer to either the python-pkg-refresh or the python-pkg-pinned stages, depending on the docker build argument and includes any post-package installation steps.

FROM python-pkg-${PYTHON_PKG_VERSIONS} as base-post-pkg

Build Stage: smoke-test

Simple smoke tests and validation commands to validate the built image.

FROM base-post-pkg as smoke-test
WORKDIR /src
COPY tests/ ./tests
RUN poetry --version && \
python ./tests/module_smoke_test.py

Build Stage: target-image

The final build target container image. Listing the target-image as the last stage in the Dockerfile has the effect of also making this the default build target.

FROM base-post-pkg as target-image

Multi-stage Makefile

The Makefile provides a workflow oriented wrapper over the Dockerfile build stage targets. The Makefile targets can be executed both in a local development environment as well as via a CICD pipeline. The Makefile includes several variables that can either be run using default values, or overridden by the CI/CD pipeline.

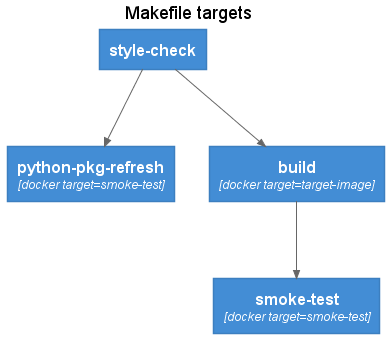
Makefile targets

Make Target: style-check

Linting and style checking of source code. Can include both application code as well as the Dockerfile itself using tools such as hadolint.

style-check:
hadolint ./Dockerfile

Make Target: python-pkg-refresh

The python-pkg-refresh target builds a version of the target image with refreshed package versions. A temporary container instance is created from the target image and the poetry.lock file is copied into the local file system. The smoke-test docker build target is used to ensure image validation is also performed. The temporary container as well as the package refresh image are removed after the build.

python-pkg-refresh:
@echo ">> Update python packages in container image"
docker build ${DOCKER_BUILD_ARGS} \
--target smoke-test \
--build-arg PYTHON_PKG_VERSIONS=refresh \
--tag ${TARGET_IMAGE_NAME}:$@ .
@echo ">> Copy the new poetry.lock file with updated package versions"
docker create --name ${TARGET_IMAGE_NAME}-$@ ${TARGET_IMAGE_NAME}:$@
docker cp ${TARGET_IMAGE_NAME}-$@:/src/poetry.lock .
@echo ">> Clean working container and refresh image"
docker rm ${TARGET_IMAGE_NAME}-$@
docker rmi ${TARGET_IMAGE_NAME}:$@

Make Target: build

The standard build target using pinned python package versions.

build:
docker build ${DOCKER_BUILD_ARGS} \
--target target-image \
--tag ${TARGET_IMAGE_NAME}:${BUILD_TAG} .

Make Target: smoke-test

Builds an image and peforms smoke testing. The smoke-testing image is removed after the build.

smoke-test:
docker build ${DOCKER_BUILD_ARGS} \
--target smoke-test \
--tag ${TARGET_IMAGE_NAME}:$@ .
docker rmi ${TARGET_IMAGE_NAME}:$@

Conclusion

The toolchain combination of multi-stage container image builds with make provides a codified method for the lifecycle management of the containers used in data science and data engineering workloads.

The maintainer:

git checkout -b my-refresh-feature
make python-pkg-refresh
make smoke-test
git add pyproject.toml poetry.lock
git commit -m "python package versions updated"
git push

The CICD pipeline:

make build
make smoke-test
docker push <target-image>:<build-tag>
info

You can find the complete source code for this article at https://gitlab.com/datwiz/multistage-pipeline-image-builds
· 4 min read
Mark Stella

Everytime I start a new project I try and optimise how the application can work across multiple envronments. For those who don't have the luxury of developing everything in docker containers or isolated spaces, you will know my pain. How do I write code that can run on my local dev environment, migrate to the shared test and ci environment and ultimately still work in production.

In the past I tried exotic options like dynamically generating YAML or JSON using Jinja. I then graduated to HOCON which made my life so much easier. This was until I stumbled across Jsonnet. For those who have not seen this in action, think JSON meets Jinja meets HOCON (a Frankenstein creation that I have actually built in the past)

To get a feel for how it looks, below is a contrived example where I require 3 environments (dev, test and production) that have different paths, databases and vault configuration.

Essentially, when this config is run through the Jsonnet templating engine, it will expect a variable 'ENV' to ultimately refine the environment entry to the one we specifically want to use.

A helpful thing I like to do with my programs is give users a bit of information as to what environments can be used. For me, running a cli that requires args should be as informative as possible - so listing out all the environments is mandatory. I achieve this with a little trickery and a lot of help from the click package!

local exe = "application.exe";

local Environment(prefix) = {
root: "/usr/" + prefix + "/app",
path: self.root + "/bin/" + exe,
database: std.asciiUpper(prefix) + "_DB",
tmp_dir: "/tmp/" + prefix
};

local Vault = {
local uri = "http://127.0.0.1:8200/v1/secret/app",
_: {},
dev: {
secrets_uri: uri,
approle: "local"
},
tst: {
secrets_uri: uri,
approle: "local"
},
prd: {
secrets_uri: "https://vsrvr:8200/v1/secret/app",
approle: "sa_user"
}
};

{

environments: {
_: {},
dev: Environment("dev") + Vault[std.extVar("ENV")],
tst: Environment("tst") + Vault[std.extVar("ENV")],
prd: Environment("prd") + Vault[std.extVar("ENV")]
},

environment: $["environments"][std.extVar("ENV")],
}

The trick I perform is to have a placeholder entry '_' that I use to initially render the template. I then use the generated JSON file and get all the environment keys so I can feed that directly into click.

from typing import Any, Dict
import click
import json
import _jsonnet
from pprint import pprint

ENV_JSONNET = 'environment.jsonnet'
ENV_PFX_PLACEHOLDER = '_'

def parse_environment(prefix: str) -> Dict[str, Any]:
_json_str = _jsonnet.evaluate_file(ENV_JSONNET, ext_vars={'ENV': prefix})
return json.loads(_json_str)

_config = parse_environment(prefix=ENV_PFX_PLACEHOLDER)

_env_prefixes = [k for k in _config['environments'].keys() if k != ENV_PFX_PLACEHOLDER]


@click.command(name="EnvMgr")
@click.option(
"-e",
"--environment",
required=True,
type=click.Choice(_env_prefixes, case_sensitive=False),
help="Which environment this is executing on",
)
def cli(environment: str) -> None:
config = parse_environment(environment)
pprint(config['environment'])


if __name__ == "__main__":
cli()

This now allows me to execute the application with both list checking (has the user selected an allowed environment?) and the autogenerated help that click provides.

Below shows running the cli with no arguments:

$> python cli.py

Usage: cli.py [OPTIONS]
Try 'cli.py --help' for help.

Error: Missing option '-e' / '--environment'. Choose from:
dev,
prd,
tst

Executing the application with a valid environment:

$> python cli.py -e dev

{'approle': 'local',
'database': 'DEV_DB',
'path': '/usr/dev/app/bin/application.exe',
'root': '/usr/dev/app',
'secrets_uri': 'http://127.0.0.1:8200/v1/secret/app',
'tmp_dir': '/tmp/dev'}

Executing the application with an invalid environment:

$> python cli.py -e prd3

Usage: cli.py [OPTIONS]
Try 'cli.py --help' for help.

Error: Invalid value for '-e' / '--environment': 'prd3' is not one of 'dev', 'prd', 'tst'.

This is only the tip of what Jsonnet can provide, I am continually learning more about the templating engine and the tool.

if you have enjoyed this post, please consider buying me a coffee ☕ to help me keep writing!

· 6 min read
Chris Ottinger

As infrastructure and teams scale, effective and robust configuration management requires growing beyond manual processes and local conventions. Fortunately, Ansible Tower (or the upstream Open Source project Ansible AWX) provides a perfect platform for configuration management at scale.

The Ansible Tower/AWX documentation and tutorials provide comprehensive information about the individual components.  However, assembling all the moving pieces into a whole working solution can involve some trial and error and reverse engineering in order to understand how the components relate to one another.  Ansible Tower, like the core Ansible solution, offers flexibility in how features assembled to support different typed of workflows. The types of workflows can include once-off initial configurations, ad-hoc system maintenance, or continuous convergence.

Continuous convergence, also referred to as desired state, regularly re-applies the defined configuration to infrastructure. This tends to 'correct the drift' often encountered when only applying the configuration on infrastructure setup. For example, a continuous convergence approach to configuration management could apply the desired configuration on a recurring schedule of every 30 minutes.  

Some continuous convergence workflow characteristics can include:

  • Idempotent Ansible roles. If there are no required configuration deviations, run will report 0 changes.
  • A source code repository per Ansible role, similar to the Ansible Galaxy approach,
  • A source code repository for Ansible playbooks that include the individual Ansible roles,
  • A host configured to provide one unique service function only,
  • An Ansible playbook defined for each unique service function that gets applied to the host,
  • Playbooks applied to each host on a repeating schedule.

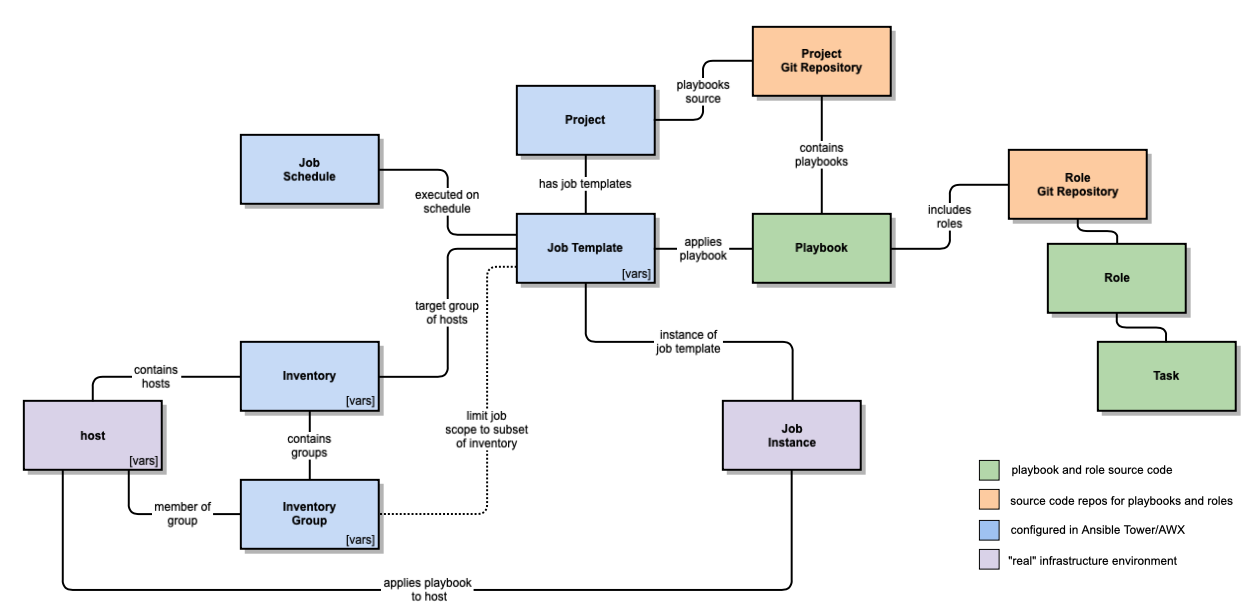
One way to achieve a continuous convergence workflow combines the Ansible Tower components according to the following conceptual model.

The Workflow Components

Playbook and Role Source Code

Ansible roles contain the individual tasks, handlers, and content with a role responsible for the installation and configuration of a particular software service.

Ansible playbooks configure a host for a particular service function in the environment acting as a wrapper for the individual role based configurations.  All the roles expected to be applied to a host must be defined in the playbook.

Source Code Repositories

Role git repositories contain the versioned definition of a role, e.g. one git repository per individual role.  The roles are pulled into the playbooks using the git reference and tags, which pegs the role version used within a playbook.

Project git repositories group the individual playbooks into single collection, e.g. one git repository per set of playbooks.  As with roles, specific versions of project repositories are also identified by version tags. 

Ansible Tower Server

Two foundational concepts in Ansible Tower are projects and inventories. Projects provide access to playbooks and roles. Inventories provide the connection to "real" infrastructure.  Inventories and projects also provide authorisation scope for activities in Ansible Tower. For example, a given group can use the playbooks in Project X and apply jobs to hosts in Inventory Y.

Each Ansible Tower Project is backed by a project git repository.  Each repository contains the playbooks and included roles that can be applied by a given job.  The Project is the glue between the Ansible configuration tasks and the plays that apply the configuration.

Ansible Tower Inventories are sets of hosts grouped for administration, similar to inventory sets used when applying playbooks manually.  One option is to group hosts into Inventories by environment.  For example, the hosts for development may be in one Inventory while the hosts for production may be in another Inventory.  User authorisation controls are applied at the Inventory level.

Ansible Tower Inventory Groups define sub-sets of hosts within the larger Inventory.  These subsets can then be used to limit the scope of a playbook job.  One option is to group hosts within an Inventory by function.  For example, the hosts for web servers may be in one Inventory Group and the hosts for databases may be in another Inventory Group.  This enables one playbook to target one inventory group.  Inventory groups effectively provide metadata labels for hosts in the Inventory.

An Ansible Job Template determines the configuration to be applied to hosts.  The Job Template links a playbook from a project to an inventory.   The inventory scope can be optionally further limited by specifying inventory group limits.  A Job Template can be invoked either on an ad-hoc basis or via a recurring schedule.

Ansible Job Schedules define the time and frequency at which the configuration specified in the Job Template is applied.  Each Job Template can be associated with one or more Job Schedules.  A schedule supports either once-off execution, for example during a defined change window, or regularly recurring execution.  A job schedule that applies the desired state configuration with a frequency of 30 minutes provides an example of a job schedule used for a continuous convergence workflow.

"Real" Infrastructure

An Ansible Job Instance defines a single invocation of an Ansible Job Template, both for scheduled and ad-hoc invocations of the job template.  Outside of Ansible Tower, the Job Instance is the equivalent of executing the ansible-playbook command using an inventory file.

Host is the actual target infrastructure resources configured by the job instance, applying an ansible playbook of included roles.

A note on Ansible Variables

As with other features of Ansible and Ansible Tower, variables also offer flexibility in defining parameters and context when applying a configuration.  In addition to declaring and defining variables in roles and playbooks, variable definitions can also be defined in Ansible Tower job templates, inventory and inventory groups, and individual hosts.  Given the plethora of options for variable definition locations, without a set of conventions for managing variable values, debugging runtime issues with roles and playbooks can become difficult.  E.g. which value defined at which location was used when applying the role?

One example of variable definitions conventions could include:

  • Variables shall be given default values in the role, .e.g. in the ../defaults/main.yml file.
  • If the variable must have a 'real' value supplied when applying the playbook, the variable shall be defined with an obvious placeholder value which will fail if not overridden.
  • Variables shall be described in the role README.md documentation
  • Do not apply variables at the host inventory level as host inventory can be transient.
  • Variables that select specific capabilities within a role shall be defined at the Ansible Tower Inventory Group.  For example, a role contains the configuration definition for both master and work nodes.  The Inventory Group variables are used to indicate which hosts must have the master configuration and applied and which must have the worker configuration applied.
  • Variables that define the environment context for configuration shall be defined in the Ansible Tower Job Template.

Following these conventions, each of the possible variable definition options serves a particular purpose.  When an issue with variable definition does arise, the source is easily identified.

· 8 min read
Chris Ottinger

Gitlab Vault

Overview

With the adoption automation for deploying and managing application environments, protecting privileged accounts and credential secrets in a consistent, secure, and scalable manner becomes critical.  Secrets can include account usernames, account passwords and API tokens.  Good credentials management and secrets automation practices reduce the risk of secrets escaping into the wild and being used either intentionally (hacked) or unintentionally (accident).

  • Reduce the likelihood of passwords slipping into source code commits and getting pushed to code repositories, especially public repositories such as github.
  • Minimise the secrets exposure surface area by reducing the number of people who require knowledge of credentials.  With an automated credentials management process that number can reach zero.
  • Limit the useful life of a secret by employing short expiry times and small time-to-live (TTL) values.  Automation enables reliable low-effort secret re-issue and rotation.

Objectives

The following objectives have been considered in designing a secrets automation solution that can be integrated into an existing CICD environment.

  • Integrate into an existing CICD environment without requiring an "all or nothing" implementation.  Allow existing jobs to operate alongside jobs that have been converted to the new secrets automation solution.
  • A single design that can be applied across different toolchains and deployment models.  For example, deployment to a Kubernetes environment can use the same secrets management process as an application installation on a virtual machine.  Similarly, the design can be used with different CICD tools, such as GitLab-CI, Travis-CI, or other build and deploy automation tool.
  • Multi-cloud capable by limiting coupling to a specific hosting environment or cloud services provider.
  • The use of secrets (or not) can be decided at any point in time, without requiring changes to the CICD job definition, similar to the use of feature flags in applications.
  • Enable changes to secrets, either due to rotation or revocation, to be maintained from a central service point.  Avoid storing the same secret multiple times in different locations.
  • Secrets organised in predictable locations in a "rest-ish" fashion by treating secrets and credentials as attributes of entities.
  • Use environment variables as the standard interface between deployment orchestration and deployed application, following the 12 Factor App approach.

Solution

  • Secrets stored centrally in Hashicorp Vault.
  • CICD jobs retrieve secrets from Vault and configure the application deployment environment.
  • Deployed applications use the secrets supplied by CICD job to access backend services.

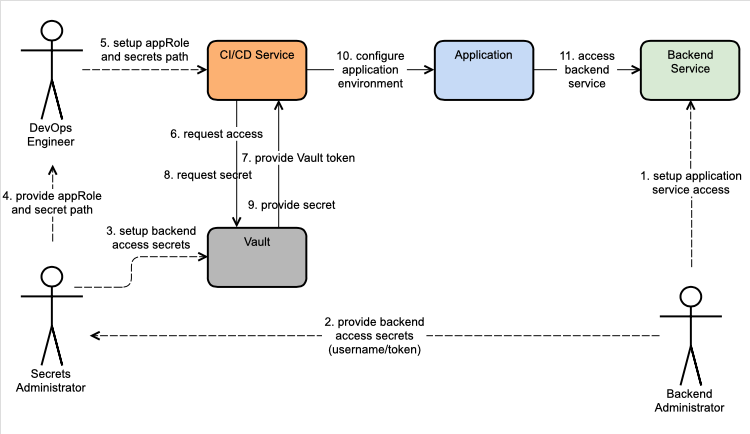
CICD Secrets with Vault

Storing Secrets

Use Vault by Hashicorp as a centralised secrets storage service.  The CICD service retrieves secrets information for integration and deployment jobs.  Vault provides a flexible set of features to support numerous different workflows and available as either Vault Open Source or Vault Enterprise.  The secrets management pattern described uses the Vault Open Source version.  The workflow described here can be explored using Vault in the unsecured development mode, however, a properly configured and managed Vault service is required for production use.

Vault supports a number of secrets backends and access workflow models.  This solution makes use of the Vault AppRole method, which is designed to support machine-to-machine automated workflows.  With the AppRole workflow model human access to secrets is minimised through the use of access controls and temporary credentials with short TTL's.  Within Vault, secrets are organised using an entity centric "rest-ish" style approach ensuring a given secret for a given service is stored in a single predictable location.

The use of Vault satisfies several of the design objectives:

  • enables single point management of secrets. The secrets content is stored in a single location referenced at CICD job runtime.  On the next invocation, the CICD job retrieves the latest version of the secrets content.
  • enables storing secrets in predictable locations with file system directory style path location.  The "rest-ish" approach to organising secret locations enables storing a given secret only once.  Access policies provide the mechanism to limit CICD  visibility to only those secrets required for the CICD job.

Passing Secrets to Applications

Use environment variables to pass secrets from the CICD service to the application environment.  

There are existing utilities available for populating a child process environment with Vault sourced secrets, such as vaultenv or envconsul.  This approach works well for running an application service.  However, with CICD, often there are often sets of tasks that require access to secrets information as opposed to a single command.  Using the child environment approach would require wrapping each command in a CICD job step with the env utility.  This works against the objective of introducing a secrets automation solution into existing CICD jobs without requiring substantial refactoring.  Similarly, some CICD solutions such as Jenkins provide Vault integration plugins which pre-populate the environment with secrets content.  This meets the objective of minimal CICD job refactoring, but closely couples the solution to a particular CICD service stack, reducing portability.  

With a job script oriented CICD automation stack like GitLab-CI or Travis-CI, an alternative is to insert a job step at the beginning of a series of CICD tasks that will populated the required secret values into expected environment variables.  Subsequent tasks in the job can then execute without requiring refactoring.  The decision on whether to source a particular environment variable's content directly from the CICD job setup or from the Vault secrets store can be made by adding an optional prefix to environment variables to be sourced from the Vault secrets store.  The prefixed instance of the environment variable contains the location or path to the required secret.  Secret locations are identified using the convention /<vault-secret-path>/<secret-key>

  • enables progressive implementation due to transparency of secret sourcing. Subsequent steps continue to rely on expected environment vars
  • enables use in any toolchain that supports use of environment variables to pass information to application environment. 
  • CICD job steps not tied to a specific secrets store. An alternative secrets storage service could be supported by only requiring modification of the secret getter utility.
  • control of whether to source application environment variables from the CICD job directly or from the secrets engine is managed at the CICD job setup level as opposed to requiring CICD job refactoring to switch the content source.
  • continues the 12 Factor App approach of using environment variables to pass context to application environments.

Example Workflow

An example workflow for a CICD job designed to use environment variables for configuring an application.

Assumptions

The following are available in the CICD environment.

  • A job script oriented CICD automation stack that executes job tasks as a series of shell commands, such as GitLab-CI or Jenkins Pipelines.
  • A secrets storage engine with a python API, such as Hashicorp Vault.
  • CICD execution environment includes the [get-vault-secrets-by-approle](https://github.com/datwiz/cicd-secrets-in-vault/blob/master/scripts/get-vault-secrets-by-approle) utility script.

Workflow Steps

Add a Vault secret

Add a secret to Vault at the location secret/fake-app/users/fake-users with a key/value entry of password=fake-password

Add a Vault access policy

Add a Vault policy for the CICD job (or set of CICD jobs) that includes 'read' access to the secret.

# cicd-fake-app-policy 
path "secret/data/fake-app/users/fake-user" {
capabilities = ["read"]
}

path "secret/metadata/fake-app/users/fake-user" {
capabilities = ["list"]
}

Add a Vault appRole

Add a Vault appRole linked to the new policy.  This example specifies a new appRole with an secret-id TTL of 60 days and non-renewable access tokens with a TTL of 5 minutes.  The CICD job uses the access token to read secrets.

vault write auth/approle/role/fake-role \
secret_id_ttl=1440h \
token_ttl=5m \
token_max_ttl=5m \
policies=cicd-fake-app-policy

Read the Vault approle-id

Retrieve the approle-id of the new appRole taking note of the returned approle-id.

vault read auth/approle/role/fake-role

Add a Vault appRole secret-id

Add a secret-id for the appRole, taking note of the returned secret-id

vault write -f auth/approle/role/fake-role/secret-id

Add CICD Job Steps

In the CICD job definition insert job steps to retrieve secrets values a set variables in the job execution environment. These are the steps to add in a gitlab-ci.yml CICD job.

...
script:
- get-vault-secrets-by-approle > ${VAULT_VAR_FILE}
- source ${VAULT_VAR_FILE} && rm ${VAULT_VAR_FILE}
...

The helper script get-vault-secrets-by-approle could be executed and sourced in a single step, e.g. source $(get-vault-secrets-by-approle).  However, when executed in a single statement all script output is processed by the source command and script error messages don't get printed and captured in the job logs.  Splitting the read and environment var sourcing into 2 steps aids in troubleshooting.

Add CICD job vars for Vault access

In the CICD job configuration add Vault access environment variables.

VAULT_ADDR=https://vault.example.com:8200
VAULT_ROLE_ID=db02de05-fa39-4855-059b-67221c5c2f63
VAULT_SECRET_ID=6a174c20-f6de-a53c-74d2-6018fcceff64
VAULT_VAR_FILE=/var/tmp/vault-vars.sh

Add CICD job vars for Vault secrets

In the CICD job configuration add environment variables for the items to be sourced from vault secrets.  The secret path follows the convention of <secret-mount-path>/<secret-path>/<secret-key>

V_FAKE_PASSWORD=secret/fake-app/users/fake-user/password

Remove CICD job vars

In the CICD job configuration remove the previously used FAKE_APP_PASSWORD variable.

Execute the CICD job

Kick off the CICD job.  Any CICD job configuration variables prefixed with "V_" results in the addition of a corresponding environment variable in the job execution environment with content sourced from Vault.

Full source code can be found at:

https://github.com/datwiz/cicd-secrets-in-vault