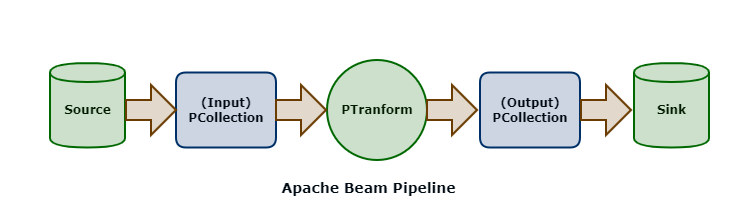
Beam SDKs allow you to define Pipelines (in languages such as Java or Python). A pipeline is essentially a graph (a DAG - Directed Acyclic Graph) of nodes that represent transformation steps.
Pipelines can then be executed on a backend service (such as your local machine, Apache Spark, or Google Cloud Dataflow) using Runners. For instance, to run a pipeline locally, you would use the DirectRunner; to run a pipeline on Google Cloud Dataflow you would use the DataflowRunner runner.
The PCollection is the most atomic data unit in the Beam programming model, akin to the RDD in the Apache Spark core API; it is a representation of an immutable collection of items that is physically broken down into bundles (subsets of elements for parallelization).
PCollections can be bounded (which is a batch processing pattern) or unbounded (which is a stream processing pattern).
A PTransform is an operator that takes a PCollection as an input and outputs a new PCollection with transforms applied. This is the same coarse-grained transformation pattern employed by Spark.
The Beam DSL is a set of higher-order functions that can be used to construct pipelines. These functions are used to construct the graph of nodes that represent the pipeline.
The basic Map, FlatMap and Filter functions in the Beam API work similarly to their namesakes in the Spark Core API. The Map and FlatMap functions are higher-order functions (that is, functions that have arguments of other functions) that operate on each element in a collection, emitting an output element for each input element. The Filter function can be used to only emit elements from an input PCollection that satisfy a given expression.
ParDo is a wrapper function for parallel execution of a user-defined function called a DoFn ("do function"), ParDo's and DoFn's are used when the basic Map and FlatMap operators are not enough. DoFns are executed in parallel on a PCollection and can be used for computational transformations or transformations other than 1:1 between inputs and outputs.
Think of these as user-defined functions to operate on a PCollection in parallel.
GroupByKey and CombineByKey are operators that group data (key-value pairs) by the key for each element. This is typically a precursor to some aggregate operation (such as a count or sum operation).
Side Inputs can be used with ParDo and DoFn to provide additional data, which can be used to enrich your output PCollection, or utilized within the logic of your DoFn.
Sources represent where data is read into an Apache Beam pipeline; sinks represent destinations where data is written out from pipelines. A Beam pipeline will contain one or more sources and sinks.
Sources can be bounded (for batch processing) or unbounded for stream processing.
Connectors can be source connectors or sink connectors to read from or write to the various sources and targets used in a Beam pipeline. Examples include FileIO and TextIO for working with files or text data, BigQueryIO for reading or writing into BigQuery, PubSubIO for reading and writing messages into Google PubSub, and much more.
Streaming data sources are represented by Unbounded PCollections. Unbounded PCollections support windowing operations using Fixed Windows, Sliding Windows, or Session Windows. Watermarks are used to allow for late-arriving data to be processed within its associated time window, and Triggers can be used to control the processing of windowed batches of data.
Beam templates enable the reusability of pipelines, converting compile-time pipeline parameters to run-time arguments. Jobs (invocations of pipelines) can be launched from templates.
Templates include classic templates, where the graph for the pipeline is built (compile-time) with the template, flex templates where the pipeline graph is created when the template is launched (runtime).
In addition, Google provides several templates with Cloud Dataflow (Google-provided templates), allowing you to launch routine jobs without writing any code.
Google-provided templates are available for batch, streaming, and utility pipelines, for example:
Kafka to BigQuery
Pub/Sub Topic to BigQuery
Text Files on Cloud Storage to BigQuery
Text Files on Cloud Storage to Cloud Spanner
Bulk Compress or Decompress Files on Cloud Storage
and more
5 minutes is up! I hope you enjoyed this quick introduction to Apache Beam. If you want to learn more, check out the Apache Beam documentation.
if you have enjoyed this post, please consider buying me a coffee ☕ to help me keep writing!
AWS and Google (and Microsoft Azure) have services called IAM, which stands for Identity and Access Management. The IAM service serves roughly the same purpose in each provider: to authorize principals (users, groups, or service accounts) to access and use services and resources on the respective platform. There are subtle yet significant differences and distinctions across the major cloud providers.
This article will look at the differences between IAM in AWS and IAM in Google.
Firstly, Google's IAM is a slight misnomer regarding the I as it does not manage identities (with the single exception of service accounts). Google identities are sourced from Google accounts created and managed outside the Google Cloud Platform. Google identities (users and groups) are Google accounts which could be accounts in a Google Workspace domain, a Google Cloud Identity domain, or Gmail accounts. Still, these accounts are NOT created or managed using the Google IAM service.
Conversely, AWS IAM creates and manages identities for use in the AWS platform (IAM Users), which can be used to access AWS resources using the AWS console or programmatically using API keys.
It can be confusing for people coming from AWS to Google or vice-versa. Some of the same terms exist in both providers but mean different things. The table below summarises the difference in the meaning of terms in both providers. We will unpack this in more detail in the sections that follow.
An AWS IAM Role is an identity that can be assumed by trusted entities using short-lived credentials (issued by the AWS Security Token Service or STS API). A trusted entity could be an IAM User, Group, or a service (such as Lambda or EC2).
Permissions are assigned to IAM Roles (and IAM Users and Groups) through the attachment of IAM Policies.
AWS Policies are collections of permissions in different services which can be used to Allow or Deny access (Effect); these can be scoped to a resource or have conditions attached. The following is an example of an AWS Policy:
Policies in AWS can be Managed Policies (created and managed by AWS) or Customer Managed Policies - where the customer defines and manages these policies.
An IAM Role that is used by a service such as Lambda or EC2 will have a Trust Policy attached, which will look something like this:
Roles in Google IAM are NOT identities ; they are collections of permissions (similar to Policies in AWS). Roles can be of the following types:
Basic Roles (also referred to as Legacy or Primitive Roles)
Basic Roles are coarse-grained permissions set at a Project level across all services, such as Owner, Editor, and Viewer. Support for Basic Roles is maintained by Google, however, Google does not recommend using Basic Roles after a Project is created.
Predefined Roles are pre-curated sets of permissions that align with a role that an actor (human or service account) would play, such as BigQuery Admin. Predefined roles are considered best practice in Google as the permissions for these roles are maintained by Google. Predefined Roles in Google would be the nearest equivalent to Managed Policies in AWS.
Custom Roles are user-specified and managed sets of permissions. These roles are scoped within your Project in Google and are your responsibility to maintain. Custom Roles are typically used when the permissions granted through a Predefined Role are too broad. Custom Roles would be the nearest equivalent of Customer Managed Policies in AWS.
Roles (collections of permissions) are attached to Principals (Identities such as users (Google accounts), groups and service accounts through IAM bindings. The example below shows a binding between a user principal (a Google Workspace account) and a predefined role (BigQuery Admin) within a GCP project:
A Service Account in GCP is a password-less identity created in a GCP Project that can be used to access GCP resources (usually by a process or service). Service accounts are identified by an email address, but these are NOT Google accounts (like the accounts used for users or groups). Service accounts can be associated with services such as Compute Engine, Cloud Functions, or Cloud Run (in much the same way as AWS Roles can be assigned to services such as Lambda functions or EC2 instances). Google Service accounts can use keys created in the IAM service, which are exchanged for short-lived credentials, or service accounts can use get tokens directly, which include OAuth 2.0 access tokens and OpenID Connect ID tokens. Service accounts in Google are the nearest equivalent to AWS IAM Roles.
AWS (save AWS Organizations) is a flat structure with no inherent hierarchy and is oriented around regions that are seperate API endpoints (almost providers unto themselves); IAM, however, is a global service in AWS.
In contrast, GCP is hierarchical and globally scoped for all services, including IAM. Resources (such as Google Compute Engine Instances or Big Query Datasets) are created in Projects (similar to Resource Groups in Azure). Projects are nested under a resource hierarchy, starting at the root (the organization or org). Organizations can contain folders, which can be nested, and these folders can contain Projects.
IAM Bindings (and the permissions they enable) are inherited from ancestor nodes in the GCP hierarchy. A Principal's net effective permissions are the union of the permissions assigned through IAM Bindings in the Project and the permissions set through IAM Bindings in all ancestor nodes (including Folders and the Org itself).
IAM governs access and entitlements to services and resources in cloud providers, although the design, implementation, and terminology are quite different as you get into the details. This is not to say one approach is better than the other, but as a multi-cloud warrior, you should understand the differences.
if you have enjoyed this post, please consider buying me a coffee ☕ to help me keep writing!
Google publishes JSON specifications for all of their APIs (including GCP services as well as other APIs associated with other products - like analytics or workspace). These specifications can be accessed without authentication starting with the root document (https://discovery.googleapis.com/discovery/v1/apis) which contains metadata and the URL for each service specific document (for services like compute or storage).
The program fetches the service document for each service that is included and not explicitly excluded (configured through variables in the program). Non preferred services (beta or alpha versions) can be included by setting the variable get_preferred_only to False.
An OpenAPI spec is constructed for each service based upon the data in the service discovery doc. In many cases this is a straightforward one to one mapping, such as to top level info, title and description values, it gets more complicated with parameters and schemas where some extra logic is required to keep the json pointers ($ref) valid.
The real magic is in extracting paths and verbs in a compliant OpenAPI format, as Google nests this data (potentially multiple levels deep) under resources.
The first step is to identify methods nested under a resources object (which can be mapped to operations - with a path and HTTP verb required to populate an OpenAPI spec), this function does this:
Now each method can be processed yielding an operation (combination of path and verb), this is done using this function:
So you're using BigQuery (BQ). It's all set up and humming perfectly. Maybe now, you want to run an ELT job whenever a new table partition is created, or maybe you want to retrain your ML model whenever new rows are inserted into the BQ table.
In my previous article on EventArc, we went through how Logging can help us create eventing-type functionality in your application. Let's take it a step further and walk through how we can couple BigQuery and Cloud Run.
Let's create a temporary dataset within BigQuery named tmp_bq_to_cr.
In that same dataset, let's create a table in which we will insert some rows to test our BQ audit log. Let's grab some rows from a BQ public dataset to create this table:
CREATEORREPLACETABLE tmp_bq_to_cr.cloud_run_trigger AS SELECT date, country_name, new_persons_vaccinated, population from`bigquery-public-data.covid19_open_data.covid19_open_data` where country_name='Australia' AND date>'2021-05-31' LIMIT100
Following this, let's run an insert query that will help us build our mock database trigger:
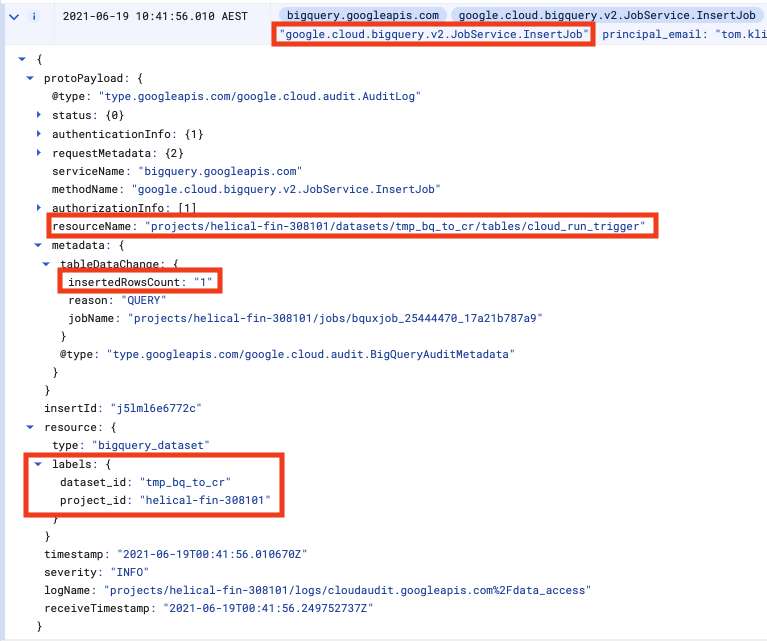
Now, in another browser tab let's navigate to BQ Audit Events and look for our INSERT INTO event:
There will be several audit logs for any given BQ action. Only after a query is parsed does BQ know which table we want to interact with, so the initial log will, for e.g., not have the table name.
We don't want any old audit log, so we need to ensure we look for a unique set of attributes that clearly identify our action, such as in the diagram above.
In the case of inserting rows, the attributes are a combination of
The method is google.cloud.bigquery.v2.JobService.InsertJob
The name of the table being inserted to is the protoPayload.resourceName
The dataset id is available as resource.labels.dataset_id
The number of inserted rows is protoPayload.metadata.tableDataChanged.insertedRowsCount
Now that we've identified the payload that we're looking for, we can write the action for Cloud Run. We've picked Python and Flask to help us in this instance. (full code is on GitHub).
First, let's filter out the noise and find the event we want to process
@app.route('/', methods=['POST']) defindex(): # Gets the Payload data from the Audit Log content = request.json try: ds = content['resource']['labels']['dataset_id'] proj = content['resource']['labels']['project_id'] tbl = content['protoPayload']['resourceName'] rows =int(content['protoPayload']['metadata'] ['tableDataChange']['insertedRowsCount']) if ds =='cloud_run_tmp'and \ tbl.endswith('tables/cloud_run_trigger')and rows >0: query = create_agg() return"table created",200 except: # if these fields are not in the JSON, ignore pass return"ok",200
Now that we've found the event we want, let's execute the action we need. In this example, we'll aggregate and write out to a new table created_by_trigger:
defcreate_agg(): client = bigquery.Client() query =""" CREATE OR REPLACE TABLE tmp_bq_to_cr.created_by_trigger AS SELECT count_name, SUM(new_persons_vaccinated) AS n FROM tmp_bq_to_cr.cloud_run_trigger """ client.query(query) return query
The Dockerfile for the container is simply a basic Python container into which we install Flask and the BigQuery client library:
Important to note here is that we're triggering on any Insert log created by BQ That's why in this action we had to filter these events based on the payload.
Take it for a spin
Now, try out the BigQuery -> Cloud Run trigger and action. Go to the BigQuery console and insert a row or two:
Metadata Hub (MDH) is intended to be the source of truth for metadata around the Company’s platform. It has the ability to load metadata configuration from yaml, and serve that information up via API. It will also be the store of information for pipeline information while ingesting files into the platform.
Config-Driven. Anyone who has been authorized to do so, should be able to add another ‘table-info.yaml’ in to MDH without the need to update any code in the system
Here’s how table information makes its way into MDH:
Before we jump right into Entity Groups in Datastore, it is important to first go over the basics and establish a common vocabulary. Datastore holds entities, which are objects, that can contain various key/value pairs, called properties. Each entity must contain a unique identifier, known as a key. When creating an entity, a user can choose to specify a custom key or let Datastore create a key. If a user decides to specify a custom key, it will contain two fields: a kind, which represents a category such as ‘Toy’ or ‘Marital Status’, and a name, which is the identifying value. If a user decides to only specify a kind when creating a key, and does not specify a unique identifier, Datastore automatically generates an ID behind the scenes. Below is an example of a Python3 script which illustrates this identifier concept.
from google.cloud import datastore

client = datastore.Client()
#Custom key- specify my kind=item and a unique_id of broker
custom_key_entry = datastore.Entity(client.key("table","broker"))
client.put(custom_key_entry)

#Only specify kind=item, let datastore generate unique_id
datastore_gen_key_entry = datastore.Entity(client.key("table"))
client.put(datastore_gen_key_entry)
In your GCP Console under Datastore, you will then see your two entities of kind “table”. One will contain your custom key and one will contain the automatically generated key.
Ancestors and Entity Groups
For highly related or hierarchical data, Datastore allows entities to be stored in a parent/child relationship. This is known as an entity group or ancestor/descendent relationship.
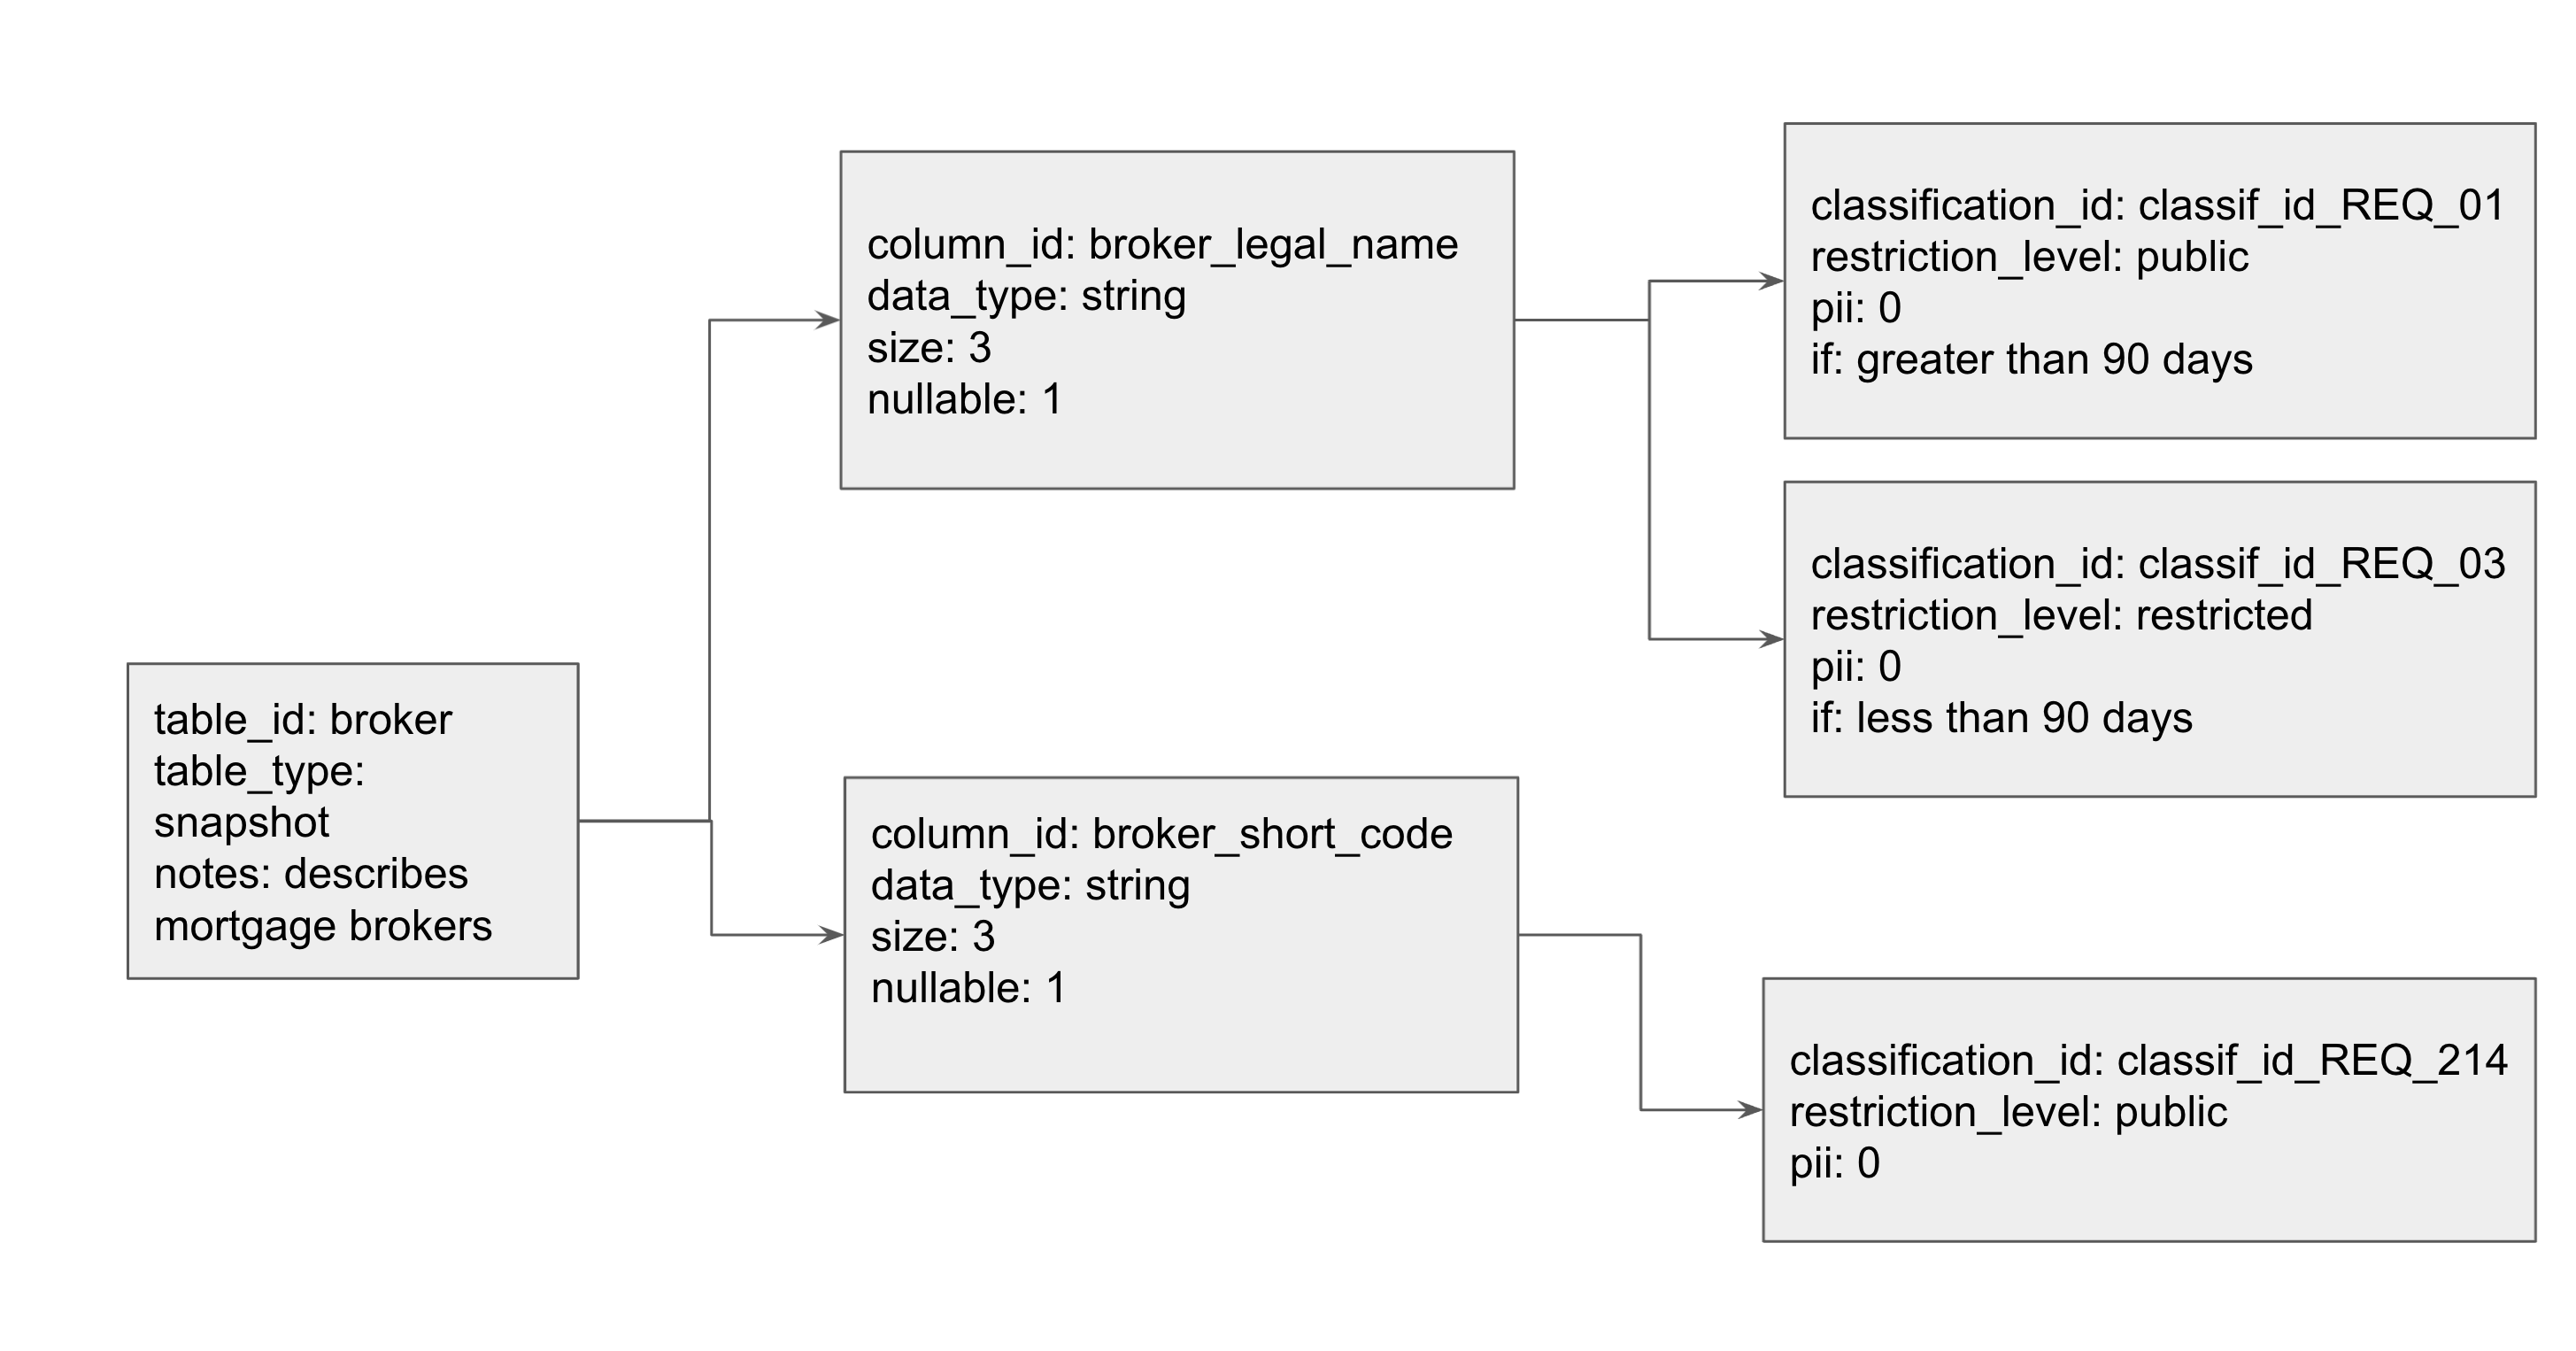
This is an example of an entity group with kinds of types: table, column, and classification. The ‘Grandparent’ in this relationship is the ‘table’. In order to configure this, one must first create the table entity. Then, a user can create a column, and specify that the parent is a table key. In order to create the grandchild, a user then creates a classification and sets its parent to be a column key. To further add customizable attributes, a user can specify additional key-value pairs such as pii and data_type. These key-value pairs are stored as properties. We model this diagram in Datastore in our working example below.
One can create entity groups by setting the ‘parent’ parameter while creating an entity key for a child. This command adds the parent key to be part of the child entity key. The child’s key is represented as a tuple (‘parent_key’, ‘child_key’), such that the parents’ key is the prefix of the key, which is followed by its own unique identifier. For example, follow the diagram above:
Printing the variable table_key will display: ("table", "broker","column", "broker_legal_name")
Datastore also supports chaining of parents, which can lead to very large keys for descendants with a long lineage of ancestors. Additionally, parents can have multiple children (representing a one-to-many relationship). However, there is no native support for entities to have multiple parents (representing a many-to-many relationship). Once you have configured this ancestral hierarchy, it is easy to retrieve all descendants for a given parent. You can do this by querying on the parent key by using the ‘ancestor’ parameter. For example, given the entity table_key created above, I can query for all of the tables
As per our Key Philosophies - Config-Driven - anyone should be able to add a new table to be processed and landed in a target-table somewhere within MDH with our yaml syntax. Below is a full working python3 example of the table/column/classification hierarchical model described above.
from google.cloud import datastore datastore_client = datastore.Client() # Entities with kinds- table, column, classification my_entities =[ {"kind":"table","table_id":"broker","table_type":"snapshot", "notes":"describes mortgage brokers"}, {"kind":"column","column_id":"broker_legal_name","table_id":"broker", "data_type":"string","size":20,"nullable":1}, {"kind":"column","column_id":"broker_short_code","table_id":"broker", "data_type":"string","size":3,"nullable":1}, {"kind":"classification","classification_id":"classif_id_REQ_01", "restriction_level":"public","pii":0,"if":"greater than 90 days", "column_id":"broker_legal_name","table_id":"broker"}, {"kind":"classification","classification_id":"classif_id_REQ_03", "restriction_level":"restricted","pii":0,"if":"less than 90 days", "column_id":"broker_legal_name","table_id":"broker"}, {"kind":"classification","classification_id":"classif_id_REQ_214", "restriction_level":"public","pii":0,"column_id":"broker_short_code", "table_id":"broker"}, ] # traverse my_entities, set parents and add those to datastore for entity in my_entities: kind = entity['kind'] parent_key =None if kind =="column": parent_key = datastore_client.key("table", entity["table_id"]) elif kind =="classification": parent_key = datastore_client.key("table", entity["table_id"], "column", entity["column_id"]) key = datastore_client.key(kind, entity[kind+"_id"], parent=parent_key) datastore_entry = datastore.Entity(key) datastore_entry.update(entity) print("Saving: {}".format(entity)) datastore_client.put(datastore_entry)
The code above assumes that you’ve set yourself up with a working Service Account or authorised yourself in, and that your GCP project has been set.
Now let’s do some digging around our newly minted Datastore model. Let’s grab the column ‘broker_legal_name’
Now that we have the column entity, let’s locate it’s parent id.
column =list(query1.fetch())[0] print("This column belongs to: "+str(column.key.parent.id_or_name))
Further to this, we can also get all data classification elements attributed to a single column using the ancestor clause query.
query2 = datastore_client.query(kind="classification", ancestor=column.key) for classification inlist(query2.fetch()): print(classification.key) print(classification["restriction_level"])
For more complex queries, Datastore has the concept of indexes being set, usually via it’s index.yaml configuration. The following is an example of an index.yaml file:
indexes: -kind: Cat ancestor: no properties: -name: name -name: age direction: desc -kind: Cat properties: -name: name direction: asc -name: whiskers direction: desc -kind: Store ancestor: yes properties: -name: business direction: asc -name: owner direction: asc
Indexes are important when attempting to add filters on more than one particular attribute within a Datastore entity. For example, the following code will fail:
# Adding a '>' filter will cause this to fail. Sidenote; it will work # without an index if you add another '=' filter. query2 = datastore_client.query(kind="classification", ancestor=column.key) query2.add_filter("pii",">",0) for classification inlist(query2.fetch()): print(classification.key) print(classification["classification_id"])
To rectify this issue, you need to create an index.yaml that looks like the following:
The official pypi package for google-cloud-datastore can be found here: https://pypi.org/project/google-cloud-datastore/. At the time of writing, Firestore in Datastore-mode will be the way forward, as per the release note from January 31, 2019.
Cloud Firestore is now Generally Available. Cloud Firestore is the new version of Cloud Datastore and includes a backwards-compatible Datastore mode.
If you intend to use the Cloud Datastore API in a new project, use Cloud Firestore in Datastore mode. Existing Cloud Datastore databases will be automatically upgraded to Cloud Firestore in Datastore mode.
Except where noted, the Cloud Datastore documentation now describes behavior for Cloud Firestore in Datastore mode.
We’ve purposefully created MDH in Datastore to show you how it was done originally, and we’ll be migrating the Datastore code to Firestore in an upcoming post.
Creating and deleting indexes within Datastore will need to be done through the REST API via googleapiclient.discovery, as this function doesn’t exist via the google-cloud-datastore API. Working with the discovery api client can be a bit daunting for a first-time user, so here’s the code to add an index on Datastore:
import os from google.oauth2 import service_account from googleapiclient.discovery import build from google.cloud import datastore SCOPES =['https://www.googleapis.com/auth/cloud-platform'] SERVICE_ACCOUNT_FILE = os.getenv('GOOGLE_APPLICATION_CREDENTIALS') PROJECT_ID = os.getenv("PROJECT_ID") credentials = service_account .Credentials .from_service_account_file(SERVICE_ACCOUNT_FILE, scopes=SCOPES) datastore_api = build('datastore','v1', credentials=credentials) body ={ 'ancestor':'ALL_ANCESTORS', 'kind':'classification', 'properties':[{ 'name':'pii', 'direction':'DESCENDING' }] } response = datastore_api.projects() .indexes() .create(projectId=PROJECT_ID, body=body) .execute()
How did we craft this API request? We can use the Google API Discovery Service to build client libraries, IDE plugins, and other tools that interact with Google APIs. The Discovery API provides a list of Google APIs and a machine-readable "Discovery Document" for each API. Features of the Discovery API:
A directory of supported APIs schemas based on JSON Schema.
A machine-readable "Discovery Document" for each of the supported APIs. Each document contains:
A list of API methods and available parameters for each method.
A list of available OAuth 2.0 scopes.
Inline documentation of methods, parameters, and available parameter values.
Navigating to the API reference page for Datastore and going to the ‘Datastore Admin’ API page, we can see references to the Indexes and RESTful endpoints we can hit for those Indexes. Therefore, looking at the link for the Discovery document for Datastore:
From this, we can build out our instantiation for the google api discovery object build('datastore', 'v1', credentials=credentials)
With respect to building out the body aspect of the request, I’ve found crafting that part within the ‘Try this API’ section of https://cloud.google.com/datastore/docs/reference/admin/rest/v1/projects.indexes/create pretty valuable.
With this code, your index should show up in your Datastore console! You can also retrieve them within gcloud with gcloud datastore indexes list if you’d like to verify the indexes outside our python code. So there you have it: a working example of entity groups, ancestors, indexes and Metadata within Datastore. Have fun coding!