
4 posts tagged with "etl"

View All Tags

· 5 min read
Jeffrey Aven

Apache Beam is an open-source project which provides a unified programming model for Batch and Streaming data pipelines.

B(atch) + str(EAM) => BEAM

Beam SDK and Execution Framework

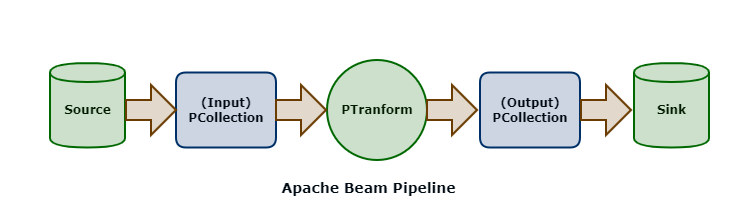
Beam SDKs allow you to define Pipelines (in languages such as Java or Python). A pipeline is essentially a graph (a DAG - Directed Acyclic Graph) of nodes that represent transformation steps.

Apache Beam Pipeline

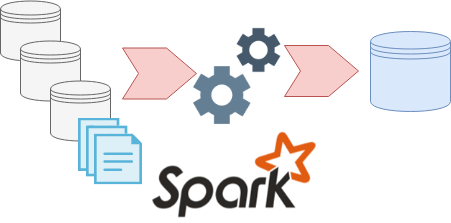
Pipelines can then be executed on a backend service (such as your local machine, Apache Spark, or Google Cloud Dataflow) using Runners. For instance, to run a pipeline locally, you would use the DirectRunner; to run a pipeline on Google Cloud Dataflow you would use the DataflowRunner runner.

Beam Programming Model

The PCollection is the most atomic data unit in the Beam programming model, akin to the RDD in the Apache Spark core API; it is a representation of an immutable collection of items that is physically broken down into bundles (subsets of elements for parallelization).

PCollections can be bounded (which is a batch processing pattern) or unbounded (which is a stream processing pattern).

A PTransform is an operator that takes a PCollection as an input and outputs a new PCollection with transforms applied. This is the same coarse-grained transformation pattern employed by Spark.

Beam DSL

The Beam DSL is a set of higher-order functions that can be used to construct pipelines. These functions are used to construct the graph of nodes that represent the pipeline.

Map, FlatMap and Filter

The basic Map, FlatMap and Filter functions in the Beam API work similarly to their namesakes in the Spark Core API. The Map and FlatMap functions are higher-order functions (that is, functions that have arguments of other functions) that operate on each element in a collection, emitting an output element for each input element. The Filter function can be used to only emit elements from an input PCollection that satisfy a given expression.

ParDo and DoFn

ParDo is a wrapper function for parallel execution of a user-defined function called a DoFn ("do function"), ParDo's and DoFn's are used when the basic Map and FlatMap operators are not enough. DoFns are executed in parallel on a PCollection and can be used for computational transformations or transformations other than 1:1 between inputs and outputs.

Think of these as user-defined functions to operate on a PCollection in parallel.

GroupByKey, CombineByKey

GroupByKey and CombineByKey are operators that group data (key-value pairs) by the key for each element. This is typically a precursor to some aggregate operation (such as a count or sum operation).

CoGroupByKey and Flatten

CoGroupByKey is akin to a JOIN operation in SQL (by the key for each element in two PCollections). Flatten is akin to a UNION in SQL.

Side Inputs

Side Inputs can be used with ParDo and DoFn to provide additional data, which can be used to enrich your output PCollection, or utilized within the logic of your DoFn.

Sources, Sinks and Connectors

Sources represent where data is read into an Apache Beam pipeline; sinks represent destinations where data is written out from pipelines. A Beam pipeline will contain one or more sources and sinks.

Sources can be bounded (for batch processing) or unbounded for stream processing.

Connectors can be source connectors or sink connectors to read from or write to the various sources and targets used in a Beam pipeline. Examples include FileIO and TextIO for working with files or text data, BigQueryIO for reading or writing into BigQuery, PubSubIO for reading and writing messages into Google PubSub, and much more.

Streaming and Unbounded PCollections

Streaming data sources are represented by Unbounded PCollections. Unbounded PCollections support windowing operations using Fixed Windows, Sliding Windows, or Session Windows. Watermarks are used to allow for late-arriving data to be processed within its associated time window, and Triggers can be used to control the processing of windowed batches of data.

Templates

Beam templates enable the reusability of pipelines, converting compile-time pipeline parameters to run-time arguments. Jobs (invocations of pipelines) can be launched from templates.

Templates include classic templates, where the graph for the pipeline is built (compile-time) with the template, flex templates where the pipeline graph is created when the template is launched (runtime).

In addition, Google provides several templates with Cloud Dataflow (Google-provided templates), allowing you to launch routine jobs without writing any code.

Google-provided templates are available for batch, streaming, and utility pipelines, for example:

  • Kafka to BigQuery
  • Pub/Sub Topic to BigQuery
  • Text Files on Cloud Storage to BigQuery
  • Text Files on Cloud Storage to Cloud Spanner
  • Bulk Compress or Decompress Files on Cloud Storage
  • and more

5 minutes is up! I hope you enjoyed this quick introduction to Apache Beam. If you want to learn more, check out the Apache Beam documentation.

if you have enjoyed this post, please consider buying me a coffee ☕ to help me keep writing!

· 6 min read
Jeffrey Aven

DBT (or Data Build Tool) is a modern data transformation tool born in the cloud/DevOps era. It's a great project which much has been written about; I will try to give as brief an overview as possible.

ETL vs ELT Refresher

A quick refresher on ELT vs ETL before we discuss DBT. I have created an infographic for this...

ETL vs ELT

Summary

DBT is an open-source command line tool written in Python from DBT Labs (formerly Fishtown Analytics).

DBT is designed to manage data transformations while applying software engineering best practices (including version control, automated testing, reviews, approvals, etc). Its modern software engineering and cloud-first design goals separate it from its old-school ETL/ELT predecessors.

DBT is an ELT tool focusing on the T(ransform) only, the E(xtract) and L(oad) are up to you (there are plenty of tools that specialize in this).

At its core DBT is a templating engine using Jinja (Python templating engine); it generates templates that represent SQL commands to create, replace or update objects in your database (the “T” in ELT), then oversees the execution of the templated commands. The work is "pushed down" to the underlying database containing the source and target objects and data.

Models

The concept most integral to DBT is the Model. A Model is simply a representation of a transform (or set of transforms) to a dataset, resulting in a target object (which could be a table or tables in a datamart). A model is expressed as a SELECT statement stored in a .sql file in your dbt project (well get to that in a minute).

Suppose we want to create a denormalized fact table for commits to store in a datamart in BigQuery. This is what a model file might look like (using the BigQuery SQL dialect and referencing objects that should exist and be accessible at runtime when we execute the model).

{{ config(materialized='table') }}

with commits as (
SELECT
SUBSTR(commit, 0, 13) as commit_short_sha,
committer.name as commiter_name,
committer.date as commit_date,
message,
repo_name
FROM `bigquery-public-data.github_repos.sample_commits` c
)

select * from commits

Models are created as views by default, but you can materialize these as tables where needed.

You configure connectivity to the target database using adapters (software libraries provided by dbt in the case of most mainstream databases) and profiles (which contain details around authentication, databases/datasets, schemas etc).

DBT Project

A DBT project is simply a folder containing your models and some other configuration data. You can initialize this by running dbt init from your desired project directory. In its most basic form, the structure looks like this:

models/
├─ your_model.sql
├─ schema.yml
dbt_project.yml

Your models can be created under subfolders for organization. schema.yml is an optional file that contains tests for columns, can also include descriptions for documentation. The dbt_project.yml file is the main entry point for the dbt program, it contains the configuration for the project, including which profile to use. Profiles (stored in a file called profiles.yml store all of the necessary connectivity information for your target database platform. By default dbt init creates this file a .dbt folder under your home directory.

info

You could store this with your project (be careful not to commit secrets like database credentials to source control). If you store it in any other directory than the default, you will need to tell dbt where it can find this file using the --profiles-dir argument of any dbt command, see here for more information.

To confirm your project is ship shape, run dbt parse; if there are no errors, you are good to proceed running and testing your models.

Running DBT Models

To run your models, simply run the following command from the directory containing your dbt_project.yml file (typically the root of your project folder):

Model deployed! Let's test it:

This will run all of the tests associated with your model(s) - in this case, not null and unique tests defined in the schema.yml file. That's it, deployed and tested.

Other Stuff

There is some other stuff in DBT you should be aware of, like seeds, snapshots, analyses, macros, and more but our five minutes is up 😃. We can discuss these next time; you are up and running with the basics of DBT now, get transforming!

if you have enjoyed this post, please consider buying me a coffee ☕ to help me keep writing!

· 7 min read
Chris Ottinger

Prefect.io is a python based Data Engineering toolbox for building and operating Data Pipelines. Out of the box, Prefect provides an initial workflow for managing data pipelines that results in a container image per data pipeline job.

The one-to-one relationship between data pipeline jobs and container images enables data engineers to craft pipelines that are loosely coupled and don't require a shared runtime environment configuration. However, as the number of data pipeline jobs grow the default container per job approach starts to introduce workflow bottlenecks and lifecycle management overheads. For example, in order to update software components used by flows, such as upgrading the version of Prefect, all the data pipeline job images have to be rebuilt and redeployed. Additionally the container image per job workflow introduces a wait time for data engineers to re-build data pipeline container images and test flows centrally on Prefect Server or Prefect Cloud environment.

Fortunately, Prefect comes to its own rescue with the ability to open up the box, exposing the flexibility in the underlying framework.

Out of the box - Prefect DockerStorage

Out of the box, Prefect provides a simple workflow for defining and deploying data pipelines as container images. After getting a first data pipeline running in a local environment, the attention turns to scaling up development and deploying flows into a managed environment, using either the Prefect Cloud service or a Prefect Server.

Combining Prefect Cloud or Prefect Server with Kubernetes provides a flexible and scalable platform solution for moving data pipelines into production. There are a number of options for packaging data pipeline flow code for execution on kubernetes clusters. The Docker Storage option provides the workflow for bundling the data pipeline job code into container images, enabling a common controlled execution environment and well understood distribution mechanism. The data pipeline runs as a pod using the flow container image.

Prefect Docker Storage workflow steps for building and deploying data pipeline flows include:

Workflow Steps

  • packaging a flow (python code) as a serialised/pickled object into a container image
  • registering the flow using the container image name
  • pushing the container image to a container repository accessible from the kubernetes cluster
  • running the flow by running an instance of the named container image as a kubernetes pod

This is relatively simple immutable workflow. Each data pipeline flow version is effectively a unique and self contained 'point-in-time' container image. This initial workflow can also be extended to package multiple related flows into a single container image, reducing the number of resulting container images. But, as the number of data pipeline jobs grow, there issues of container image explosion and data engineering productivity remain.

Using Prefect GitStorage for flows addresses both container image proliferation as well as development bottlenecks.

Prefect Git Storage

Prefect Git Storage provides a workflow for developing and deploying data pipelines directly from git repositories, such as Gitlab or Github. The data pipeline code (python) is pulled from the git repository on each invocation with the ability to reference git branches and git tags. This approach enables:

  • reducing the number of container images to the number of different runtime configurations to be supported.
  • improving the data engineering development cycle time by removing the need to build and push container images on each code change.
  • when combined with kubernetes Prefect Run Configs and Job templates, enables selection of specific runtime environment images

Note that the GitStorage option does required access from the runtime kubernetes cluster to the central git storage service, e.g. gitlab, github, etc.

Prefect Git Storage workflow steps for 'building' and deploying data pipeline flows include:

Workflow Steps

  • pushing the committed code to the central git service
  • registering the flow using the git repository url and branch or tag reference
  • running the flow by pulling the reference code from the git service in a kubernetes pod

The container image build and push steps are removed from the developer feedback cycle time. Depending on network bandwidth and image build times, this can save remove 5 to 10 minutes from each deployment iteration.

Pushing the flow code

Once a set of changes to the data pipeline code has been committed, push to the central git service.

$ git commit
$ git push

Registering the flow

The flow can be registered with Prefect using either a branch (HEAD or latest) or tag reference. Assuming a workflow with feature branches:

  • feature branches: register the flow code using the feature branch. This enables the latest version (HEAD) of the pushed flow code to be used for execution. It also enables skipping re-registration of the flow on new changes as the HEAD of the branch is pulled on each flow run
  • main line branches: register pinned versions of the flow using git tags. This enables the use of a specific version of the flow code to be pulled on each flow run, regardless of future changes.

Determining the which reference to use:

# using gitpython module to work with repo info
from git import Repo

# presidence for identifing where to find the flow code
# BUILD_TAG => GIT_BRANCH => active_branch
build_tag = branch_name = None
build_tag = os.getenv("BUILD_TAG", "")
if build_tag == "":
branch_name = os.getenv("GIT_BRANCH", "")
if branch_name == "":
branch_name = str(Repo(os.getcwd()).active_branch)

Configuring Prefect Git storage:

from prefect.storage import Git
import my_flows.hello_flow as flow # assuming flow is defined in ./my_flows/flow.py

# example using Gitlab
# either branch_name or tag must be empty string "" or None
storage = Git(
repo_host=git_hostname,
repo=repo_path,
flow_path=f"{flow.__name__.replace('.','/')}.py",
flow_name=flow.flow.name,
branch_name=branch_name,
tag=build_tag,
git_token_secret_name=git_token_secret_name,
git_token_username=git_token_username
)

storage.add_flow(flow.flow)
flow.flow.storage = storage

flow.flow.regsiter(build=False)

Once registered, the flow storage details can be viewed in the Prefect Server or Prefect Cloud UI. In this example, Prefect will use the HEAD version of the main branch on each flow run.

hello flow storage details

Next Steps - Run Config

With Prefect Git Storage the runtime configuration and environment management is decoupled from the data pipeline development workflow. Unlike with Docker Storage, with Git Storage, the runtime execution environment and data pipeline development workflows are defined and managed separately. As an added benefit, the developer feedback loop cycle time is also reduced.

With the data engineering workflow addressed, the next step in scaling out the Prefect solution turns to configuration and lifecycle management of the runtime environment for data pipelines. Prefect Run Configs and Job templates provide the tools retaining the flexibility on container image based runtime environments with improved manageability.

· 3 min read
Jeffrey Aven

Spark SQL ETL Framework

Most traditional data warehouse or datamart ETL routines consist of multi stage SQL transformations, often a series of CTAS (CREATE TABLE AS SELECT) statements usually creating transient or temporary tables – such as volatile tables in Teradata or Common Table Expressions (CTE’s).

The initial challenge when moving from a SQL/MPP based ETL framework platformed on Oracle, Teradata, SQL Server, etc to a Spark based ETL framework is what to do with this…

Multi Stage SQL Based ETL

One approach is to use the lightweight, configuration driven, multi stage Spark SQL based ETL framework described in this post.

This framework is driven from a YAML configuration document. YAML was preferred over JSON as a document format as it allows for multi-line statements (SQL statements), as well as comments - which are very useful as SQL can sometimes be undecipherable even for the person that wrote it.

The YAML config document has three main sections: sources, transforms and targets.

Sources

The sources section is used to configure the input data source(s) including optional column and row filters. In this case the data sources are tables available in the Spark catalog (for instance the AWS Glue Catalog or a Hive Metastore), this could easily be extended to read from other datasources using the Spark DataFrameReader API.

Transforms

The transforms section contains the multiple SQL statements to be run in sequence where each statement creates a temporary view using objects created by preceding statements.

Targets

Finally the targets section writes out the final object or objects to a specified destination (S3, HDFS, etc).

Process SQL Statements

The process_sql_statements.py script that is used to execute the framework is very simple (30 lines of code not including comments, etc). It loads the sources into Spark Dataframes and then creates temporary views to reference these datasets in the transforms section, then sequentially executes the SQL statements in the list of transforms. Lastly the script writes out the final view or views to the desired destination – in this case parquet files stored in S3 were used as the target.

You could implement an object naming convention such as prefixing object names with sv_, iv_, fv_ (for source view, intermediate view and final view respectively) if this helps you differentiate between the different objects.

To use this framework you would simply use spark-submit as follows:

spark-submit process_sql_statements.py config.yml

Full source code can be found at: https://github.com/avensolutions/spark-sql-etl-framework

if you have enjoyed this post, please consider buying me a coffee ☕ to help me keep writing!