
· 4 min read
Jeffrey Aven

Databricks is a unified data management and analytics platform built by the creators of Apache Spark. It provides a collaborative environment for data scientists, engineers, and business analysts to work together. This brief overview will walk you through the basics of Databricks.

Summary

Databricks is a cloud-based "as-a-Service" platform for data management and analytics powered by Apache Spark. It enables organizations to deploy scalable, high-performance analytics workloads against large-scale datasets in their cloud environments. Databricks also supports multiple languages (SQL, Python, R, Scala, and Java), interactive notebooks and collaborative features, job scheduling, and more. The Databricks platform supports batch and stream processing and analytics, integrating with various data sources and formats.

Architecture

The Databricks architecture consists of two main components: the Control Plane and the Data Plane.

Databricks Architecture

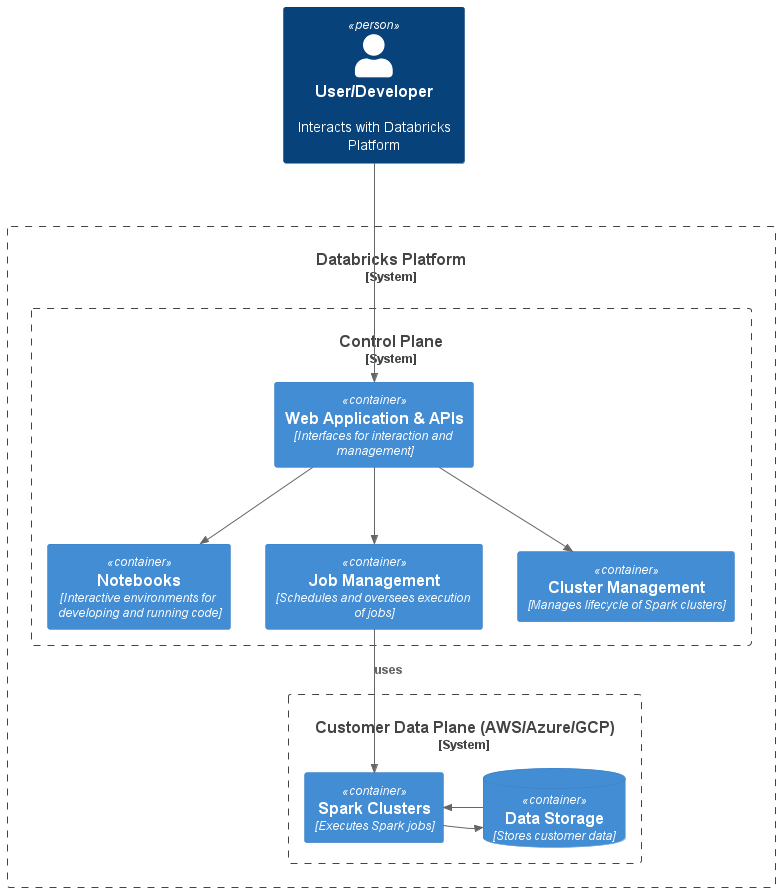
The user interfaces and APIs are located in the Control Plane. It's where users write code in notebooks, manage clusters, and schedule jobs. The Control Plane does not handle customer data directly.

The Data Plane - deployed in the customer's cloud environment and managed by the Control Plane - is where compute clusters (Apache Spark clusters) and storage resources are located. Spark jobs run in the Data Plane to process a customer's data.

This architecture enables a clear separation of responsibilities and increases overall system security. By keeping customer data within the Data Plane, Databricks ensures that sensitive information remains in the customer's environment and control.

Databricks supports a multi-cloud architecture, allowing customers to choose between AWS, Azure, and Google Cloud as their preferred environment for the Data Plane.

Clusters

Databricks allows you to create Spark clusters required to execute notebook code. Clusters can be Job Clusters used mainly for non-interactive or scheduled workloads, or All Purpose Clusters which are mainly used for ad-hoc, interactive analysis operations. All-Purpose Clusters are shared clusters that multiple users can run commands on simultaneously. The Databricks Control Plane provides cluster automation, scaling, and collaboration capabilities.

Workspaces and Notebooks

The Workspace is a personalized space where users can create notebooks, import libraries, and run jobs. Notebooks are documents combining code execution, visualizations, and narrative. They support Python, R, Scala, and SQL. Databricks notebooks are similar to popular notebook environments such as Jupyter Notebooks and Apache Zeppelin Notebooks.

Databricks Notebook

Databricks File System (DBFS)

DBFS is an abstraction layer on top of scalable object storage and offers the benefits of distributed storage without needing local file I/O. DBFS can be used as a source or target for jobs, and Databricks offers multiple utilities for working with DBFS.

Delta Lake and Lakehouse

Delta Lake is an open-source project providing ACID transactions, scalable metadata handling, and unifying streaming and batch data processing on top of your existing data lake. It brings reliability to data lakes, and it is fully compatible with Apache Spark APIs.

A Lakehouse is a new kind of data management paradigm combining the benefits of data warehouses and data lakes. It provides a data warehouse's reliability, performance, and transactional capabilities with schema-on-read flexibility and low-cost data lake storage.

Delta Live Tables

Delta Live Tables represent the state of a streaming dataset, views, or materialized views. Delta Live Tables provide improved data availability, quality, and reliability.

Medallion Architecture

The Medallion Architecture is a methodology for organizing data in your data lake. This is not a new concept; it has been around for a while in the field of data engineering. The names for the layers might differ (like Raw, Clean, and Refined etc), but the concept remains the same. It provides a guideline to systematically organize the data transformation process, with a clear separation between stages.

The Medallion Architecture is named after the 'bronze', 'silver', and 'gold' stages of refining raw material.

Bronze tables, also known as raw tables, store the raw data ingested from various sources. This data is in its original form and hasn't undergone any transformation or cleaning.

Silver tables contain cleansed and enriched data. This results from applying transformations, such as deduplication and schema normalization, to the bronze data.

Gold tables hold business-level aggregates often used for reporting and dashboarding. This might be like daily active users or revenue by geography and product.

This architecture aims to separate data processing into logical layers and allow different teams to work on each layer independently. The Databricks Lakehouse is designed to support this methodology.

if you have enjoyed this post, please consider buying me a coffee ☕ to help me keep writing!

· 2 min read
Jeffrey Aven

Log Drains for function and CDN logs from Netlify, which have native SumoLogic collectors available, are included with Enterprise level subscriptions. However, there is a quantum jump in subscription costs between the Teams or Pro Editions of Netlify and the Enterprise Edition.

If you are deploying a JAMStack app in Netlify, the odds are each page will include an API call (using Netlify functions), and for authenticated pages, the request will include a Bearer Token.

Solution Overview

Create a logging module that exports functions that can be used by any of your Netlify functions to log verbose data to the console (seen in the function log output in the Netlify app) and to push log events to a Hosted SumoLogic Collector Source. This will allow you to see verbose logs for each function call and CDN logs for each page load.

Steps

Steps to deploy this solution are detailed here:

Step 1. Set up a Collector and Source

Set up a Custom HTTP Collector and Source in SumoLogic (copy the source URL) using the SumoLogic web interface; see the documentation here: https://help.sumologic.com/03Send-Data/Sources/02Sources-for-Hosted-Collectors/HTTP-Source/Upload-Data-to-an-HTTP-Source.

Step 2. Create Netlify Environment Variable(s)

Create a build time environment variable in Netlify for the Sumo Source URL you generated in Step 1 (in this case, I have called it SUMO_REQUEST_SOURCE_URL).

Step 3. Create a logging module

Create your logging module (this example is in TypeScript, but you could implement the same logic in any other language/runtime). In this case, we will unpack the request event and send the fields to the collector source.

Step 4. Import and use the logging module

Now import and use the logRequest function at the beginning of each Netlify function you deploy.

You will now get verbose logs (similar to CDN logs) to the Netlify console and to Sumo Logic!

You can implement similar functions for each request to log the jwtId and userInfo from the Bearer Token. This will allow you to see the user information for each request in SumoLogic.

info

Your http response header should include:

headers: {
'Access-Control-Allow-Origin': '*',
'Access-Control-Allow-Headers': 'Content-Type',
...
},

if you have enjoyed this post, please consider buying me a coffee ☕ to help me keep writing!

· 6 min read
Chris Ottinger

The out-of-the-box dbt snapshots provide change data capture (CDC) capability for tracking the changes to data in your data lake or data warehouse. The dbt snapshot metadata columns enable a view of change to data - which records have been updated and when. However, the dbt snapshot metadata doesn't provide a view of the processing audit - which process or job was responsible for the changes. The ability to audit at the processing level requires additional operational metadata.

The out-of-the-box dbt snapshot strategies (rules for detecting changes) likely provide the desired logic for detecting and managing data change. No change to the snapshot strategies or snapshot pipeline processing is desired, but additional operational metadata fields must be set and carried through with the data.

note

The full source code for this article is available at github.com/datwiz/dbt-snapshot-metadata.

Objectives

Both operational and governance requirements can drive the need for greater fidelity of operational metadata. Example considerations could include:

  • use of the out-of-the-box dbt snapshot logic and strategies for Change Data Capture (CDC)
  • addition of operational metadata fields to snapshot tables with processing details for ops support and audit
    • when new records are inserted, add operational processing metadata information to each record
    • when existing records are closed or end-dated, update operational metadata fields with processing metadata

standard snapshot table

enhanced snapshot table

Aside from including a new process_id value in records, these enhancements don't add further information to the table. Instead they are a materialization of the operational data that is easier to access. The same information could be derived from standard dbt metadata fields but would require a more complex SQL statement that includes a left outer self-join. As with any materialization decision, there is a trade-off between ease of access vs. additional storage requirements.

NULL vs High-End Date/Timestamp

In addition to the ops support and audit requirements, there can also be a legacy migration complication related to how open records (the most current version of the record) are represented in snapshots. dbt snapshots represent open records using NULL values for dbt_valid_to fields. In legacy data lakes or data warehouses, the open records often are identified using a well-known high value for the effective end date/timestamp, such as 9999-12-31 or 9999-12-31 23:59:59. Adding additional snapshot metadata columns enables a legacy view of record changes without having to alter the dbt snapshot strategy or processing logic.

tip

Transitioning to NULL values for the valid_to end date/timestamp value for open records is highly recommended, especially when porting to a new database platform or cloud-based service. On-premise legacy database platforms often use TIMESTAMP values without including timezones or timezone offsets, relying on a system-wide default timezone setting. Different databases may also have extra millisecond precision for TIMESTAMP columns. Precision and timezone treatment can cause unexpected issues when migrating to a new database platform.

For example, in BigQuery

datetime('9999-12-31 23:59:59.999999', 'Australia/Melbourne')

will generate an invalid value error, while

timestamp('9999-12-31 23:59:59.999999', 'Australia/Melbourne')

will silently convert the localised timestamp to UTC 9999-12-31 23:59:59.999999+00

The use of NULL values for open records/valid_to fields avoids this risk of subtle breakage.

Enhancing the default Snapshot

Modify the default dbt snapshot behavior by overriding the dbt snapshot materialization macros. dbt enbles macros to be overridden using the following resolution or search order:

  1. locally defined macros in the project's ./macros directory
  2. macros defined in additional dbt packages included in the project packages.yml file
  3. dbt adaptor-specific macros
  4. dbt provided default macros

To inject additional snapshot metadata fields into snapshot tables override the following two default macros:

  • default__build_snapshot_table() creates the snapshot table on the first run
  • default__snapshot_staging_table() stages in the inserts and updates to be applied to the snapshot table

To update fields on snapshot update, override the following default macro:

  • default__snapshot_merge_sql() performs the MERGE/UPSERT

Note that if the dbt database adaptor implements adaptor-specific versions of these macros, then update the adaptor-specific macro accordingly. For example the dbt-spark adaptor overrides the dbt default__snapshot_merge_sql() as spark__snapshot_merge_sql().

build_snapshot_table()

The default__build_snapshot_table() macro is called on the first dbt snapshot invocation. This macro defines the content to include in the CREATE TABLE statement. The following example adds process id's using the dbt invocation_id and additional timestamp fields, including use of the well-known high timestamp value for open records. This value is defined as the variable default_high_dttm in the dbt_project.yml file. The dbt snapshot strategy processing uses the unmodified standard dbt columns, so modification to change detection logic is not required.

snapshot_staging_table()

The default__snapshot_staging_table() macro is called on subsequent dbt snapshot invocations. This macro defines the content in the MERGE statement for inserts and updates. The following example adds the additional operational metadata fields to the insertions common table expression (CTE) and the updates (CTE). The dbt invocation_id is used again as the process_id for inserts on new records and updates that close existing records.

Note that the deletes CTE has not been updated with the additional fields. In scenarios that use the hard deletes feature, the deletes CTE would need to be modified as well.

snapshot_merge_sql()

The default__snapshot_merge_sql() macro is called to perform the MERGE/UPSERT into the target snapshot table. This macro defines how fields in the records being closed should be updated. The update set section of the MERGE statement defines the updated columns and values.

Conclusion

Overriding the default dbt snapshot macros enables the injection and updating of additional operational metadata in snapshot tables. Fields can be added such that the provided dbt logic and snapshot strategy processing is still applied. Still, the resulting snapshot tables contain the columns required for the data lake or data warehouse.

The sample dbt project in datwiz/dbt-snapshot-metadata/tree/main/dbt_snapshot_ops_metadata contains an implementation of the snapshot customization.

· 6 min read
Jeffrey Aven

Yoast is a well-known SEO plugin for WordPress which automagically generates structured data for every page (amongst other things). This helps render rich results for search as well as improve general on-site SEO.

We use Docusaurus, a React-based Static Site Generator from Facebook, for all of our docs and blog properties. Docusaurus does have some native structured data capabilities through Microdata. We were after:

  • Structured data implemented using JSON-LD - which is the recommended approach by Google; and
  • Support multi-level structured data (like Yoast does), including Organization, WebSite, WebPage, Article, and Breadcrumb level data

The solution was to create a Docusaurus plugin, docusaurus-plugin-structured-data.

info

Google allows you to combine structured data in Microdata format with data in JSON-LD format. You can see the union of the two markup approaches using the Rich Results Test.

How it works

Organization and Website level structured data are defined in the plugin configurations (see Configuration). WebPage, Article and Breadcrumb level data are derived for each page from metadata sourced from the postBuild lifecycle api and then injected into the <head> of each page using JSON-LD format as follows:

<head>
...
<script type="application/ld+json">
{"@context":"https://schema.org","@graph":[...]}
</script>
...
</head>

Docusaurus allows you to create hierarchical document structures using categories and folders defined at build time; although this is useful for organization and context, to search engines, it can appear too complex (with leaf-level documents seemingly multiple clicks from the home page). In actuality, this is not the case, as the sidebar in Docusuarus makes any page one click away from the home page.

As a solution (to keep the hierarchy), the plugin takes each level in the route, maps it to a friendly term or token (using the breadCrumbLabelMap configuration property), and creates a concatenated string, so for a route such as:

/docs/language-spec/functions/aggregate/group_concat

The resultant Breadcrumb structured data looks like this...

    {
"@type": "BreadcrumbList",
"@id": "https://stackql.io/docs/language-spec/functions/aggregate/group_concat/#breadcrumb",
"itemListElement": [
{
"@type": "ListItem",
"position": 1,
"item": "https://stackql.io",
"name": "Home"
},
{
"@type": "ListItem",
"position": 2,
"item": "https://stackql.io/docs",
"name": "Documentation"
},
{
"@type": "ListItem",
"position": 3,
"name": "Language Specification - Functions - Aggregate - GROUP_CONCAT"
}
]
},

Blog Posts

The docusaurus-plugin-structured-data plugin detects blog posts and injects Article structured data accordingly, including the following properties:

  • author
  • headline
  • datePublished
  • dateModified
  • wordCount
  • keywords
  • and more...

An example is shown here:

    {
"@type": "Article",
"@id": "https://stackql.io/blog/sumologic-provider-for-stackql-now-available/#article",
"isPartOf": {
"@type": "WebPage",
"@id": "https://stackql.io/blog/sumologic-provider-for-stackql-now-available/#webpage"
},
"author": {
"name": "Jeffrey Aven",
"@id": "https://stackql.io/#/schema/person/1"
},
"headline": "Sumologic Provider for StackQL Now Available",
"datePublished": "2023-01-03T00:00:00.000Z",
"dateModified": "2023-01-03T00:00:00.000Z",
"mainEntityOfPage": {
"@id": "https://stackql.io/blog/sumologic-provider-for-stackql-now-available/#webpage"
},
"wordCount": 201,
"publisher": {
"@id": "https://stackql.io/#organization"
},
"image": {
"@id": "https://stackql.io/blog/sumologic-provider-for-stackql-now-available/#primaryimage"
},
"thumbnailUrl": "https://stackql.io/img/blog/stackql-sumologic-provider-featured-image.png",
"keywords": ["stackql", "sumologic", "multicloud", "monitoring", "logging"],
"articleSection": ["Blog"],
"inLanguage": "en-US"
}

Installation

The docusaurus-plugin-structured-data is available via NPMJS at @stackql/docusaurus-plugin-structured-data.

To install via NPM use:

npm i @stackql/docusaurus-plugin-structured-data

To install using Yarn use:

yarn add @stackql/docusaurus-plugin-structured-data

Configuration

Add the docusaurus-plugin-structured-data plugin to plugins section in docusaurus.config.js:

{
plugins: [
'@stackql/docusaurus-plugin-structured-data',
...
]
}

Update themeConfig in the docusaurus.config.js file, the following shows mandatory properties:

{
...,
themeConfig: {
structuredData: {
excludedRoutes: [], // array of routes to exclude from structured data generation, include custom redirects here
verbose: boolean, // print verbose output to console (default: false)
featuredImageDimensions: {
width: 1200,
height: 630,
},
authors:{
author_name: {
authorId: string, // unique id for the author - used as an identifier in structured data
url: string, // MUST be the same as the `url` property in the `authors.yml` file in the `blog` directory
imageUrl: string, // gravatar url
sameAs: [] // synonymous entity links, e.g. github, linkedin, twitter, etc.
},
},
organization: {}, // Organization properties can be added to this object
website: {}, // WebSite properties can be added to this object
webpage: {
datePublished: string, // default is the current date
inLanguage: string, // default: en-US
},
breadcrumbLabelMap: {} // used to map the breadcrumb labels to a custom value
}
},
...
}

Resultant Structured Data Example

Below is an example of the data created and injected into the <head> of each page in the generated site (this is formatted for readability - the actual structured data generated is minified for performance).

Docusaurus Structured Data Example
<script type="application/ld+json">
{
"@context": "https://schema.org",
"@graph": [
{
"@type": "WebPage",
"isPartOf": {
"@id": "https://stackql.io/#website"
},
"inLanguage": "en-US",
"datePublished": "2021-07-01",
"@id": "https://stackql.io/docs/language-spec/functions/json/json_extract/#webpage",
"url": "https://stackql.io/docs/language-spec/functions/json/json_extract",
"name": "JSON_EXTRACT",
"description": "Query and Deploy Cloud Infrastructure and Resources using SQL",
"dateModified": "2023-01-23T23:56:08.545Z",
"breadcrumb": {
"@id": "https://stackql.io/docs/language-spec/functions/json/json_extract/#breadcrumb"
},
"potentialAction": [
{
"@type": "ReadAction",
"target": [
"https://stackql.io/docs/language-spec/functions/json/json_extract"
]
}
]
},
{
"@type": "BreadcrumbList",
"@id": "https://stackql.io/docs/language-spec/functions/json/json_extract/#breadcrumb",
"itemListElement": [
{
"@type": "ListItem",
"position": 1,
"item": "https://stackql.io",
"name": "Home"
},
{
"@type": "ListItem",
"position": 2,
"item": "https://stackql.io/docs",
"name": "Documentation"
},
{
"@type": "ListItem",
"position": 3,
"name": "Language Specification - Functions - JSON - JSON_EXTRACT"
}
]
},
{
"@type": "WebSite",
"@id": "https://stackql.io/#website",
"name": "StackQL",
"url": "https://stackql.io",
"description": "Provision and Query Cloud and SaaS Resources using SQL",
"publisher": {
"@id": "https://stackql.io/#organization"
},
"potentialAction": [
{
"@type": "SearchAction",
"target": {
"@type": "EntryPoint",
"urlTemplate": "https://stackql.io/search?q={searchTerms}"
},
"query-input": "required name=searchTerms"
}
],
"inLanguage": "en-US"
},
{
"@type": "Organization",
"@id": "https://stackql.io/#organization",
"name": "StackQL",
"url": "https://stackql.io",
"sameAs": [
"https://twitter.com/stackql",
"https://www.linkedin.com/company/stackql",
"https://github.com/stackql",
"https://www.youtube.com/@stackql",
"https://hub.docker.com/u/stackql"
],
"contactPoint": {
"@type": "ContactPoint",
"email": "info@stackql.io"
},
"logo": {
"@type": "ImageObject",
"inLanguage": "en-US",
"@id": "https://stackql.io/#logo",
"url": "https://stackql.io/img/stackql-cover.png",
"contentUrl": "https://stackql.io/img/stackql-cover.png",
"width": 1440,
"height": 900,
"caption": "StackQL - your cloud using SQL"
},
"image": {
"@id": "https://stackql.io/#logo"
},
"address": {
"@type": "PostalAddress",
"addressCountry": "AU",
"postalCode": "3001",
"streetAddress": "Level 24, 570 Bourke Street, Melbourne, Victoria"
},
"duns": "750469226",
"taxID": "ABN 65 656 147 054"
}
]
}
</script>

Testing

Once you have built and deployed your site (using yarn build), you can use the Schema Validator Tool or the Google Rich Results Tool to inspect urls from your site.

Pull requests or issues are welcome. Please feel free to contribute. Thanks!

if you have enjoyed this post, please consider buying me a coffee ☕ to help me keep writing!

· 2 min read
Jeffrey Aven

With our StackQL Provider Registry, we had an interesting challenge:

  1. Maintain different versions for one or more different documents in the same repo(which were decoupled from releases)
  2. Provide dynamic versioning (with no user input required and not dictated by tags)
  3. Maintain some traceability to the source repo (pull requests, commit shas, etc)

SemVer required users to make arbitrary decisions on major, minor, and build numbers.

Although CalVer required less user discretion for the major and minor components, the micro-component was still an arbitrary number. This was not ideal for our use case.

As our document versioning was not related to tags, and we have implemented GitFlow (specifically based upon PRs to dev or main) as our release path, we created a new variant scheme... GitVer.

This is completely different from GitVersion, which is a tool to determine the version of a project based on Git history.

This scheme is implemented using GitHub as the remote but could easily be adapted to GitLab, Bitbucket, etc.

How it works

Each pull request is assigned a version based on the date the PR was raised or merged, and the PR number. This version (the GitVer) can then be used to version artifacts (which could be pushed to releases if desired).

Workflow Example Code

This is an example using GitHub actions. The version is determined automatically within the workflow.

main.yml example:

The code used to get the relevant PR info is here (setup-job.js), the tricky bit is that the PR number presents differently for a pull request open or sync (pushing changes to an open PR) and a merge commit (which is simply a push to a protetcted branch). See the code below:

tip

you can export some other metadata while you are here like the commit sha, source and target branch, (PR) action, etc.

The code to generate the GitVer for the PR is here (get-version.js):

You can see it at work here stackql/stackql-provider-registry which builds and deploys providers for StackQL.

Thoughts?

if you have enjoyed this post, please consider buying me a coffee ☕ to help me keep writing!