2 posts tagged with "github"

View All Tags

· 2 min read
Jeffrey Aven

With our StackQL Provider Registry, we had an interesting challenge:

  1. Maintain different versions for one or more different documents in the same repo(which were decoupled from releases)
  2. Provide dynamic versioning (with no user input required and not dictated by tags)
  3. Maintain some traceability to the source repo (pull requests, commit shas, etc)

SemVer required users to make arbitrary decisions on major, minor, and build numbers.

Although CalVer required less user discretion for the major and minor components, the micro-component was still an arbitrary number. This was not ideal for our use case.

As our document versioning was not related to tags, and we have implemented GitFlow (specifically based upon PRs to dev or main) as our release path, we created a new variant scheme... GitVer.

This is completely different from GitVersion, which is a tool to determine the version of a project based on Git history.

This scheme is implemented using GitHub as the remote but could easily be adapted to GitLab, Bitbucket, etc.

How it works

Each pull request is assigned a version based on the date the PR was raised or merged, and the PR number. This version (the GitVer) can then be used to version artifacts (which could be pushed to releases if desired).

Workflow Example Code

This is an example using GitHub actions. The version is determined automatically within the workflow.

main.yml example:

The code used to get the relevant PR info is here (setup-job.js), the tricky bit is that the PR number presents differently for a pull request open or sync (pushing changes to an open PR) and a merge commit (which is simply a push to a protetcted branch). See the code below:

tip

you can export some other metadata while you are here like the commit sha, source and target branch, (PR) action, etc.

The code to generate the GitVer for the PR is here (get-version.js):

You can see it at work here stackql/stackql-provider-registry which builds and deploys providers for StackQL.

Thoughts?

if you have enjoyed this post, please consider buying me a coffee ☕ to help me keep writing!
· 3 min read
Yuncheng Yang

It is common to have a remote and dispersed team these days. As face to face meetings are less common and with geographically dispersed development teams not possible, it is challenging to have a clear picture of where your team is.

GitHub provides useful data to help us understand your development team's workload and progress. StackQL has an official GitHub provider which allows you to access this data using SQL.

info

StackQL is an open source project which enables you to query, analyze and interact with cloud and SaaS provider resources using SQL, see stackql.io

In this example we will use the pystackql Python package (Python wrapper for StackQL) along with a Jupyter Notebook to retrieve data from GitHub using SQL, then sink the data into a cloud native data warehouse for long term storage and analytics at scale, in this example we have used BigQuery.

Step by Step Guide

This guide will walk you through the steps involved in capturing and analyzing developer data using StackQL, Python, Jupyter and BigQuery.

1. Create GitHub Personal Access Token

You will need to create a Personal Access Token in GitHub for a user which has access to the org or orgs in GitHub you will be analyzing. Follow this guide to create your GitHub token and store it somewhere safe.

2. Setup your Jupyter Notebook

You need to set up your Jupyter environment, you can either use the Docker, see stackql/stackql-jupyter-demo or:

  1. Create your Jupyter project
  2. Download and install StackQL
  3. Clone the pystackql repo

3. Setup StackQL Authentication to GitHub

You can find instructions on how to use your personal access token to authenticate to GitHub here. The following example shows how to do this in a Jupyter notebook cell using pystackql.

4. Retrieve data

Next, we will use StackQL SQL queries to get commits, pull requests and pull request reviews, then we will aggregate by usernames of contributors. You can use JOIN semantics in StackQL to do this as well.

Get Contributors, Commits, Pull Requests and Reviews

In the following cell we will query data from GitHub using StackQL:

Aggregate Data By Username

Now we will aggregate the data by each contributor, see the following example:

5. Store the Data in BigQuery

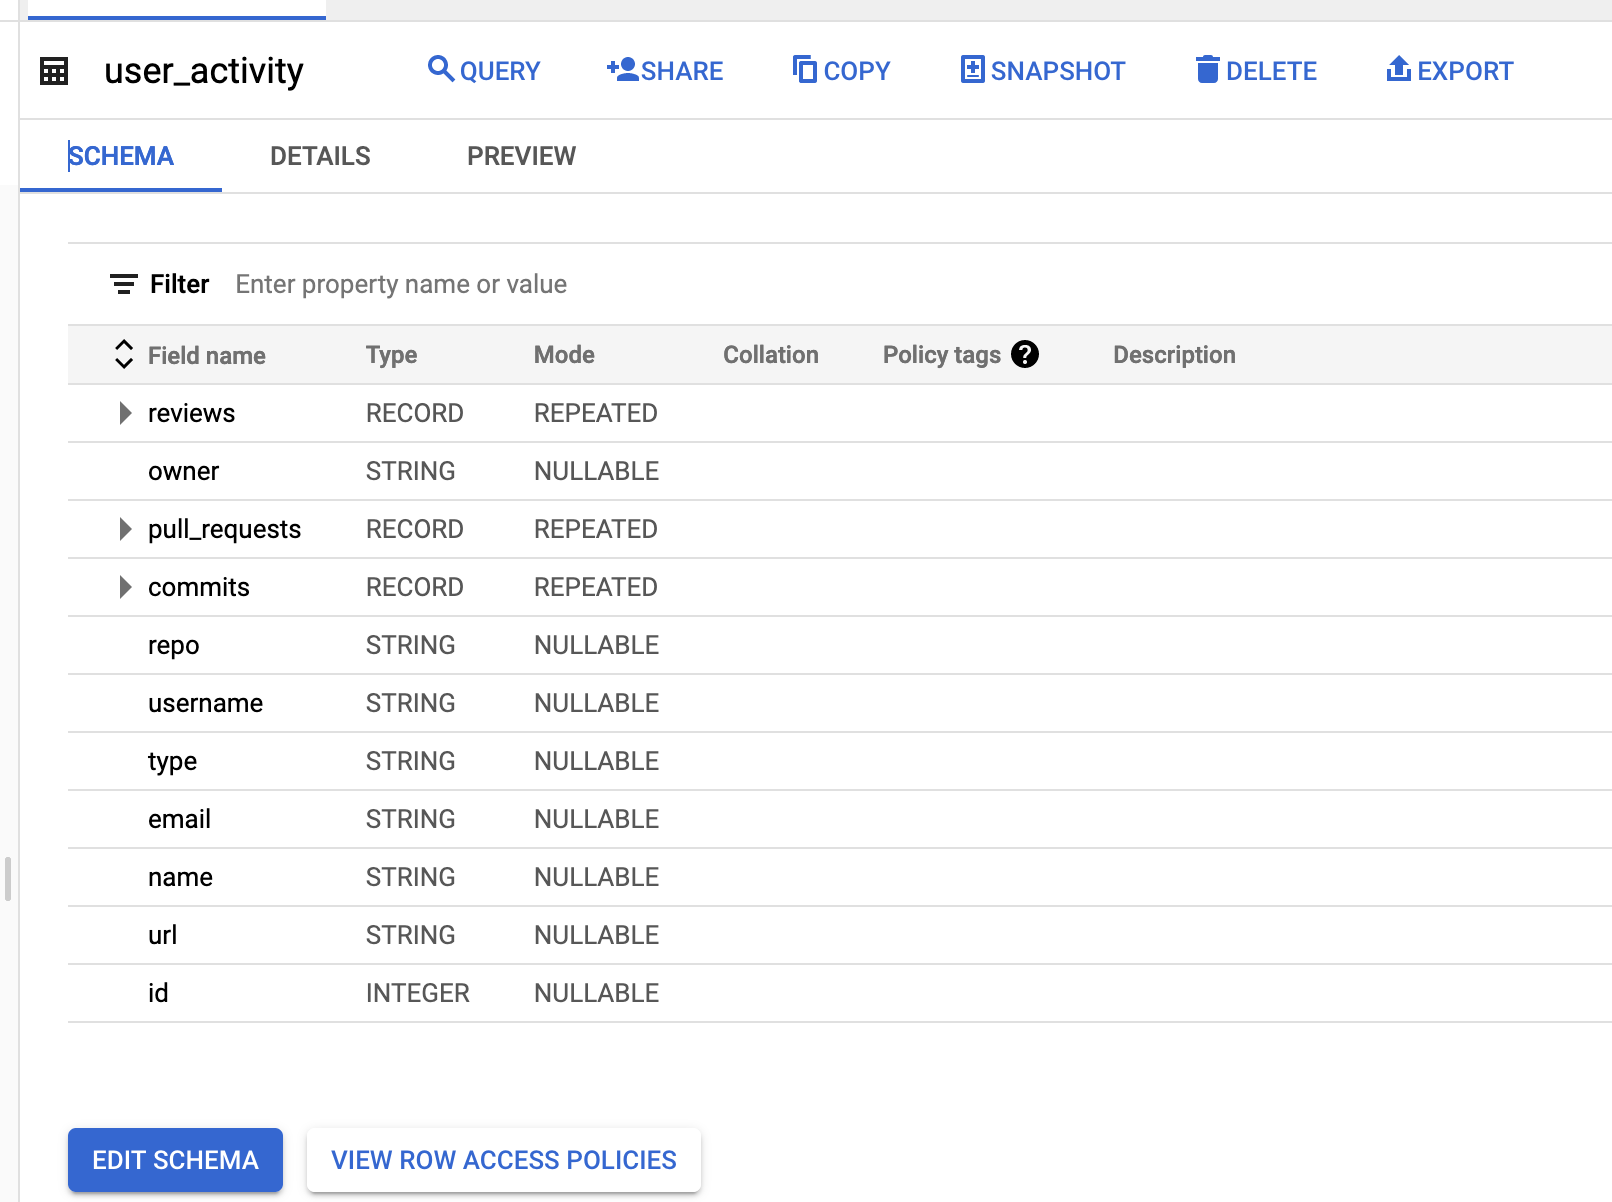
After the transformation of data, we will then upload it to BigQuery. First, we will store the data as a new line delimited json file, making the uploading process much easier and handling the nested schema better, as shown in the following cell:

Now we can see the table on BigQuery as shown here:

BigQuery User Activity Table

From here you can use the same process to append data to the table and use BigQuery to perform analytics at scale on the data.

info

The complete notebook for this article can be accessed at FabioYyc/stackql-github-notebook-bq