This article describes a simple SSO pattern for authenticating and authorizing users from an external AD and to your application without requiring federation.
You need to authenticate external users to use your application, these users belong to an organization using Azure Active Directory with specific login policies (such as password strength and expiry, multi factor authentication, etc). Your requirements (if you choose to accept them) are:
You are required to provide SSO to these users using their home AD tenant and policies
The solution does not include SAML based federation between directories (yours and theirs)
The solution does not require any changes on the external AD tenant (no new AAD applications, client secrets, etc)
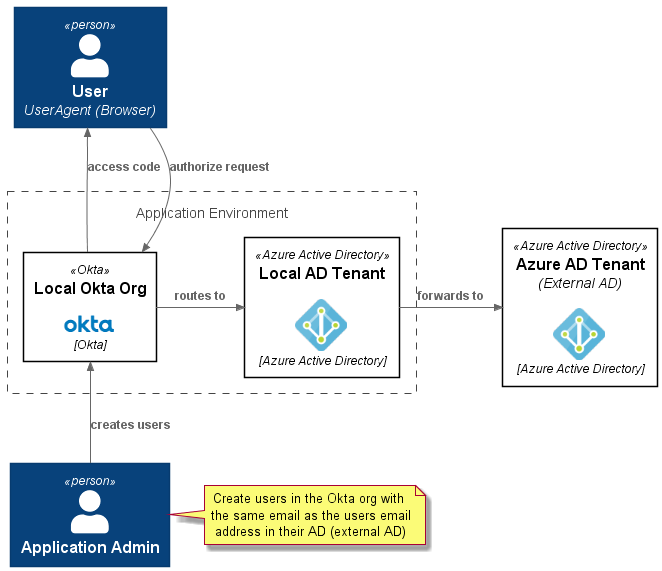
Using an IDAM/IDaaS platform (such as Okta in this case), along with an AAD application (in your AD tenant in your Azure subscription), you can create a local AD app using this magic property to accomplish all of the above requirements (requiring zero changes on the third-party AD).
This is what it looks like using the az cli:
the --available-to-other-tenants property is Microsoft's way of allowing you to implicitly trust other AAD/Office 365 tenants, meaning the authentication request is passed to the target AD tenant from your application.
Here is a context diagram which explains the interactions in the context of a Jamstack application (using a library such as Auth.js).
Overview
PlantUML
@startuml

!define C4Puml https://raw.githubusercontent.com/RicardoNiepel/C4-PlantUML/master
!includeurl C4Puml/C4_Context.puml
!includeurl C4Puml/C4_Component.puml
!includeurl C4Puml/C4_Container.puml

'left to right direction

!define Rel_NoRank(e_from,e_to, e_label=" ") Rel_(e_from,e_to, e_label, "-[norank]->")

!$imgroot = "https://github.com/avensolutions/plantuml-cloud-image-library/raw/main/images"

!unquoted procedure $AzureActiveDirectory($alias, $label, $techn, $descr="", $stereo="Azure Active Directory")
    rectangle "==$label\n\n<img:$imgroot/azure/AzureActiveDirectory.png{scale=0.75}>\n//<size:12>[$techn]</size>//" <<$stereo>> as $alias #white
!endprocedure

!unquoted procedure $Okta($alias, $label, $techn, $descr="", $stereo="Okta")
    rectangle "==$label\n\n<img:$imgroot/okta/okta.png{scale=1}>\n//<size:12>[$techn]</size>//" <<$stereo>> as $alias #white
!endprocedure

Person(user, User\n<i>UserAgent (Browser) )
Person(admin, Application Admin)
note right
Create users in the Okta org with the same email as the users email address in their AD (external AD)
end note
rectangle "Application Environment" <<boundary>> as app{
    $AzureActiveDirectory(localad, Local AD Tenant, Azure Active Directory)
    $Okta(okta, Local Okta Org, Okta)
}
$AzureActiveDirectory(otherad, Azure AD Tenant\n<i>(External AD), Azure Active Directory)

Lay_D(user, okta)
Lay_R(okta, localad)
Lay_R(localad, otherad)
Lay_D(okta, admin)

Rel_U(okta, user, access code)
Rel_D(user, okta, authorize request)
Rel_R(okta, localad, routes to)
Rel_R(localad, otherad, forwards to)
Rel_U(admin, okta, creates users)

@enduml
The following flowchart explains the steps involved in setting this up. The highlighted nodes are part of normal application lifecycle operations as users get created and deactivated.
The Azure Static Web App feature is relatively new in the Azure estate which has recently become generally available, I thought I would take it for a test drive and discuss my findings.
I am a proponent of the JAMStack architecture for front end applications and a user of CD enabled CDN services like Netlify, so this Azure feature was naturally appealing to me.
Azure SWAs allow you to serve static assets (like JavaScript) without a origin server, meaning you don’t need a web server, are able to streamline content distribution and web app performance, and reduce the attack surface area of your application.
The major advantage to using is simplicity, no scaffolding or infra requirements and it is seamlessly integrated into your CI/CD processes (natively if you are using GitHub).
Pretty simple to setup, aside from a name and a resource group, you just need to supply:
a location (Azure region to be used for serverless back end APIs via Azure Function Apps) note that this is not a location where the static web is necessarily running
a GitHub or GitLab repo URL
the branch you wish to use to trigger production deployments (e.g. main)
a path to your code within your app (e.g. where your package.json file is located)
an output folder (e.g. dist) this should not exist in your repo
a project or personal access token for your GitHub account (alternatively you can perform an interactive OAuth2.0 consent if using the portal)
Using the consent provided (either using the OAuth flow or by providing a token), Azure Static Web Apps will automagically create the GitHub Actions workflow to deploy your application on a push or merge event to your repo. This includes providing scoped API credentials to Azure to allow access to the Static Web App resource using secrets in GitHub (which are created automagically as well). An example workflow is shown here:
Similar to the functionality in analogous services like Netlify, you can configure preview releases of your application to be deployed from specified branches on pull request events.
Routes (for SPAs) need to be provided to Azure by using a file named staticwebapp.config.json located in the application root of your repo (same level as you package.json file). You can also specify response codes and whether the rout requires authentication as shown here:
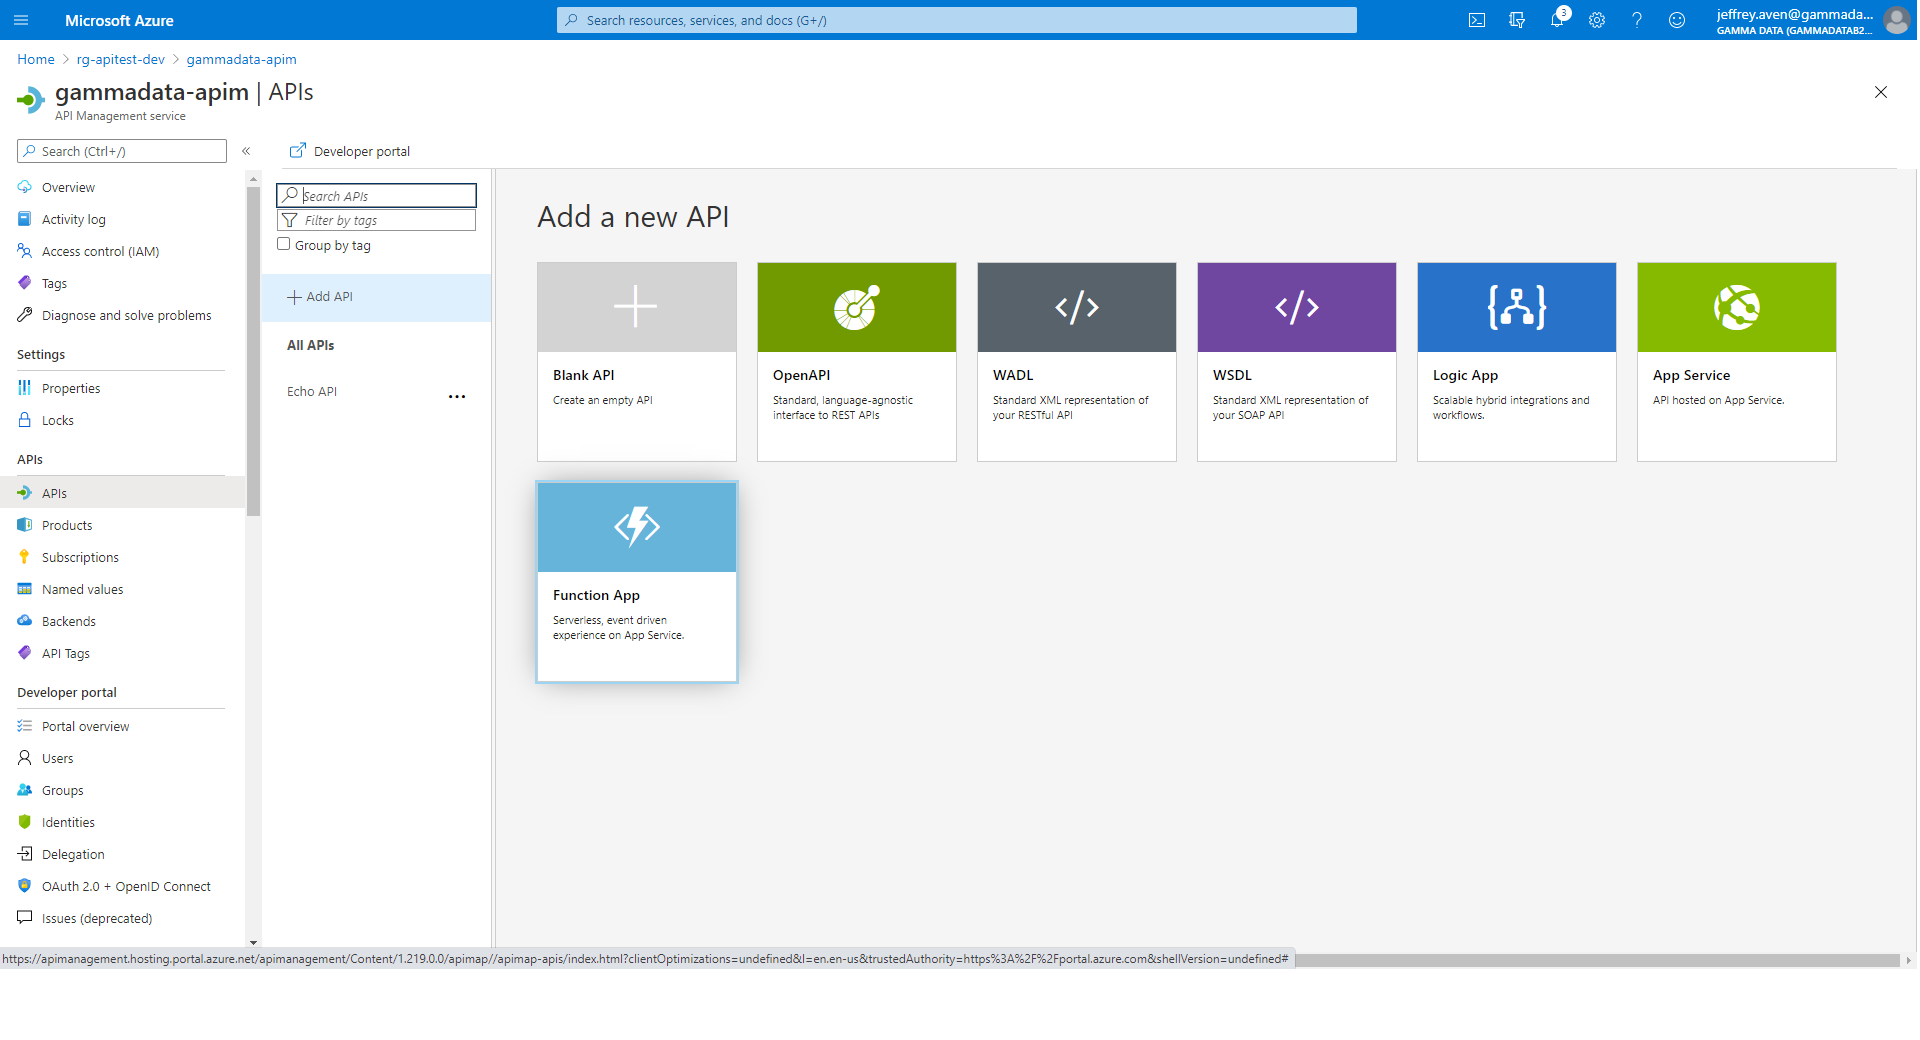
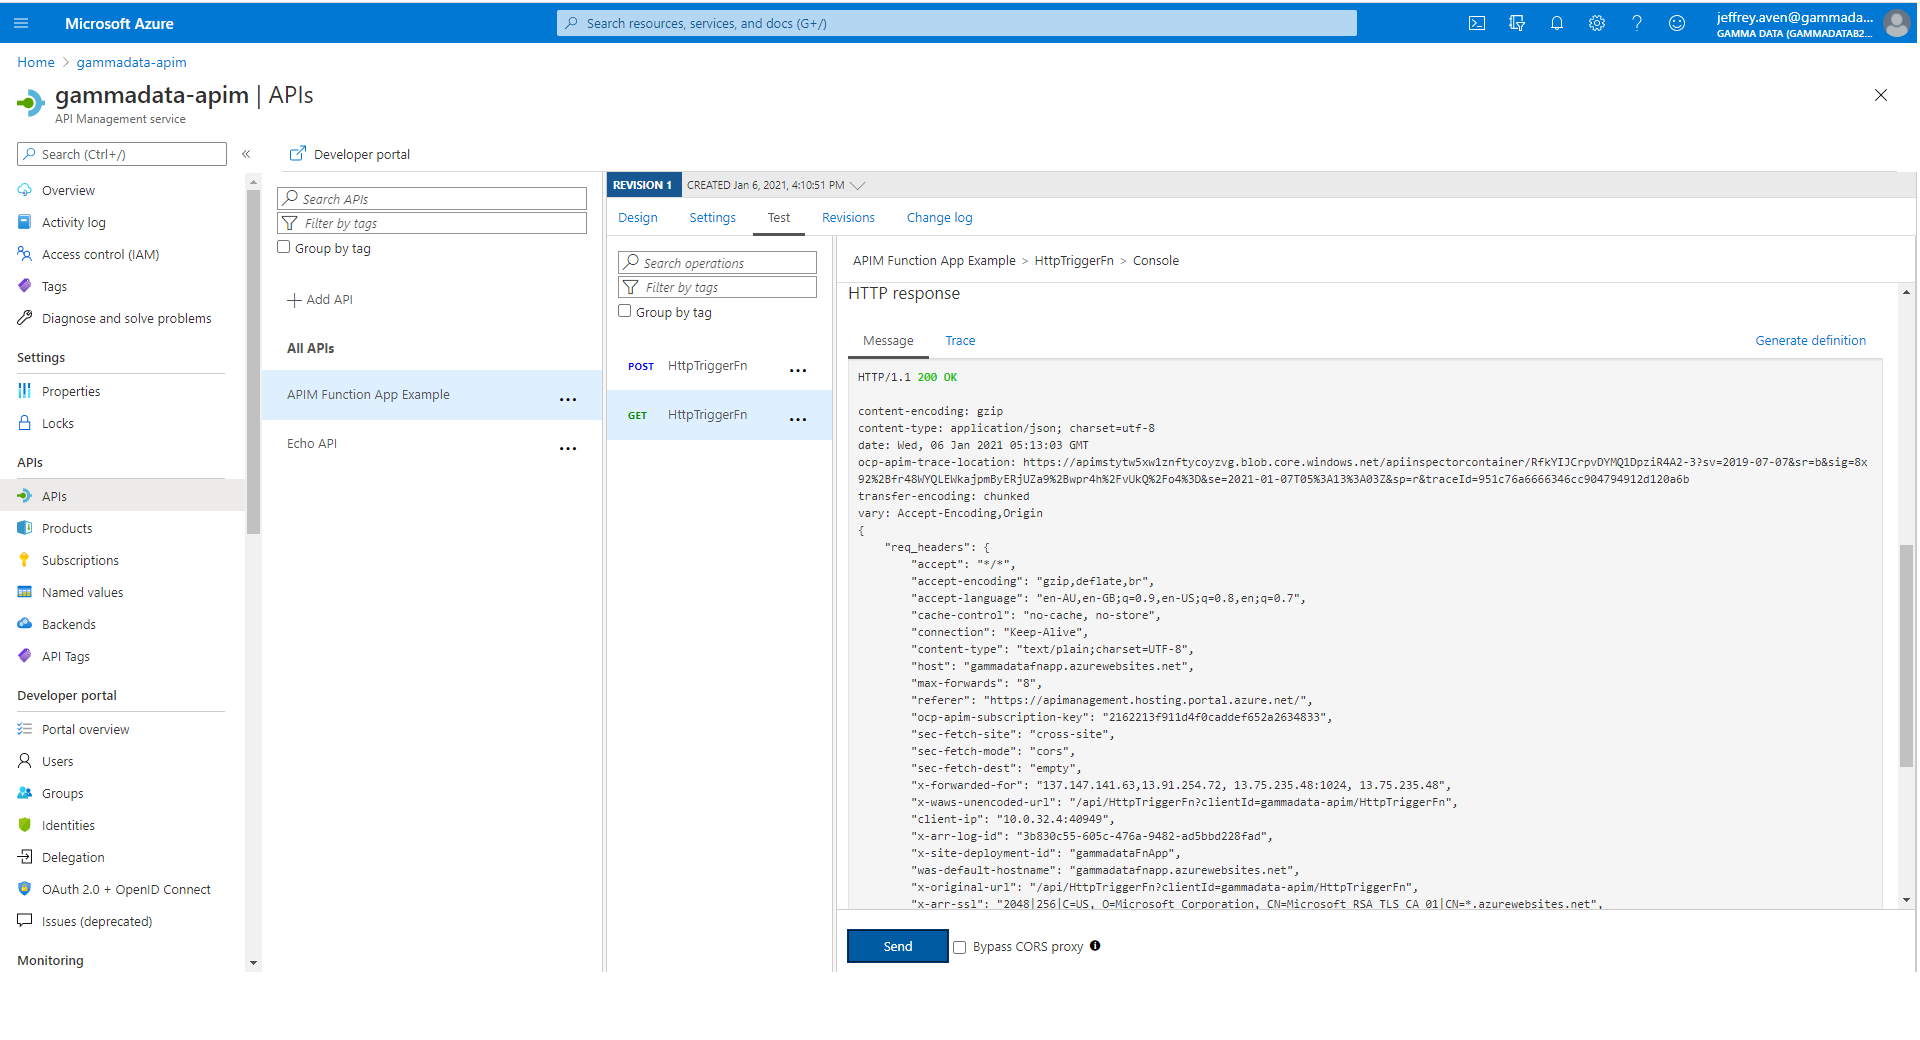
Function Apps, Logic Apps and App Services can be used to expose APIs within Azure API Management which is an easy way to deploy serverless microservices. You can see this capability in the Azure portal below within API Management:
Like most readers, I like to script everything, so I was initially frustrated when I couldn’t replicate this operation in the Azure cli, REST, PowerShell, or any of the other SDKs or IaC tools. Others shared my frustration as seen here.
I was nearly resigned to using click ops in the portal (arrrgh) before I worked out this workaround.
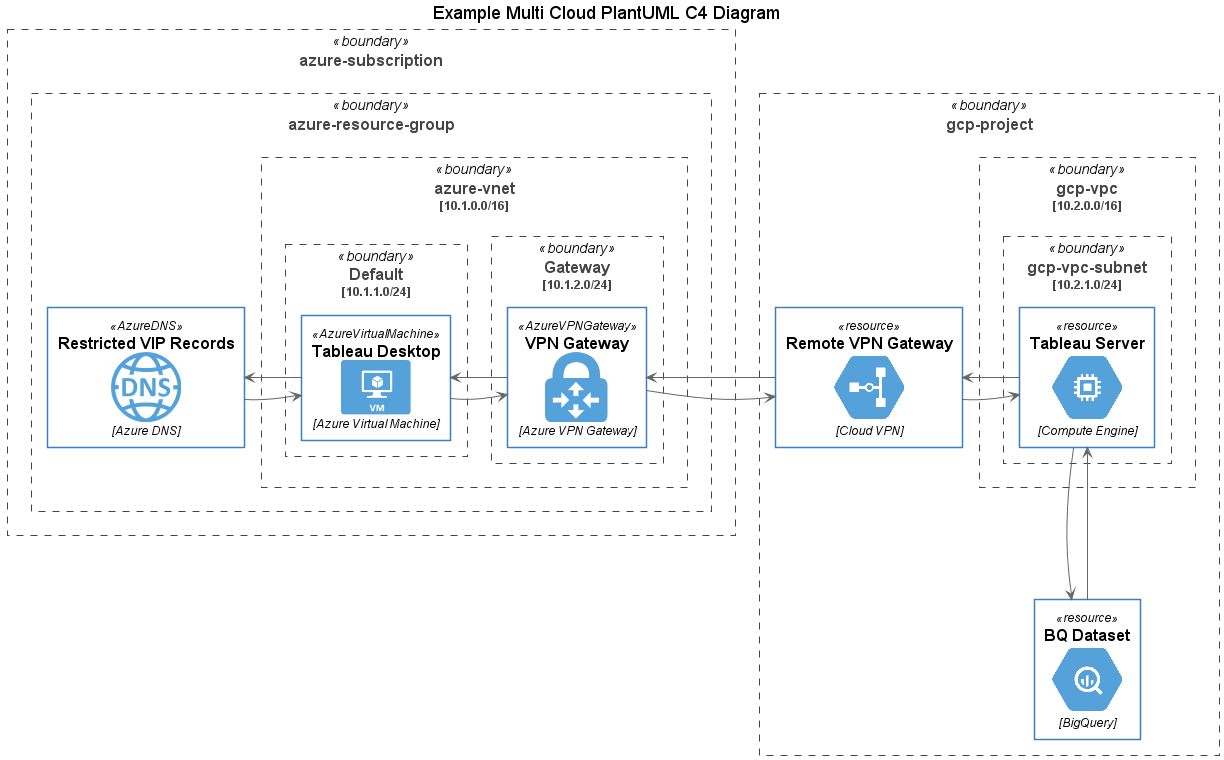
Following on from the recent post GCP Templates for C4 Diagrams using PlantUML, cloud architects are often challenged with producing diagrams for architectures spanning multiple cloud providers, particularly as you elevate to enterprise level diagrams.
In this post, with the magic of !includeurl we have brought PlantUML template libraries together for AWS, Azure and GCP icon sets, allowing us to produce multi cloud C4 diagrams using PlantUML like this one:
Creating a multi cloud diagram is simple, start by adding the following include statements after the @startuml label in a new PlantUML C4 diagram:
Then add references to the required services from different providers…
Then include the predefined resources from your different cloud providers in your diagram as shown here (describing a client server application over a cloud to cloud VPN between Azure and GCP)...
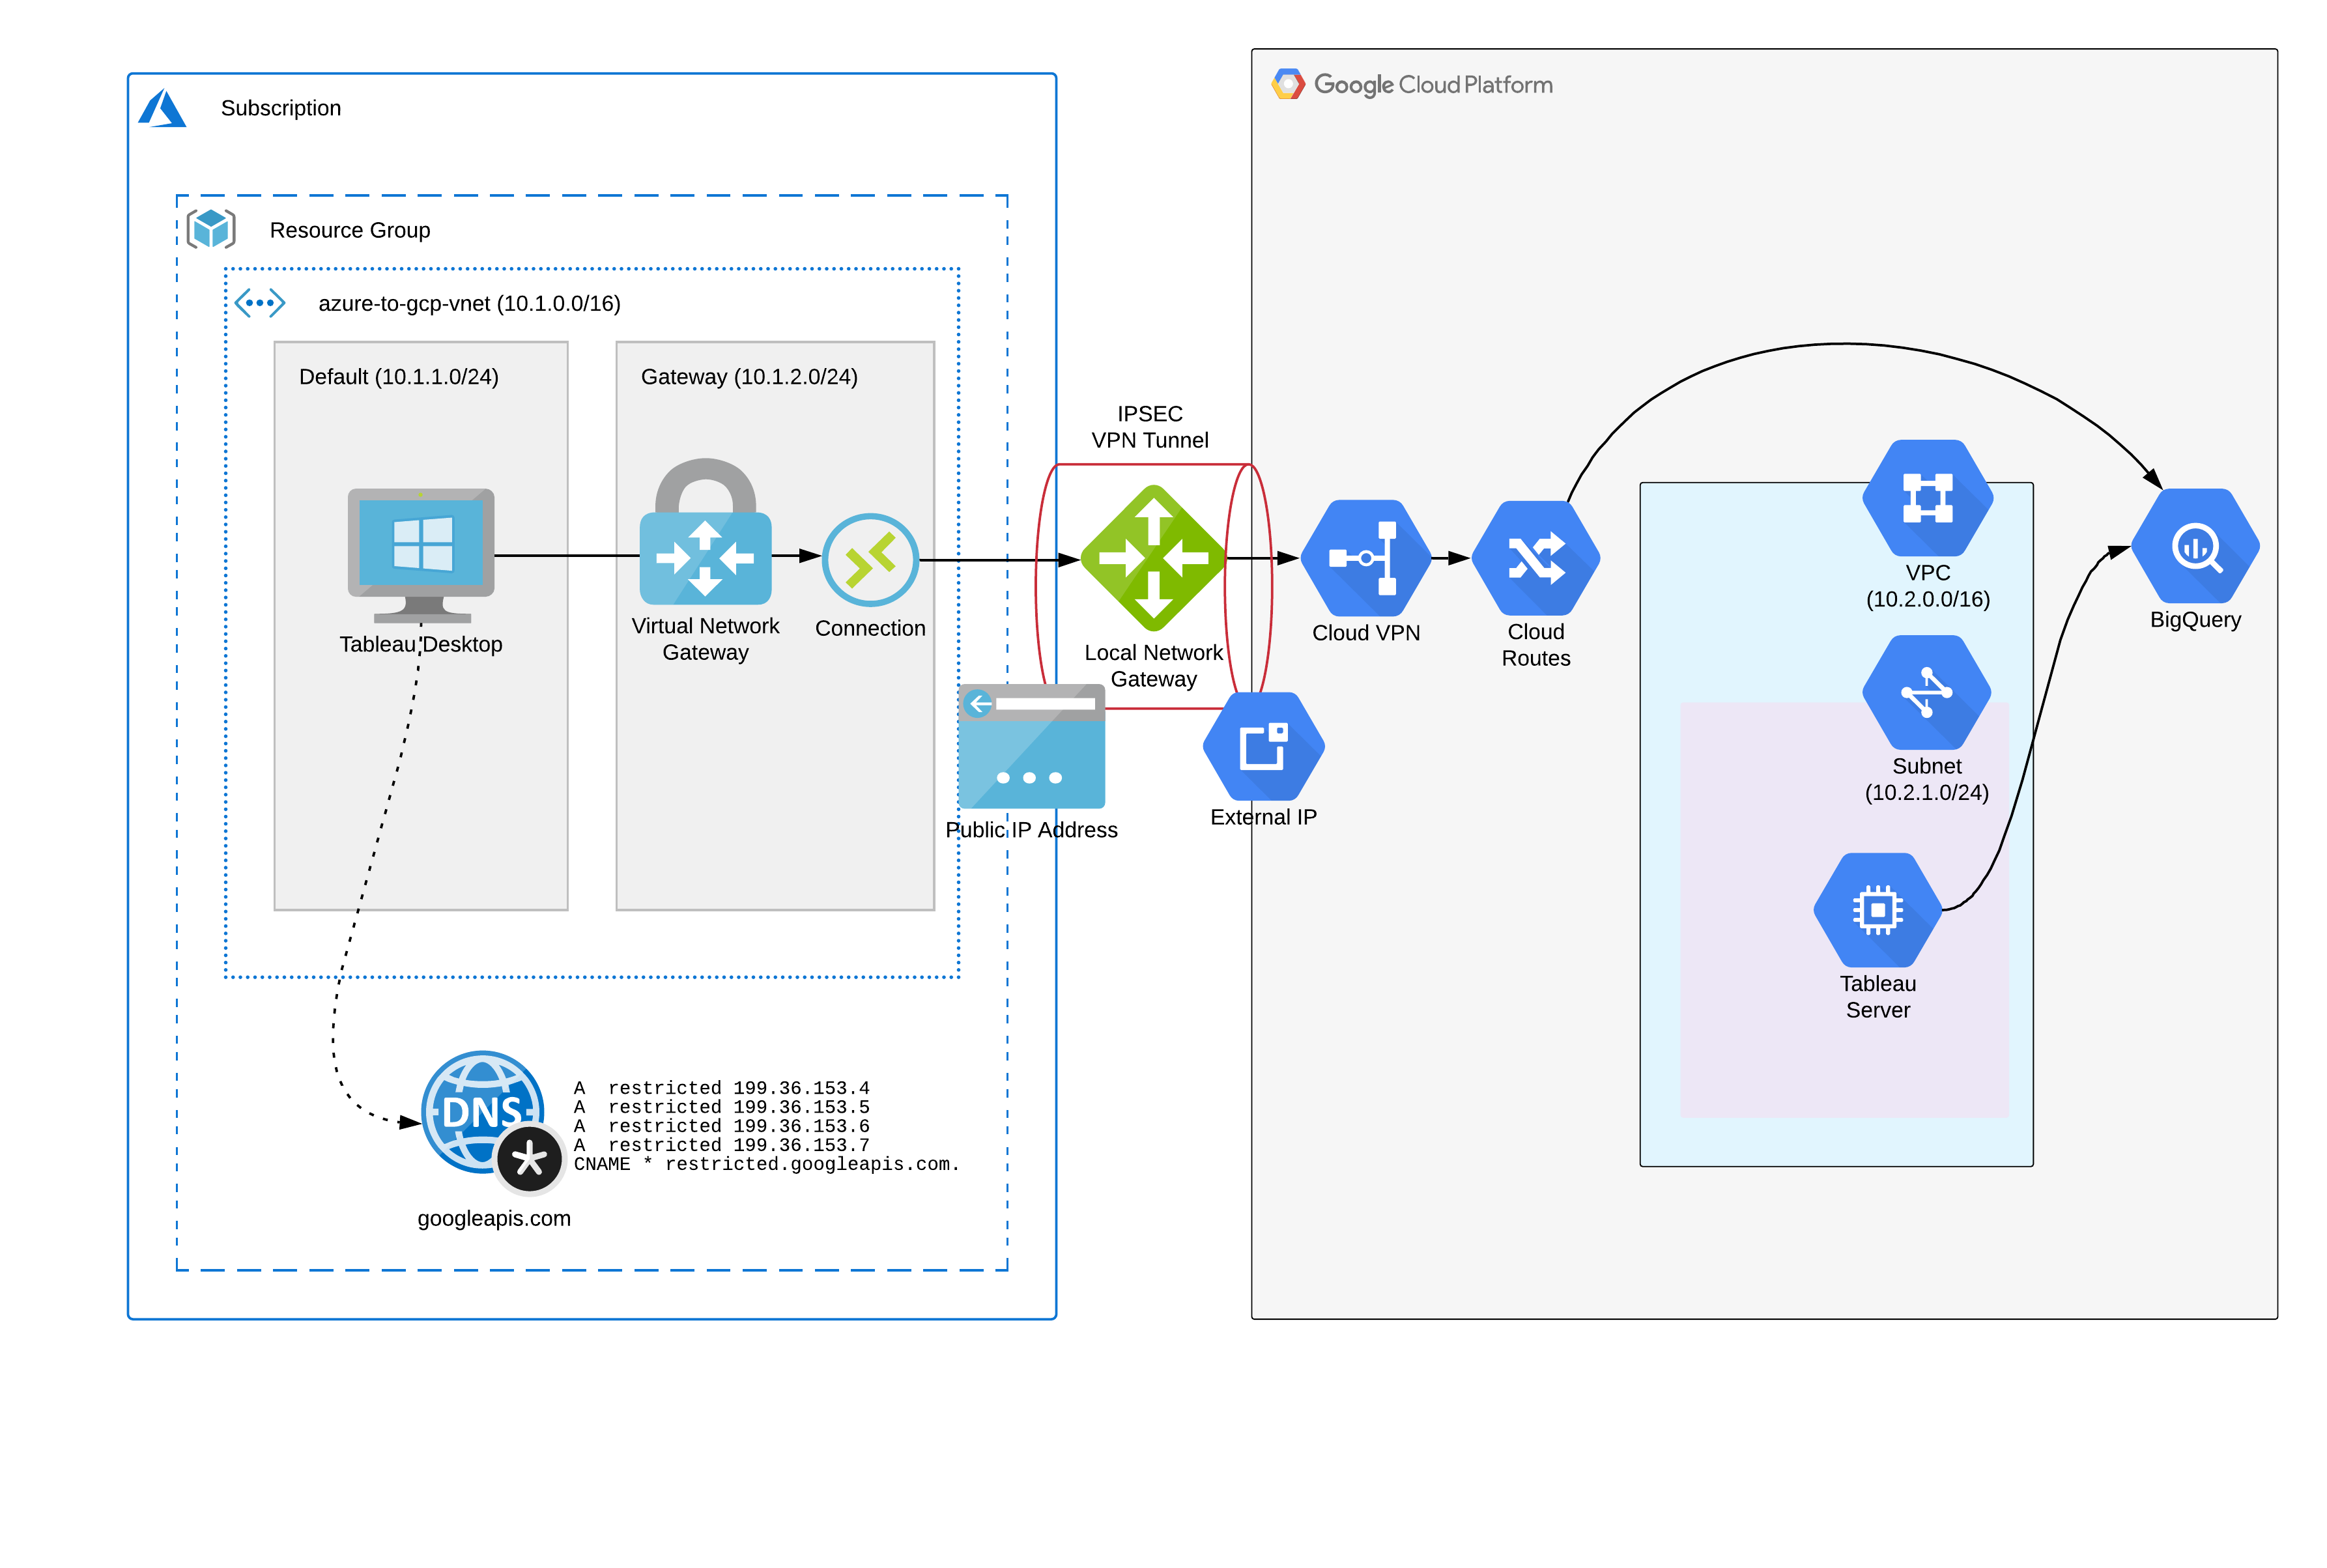
This article demonstrates creating a site to site IPSEC VPN connection between a GCP VPC network and an Azure Virtual Network, enabling private RFC1918 network connectivity between virtual networks in both clouds. This is done using a single PowerShell script leveraging Azure PowerShell and gcloud commands in the Google SDK.
Additionally, we will use Azure Private DNS to enable private access between Azure hosts and GCP APIs (such as Cloud Storage or Big Query).
An overview of the solution is provided here:
One note before starting - site to site VPN connections between GCP and Azure currently do not support dynamic routing using BGP, however creating some simple routes on either end of the connection will be enough to get going.
Step 3 : Create a Virtual Network with Subnets and Routes (Azure)
An Azure Virtual Network is the equivalent of a VPC network in GCP (or AWS), you must define subnets before creating a Virtual Network. In this example we will create two subnets, one Gateway subnet (which needs to be named accordingly) where the VPN gateway will reside, and one subnet named ‘default’ where we will host VMs which will connect to GCP services over the private VPN connection.
Before defining the default subnet we must create and attach a Route Table (equivalent of a Route in GCP), this particular route will be used to route ‘private’ requests to services in GCP (such as Big Query).
Network Security Groups in Azure are stateful firewalls much like Firewall Rules in VPC networks in GCP. Like GCP, the lower priority overrides higher priority rules.
In the example we will create several rules to allow inbound ICMP, TCP and UDP traffic from our Google VPC and RDP traffic from the Internet (which we will use to logon to a VM in Azure to test private connectivity between the two clouds):
The Virtual Network Gateway in Azure is the VPN Gateway equivalent in Azure which will be used to create a VPN tunnel between Azure and a GCP VPN Gateway. This gateway will be placed in the Gateway subnet created previously and one of the Public IP addresses created in the previous step will be assigned to this gateway.
# create virtual network gateway
$ngwipconfig = New-AzVirtualNetworkGatewayIpConfig `
  -Name "ngw-ipconfig" `
  -SubnetId $gatewaySubnet.Id `
  -PublicIpAddressId $ngwpip.Id

# use the AsJob switch as this is a long running process
$job = New-AzVirtualNetworkGateway -Name "vnet-gateway" `
  -ResourceGroupName "azure-to-gcp" `
  -Location "Australia Southeast" `
  -IpConfigurations $ngwipconfig `
  -GatewayType "Vpn" `
  -VpnType "RouteBased" `
  -GatewaySku "VpnGw1" `
  -VpnGatewayGeneration "Generation1" `
  -AsJob

$vnetgw = Get-AzVirtualNetworkGateway `
  -Name "vnet-gateway" `
  -ResourceGroupName "azure-to-gcp"
Step 7 : Create a VPC Network and Subnetwork(s) (GCP)
A VPC network and subnet need to be created in GCP, the subnet defines the VPC address space. This address space must not overlap with the Azure Virtual Network CIDR. For all GCP steps it is assumed that the project is set for client config (e.g. gcloud config set project your_project) so it does not need to be specified for each operation. Private Google access should be enabled on all subnets created.
VPC firewall rules will need to be created in GCP to allow VPN traffic as well as SSH traffic from the internet (which allows you to SSH into VM instances using Cloud Shell).
Now we will create the GCP side of our VPN tunnel using the Public IP Address of the Azure Virtual Network Gateway created in a previous step. As this example uses a route based VPN the traffic selector values need to be set at 0.0.0.0/0. A PSK (Pre Shared Key) needs to be supplied which will be the same key used when we configure a VPN Connection on the Azure side of the tunnel.
As we are using static routing (as opposed to dynamic routing) we will need to define all of the specific routes on the GCP side. We will need to setup routes for both outgoing traffic to the Azure network as well as incoming traffic for the restricted Google API range (199.36.153.4/30).
Now we can setup the Azure side of the VPN Connection which is accomplished by associating the Azure Virtual Network Gateway with the Local Network Gateway. A PSK (Pre Shared Key) needs to be supplied which is the same key used for the GCP VPN Tunnel in step 10.
At this stage we have created an end to end connection between the virtual networks in both clouds. You should see this reflected in the respective consoles in each provider.
GCP VPN Tunnel to a Azure Virtual NetworkAzure VPN Connection to a GCP VPC Network
Congratulations! You have just setup a multi cloud environment using private networking. Now let’s setup Google Private Access for Azure hosts and create VMs on each side to test our setup.
Step 14 : Create a Private DNS Zone for googleapis.com (Azure)
We will now need to create a Private DNS zone in Azure for the googleapis.com domain which will host records to redirect Google API requests to the Restricted API range.
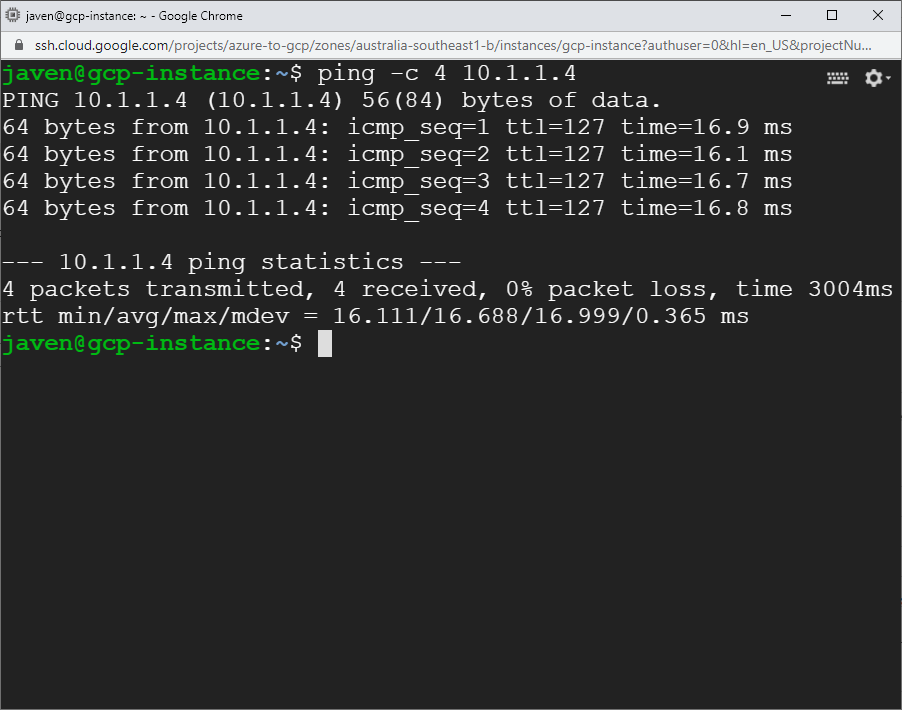
Now that we have established bi-directional connectivity between the two clouds, we can test private access to Google APIs from our Azure host. Follow the steps below to test private access:
Perform an nslookup to ensure that calls to googleapis.com resolve to the restricted API range (e.g. nslookup storage.googleapis.com). You should see a response showing the A records from the googleapis.com Private DNS Zone created in step 14.
Now test connectivity to Google APIs, for example to test access to Google Cloud Storage using gsutil, or test access to Big Query using the bq command
Congratulations! You are now a multi cloud ninja!
if you have enjoyed this post, please consider buying me a coffee ☕ to help me keep writing!