
7 posts tagged with "spark"

View All Tags

· 7 min read
Jeffrey Aven

Loading Parquet format files into BigQuery is straightforward, you just need to specify the file location (local, Google Cloud Storage, Drive, Amazon S3 or Azure Blob storage) and thats pretty much it, BigQuery works the rest out from there.

bq load \
--location=australia-southeast2 \
--project_id=parquet-demo \
--source_format=PARQUET \
parquet_test.dim_calendar \
.\Calendar.gzip

In Snowflake, however, it is not as simple, I'll share my approach to automating this here.

info

Parquet is a self-describing, column-oriented storage format commonly used in distributed systems for input and output. Data in Parquet files is serialised for optimised consumption from Parquet client libraries and packages such as pandas, pyarrow, fastparquet, dask, and pyspark.

Background

Data in a Parquet file is stored in a single column for a self-contained dataset. If you were to ingest this into Snowflake without knowing the schema you could do something like this...

CREATE OR REPLACE TABLE PARQUET_TEST.PUBLIC.DIM_CALENDAR (
Data variant
);

COPY INTO PARQUET_TEST.PUBLIC.DIM_CALENDAR
(
Data
) FROM (
SELECT
*
FROM
@PARQUET_TEST.PUBLIC.DIM_CALENDAR_STAGE)
file_format = (TYPE = parquet);

You would end up with something like...

RowData
1{"CalMonthOfYearNo": 6, "CalYear": 2020, ... }
2{"CalMonthOfYearNo": 6, "CalYear": 2020, ... }
......

You could then have a second stage of processing to convert this into a normal relational structure.

Or you could do this in one step, with a little prep work ahead of time. In my scenario I was given several parquet files from a client for a one-off load into Snowflake, several files for a fact table and multiple single files representing different dimension tables.

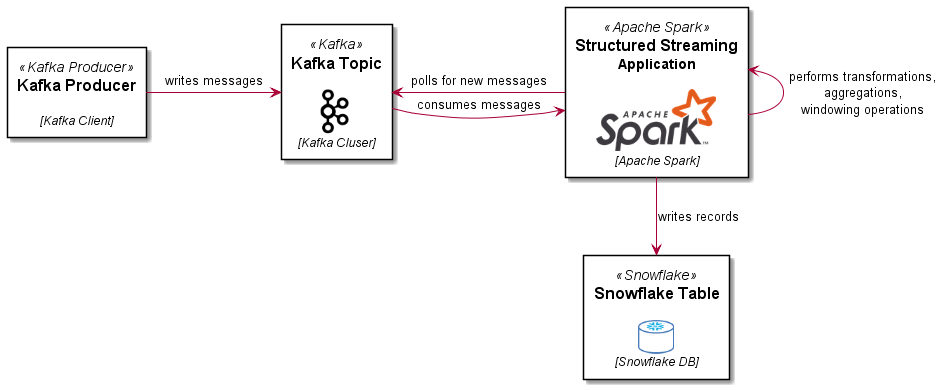
Streamlined Ingestion for Parquet Files into Snowflake

To collapse the formatting and uploading of Parquet files into a materialized table into one step, we need to do a couple of things:

  1. Create the target table with the correct schema (column names and data types); and
  2. perform a projection in our COPY command from the single column containing all of the data (represented by $1 in Snowflake) into columns defined in step 1

Since this is technically a transformation and only named stages are supported for COPY transformations, we need to create a stage for the copy. In my case there is a pre-existing Storage Integration in place that can be used by the stage.

Generate Table DDL

To automate the generation of the DDL to create the table and stage and the COPY command, I used Python and Spark (which has first class support for Parquet files). Parquet datatypes are largely the same as Snowflake, but if we needed to, we could create a map and modify the target types during the DDL generation.

First copy specimen Parquet formatted files to a local directory, the script we are creating can then iterate through the parquet files and generate all of the commands we will need saved to a .sql file.

With some setup information provided (not shown for brevity), we will first go through each file in the directory, capture metadata along with the schema (column name and data type) as shown here:

for file in files:
tableMap = {}
table = file.stem
spark = launch_spark_session()
parquetFile = spark.read.parquet("%s/%s" %(BASE_DIR, file))
data_types = parquetFile.dtypes
stop_spark_session(spark)
tableMap['name'] = table
tableMap['file'] = file
tableMap['data_types'] = data_types
allTables.append(tableMap)

The allTables list looks something like this...

[{'name': 'Calendar', 'file': PosixPath('data/dim/Calendar.gzip'), 'data_types': [('Time_ID', 'bigint'), ('CalYear', 'bigint'), ('CalMonthOfYearNo', 'bigint'), ('FinYear', 'bigint'), ('FinWeekOfYearNo', 'bigint')]}, ... ]

Next we generate the CREATE TABLE statement using the allTables list:

# create output file for all sql
with open('all_tables.sql', 'w') as f:
for table in allTables:
print("processing %s..." % table['name'])
f.write("/*** Create %s Table***/" % table['name'].upper())
sql = """
CREATE OR REPLACE TABLE %s.%s.%s (
""" % (database, schema, table['name'].upper())
for column in table['data_types']:
sql += " %s %s,\n" % (column[0], column[1])
sql = sql[:-2] + "\n);"
f.write(sql)
f.write("\n\n")

Generate Named Stage DDL

Then we generate the stage in S3 from which the files will be loaded:

        f.write("/*** Create %s Stage***/" % table['name'].upper())
sql = """
CREATE OR REPLACE STAGE %s.%s.%s_STAGE
url='%s/%s'
storage_integration = %s
encryption=(type='AWS_SSE_KMS' kms_key_id = '%s');
""" % (database, schema, table['name'].upper(), s3_prefix, table['file'], storage_int, kms_key_id)
f.write(sql)
f.write("\n\n")

Generate COPY commands

Then we generate the COPY commands...

        f.write("/*** Copying Data into %s ***/" % table['name'].upper())
sql = """
COPY INTO %s.%s.%s
(\n""" % (database, schema, table['name'].upper())
for column in table['data_types']:
sql += " %s,\n" % column[0]
sql = sql[:-2] + "\n)"
sql += " FROM (\nSELECT\n"
for column in table['data_types']:
sql += " $1:%s::%s,\n" % (column[0], column[1])
sql = sql[:-2] + "\nFROM\n"
sql += "@%s.%s.%s_STAGE)\n" % (database, schema, table['name'].upper())
sql += " file_format = (TYPE = parquet);"
f.write(sql)
f.write("\n\n")

Since this is a one off load, we will go ahead and drop the stage we created as it is no longer needed (this step is optional)..

        f.write("/*** Dropping stage for %s ***/" % table['name'].upper())
sql = """
DROP STAGE %s.%s.%s_STAGE;
""" % (database, schema, table['name'].upper())
f.write(sql)
f.write("\n\n")

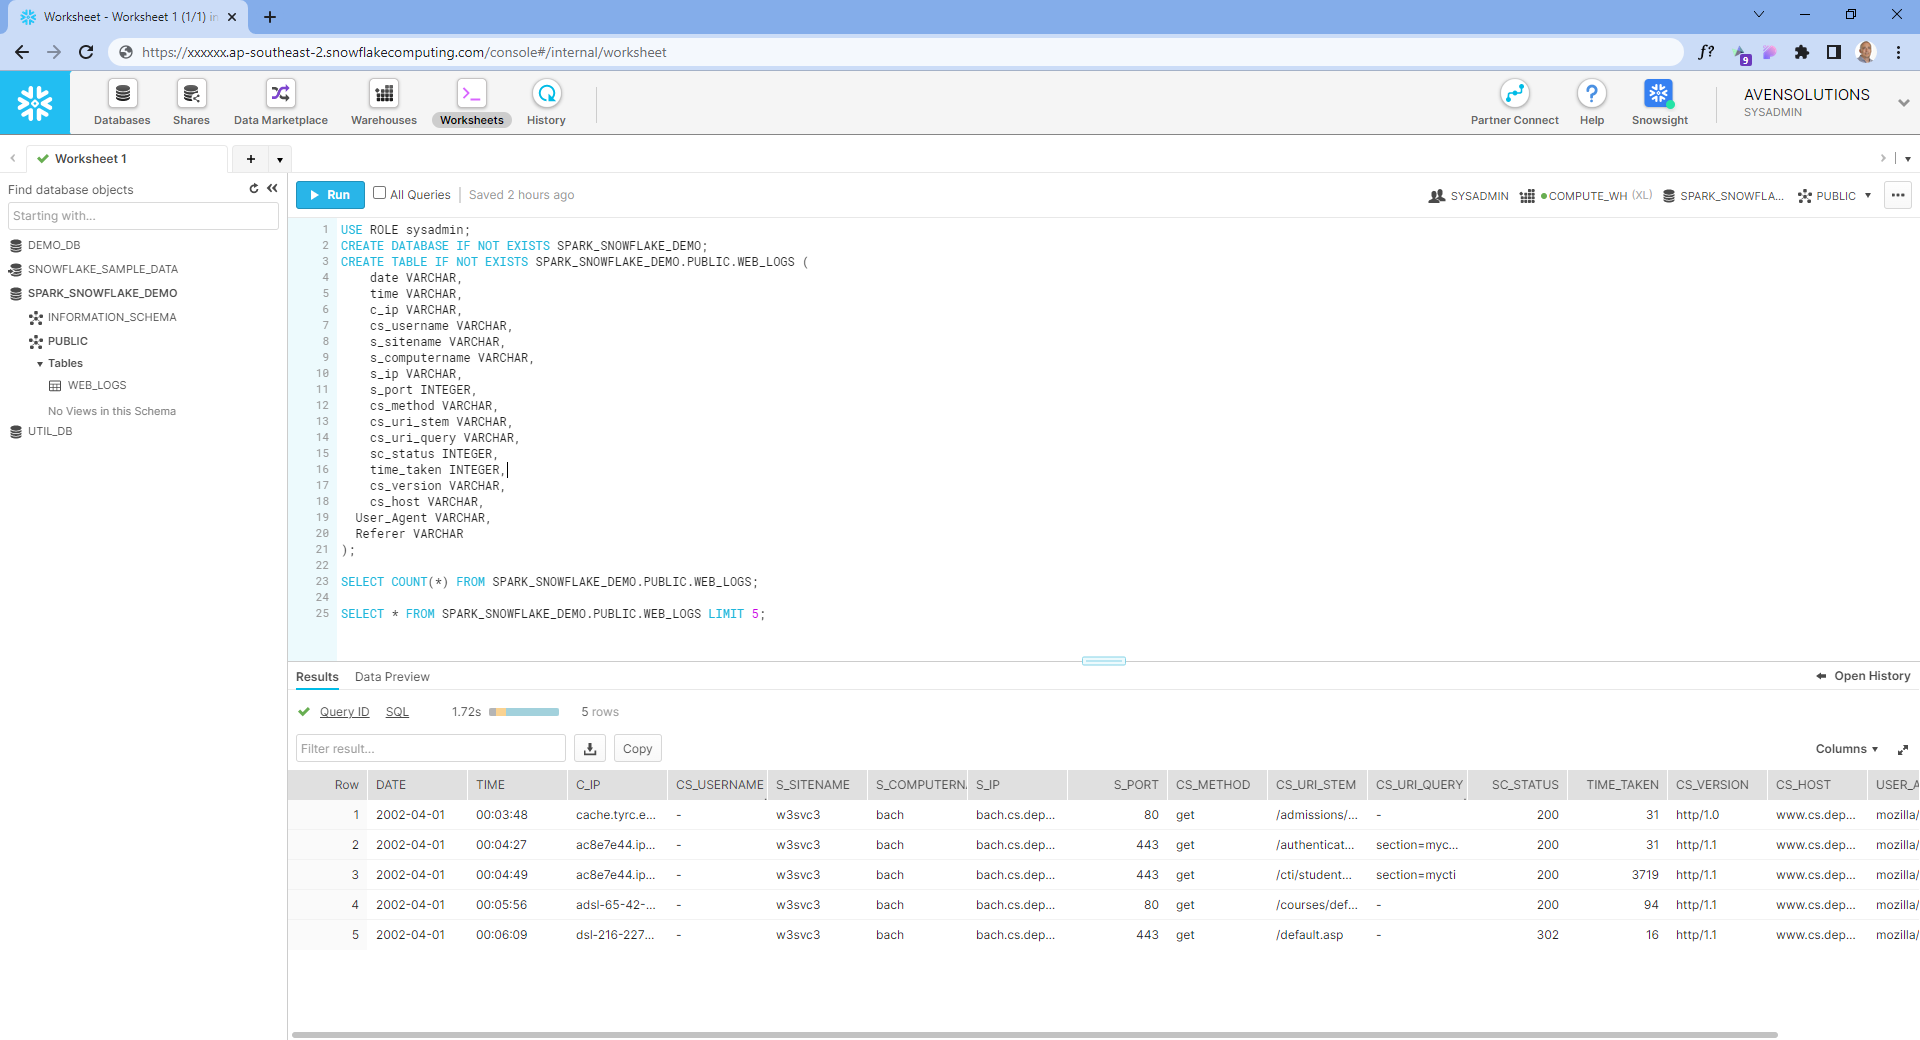
The resultant file created looks like this..

/*** Create CALENDAR Table***/
CREATE OR REPLACE TABLE PARQUET_TEST.PUBLIC.DIM_CALENDAR (
Time_ID bigint,
CalYear bigint,
CalMonthOfYearNo bigint,
FinYear bigint,
FinWeekOfYearNo bigint
);

/*** Create DIM_CALENDAR Stage***/
CREATE OR REPLACE STAGE PARQUET_TEST.PUBLIC.DIM_CALENDAR_STAGE
url='s3://my-bucket/data/dim/Calendar.gzip'
storage_integration = my_storage_int
encryption=(type='AWS_SSE_KMS' kms_key_id = '4f715ec9-ee8e-44ab-b35d-8daf36c05f19');

/*** Copying Data into DIM_CALENDAR ***/
COPY INTO PARQUET_TEST.PUBLIC.DIM_CALENDAR
(
Time_ID,
CalYear,
CalMonthOfYearNo,
FinYear,
FinWeekOfYearNo
) FROM (
SELECT
$1:Time_ID::bigint,
$1:CalYear::bigint,
$1:CalMonthOfYearNo::bigint,
$1:FinYear::bigint,
$1:FinWeekOfYearNo::bigint
FROM
@PARQUET_TEST.PUBLIC.DIM_CALENDAR_STAGE)
file_format = (TYPE = parquet);

/*** Dropping stage for DIM_CALENDAR ***/
DROP STAGE PARQUET_TEST.PUBLIC.DIM_CALENDAR_STAGE;
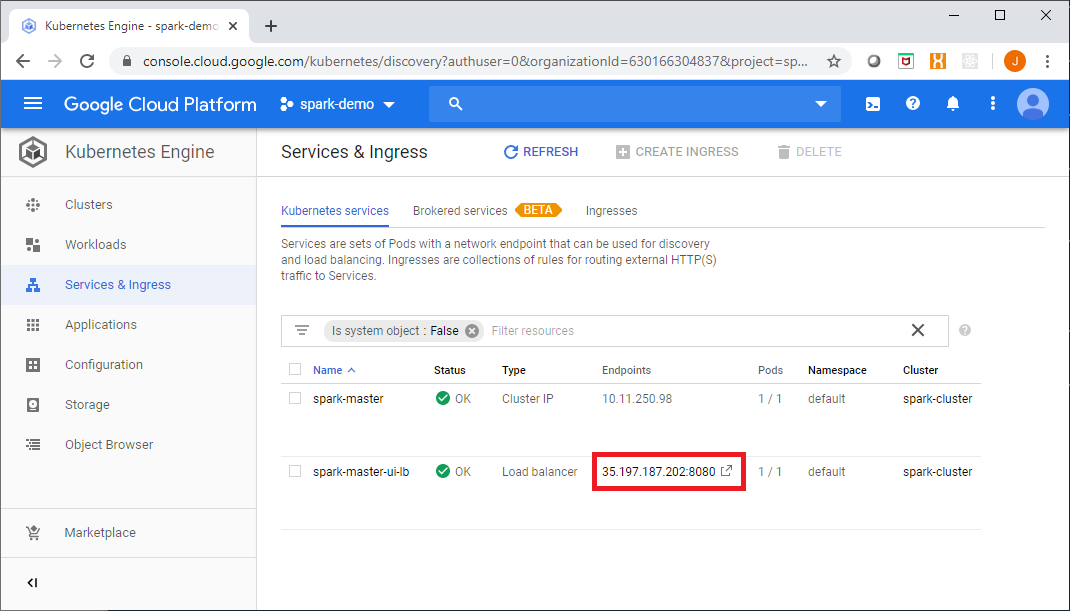
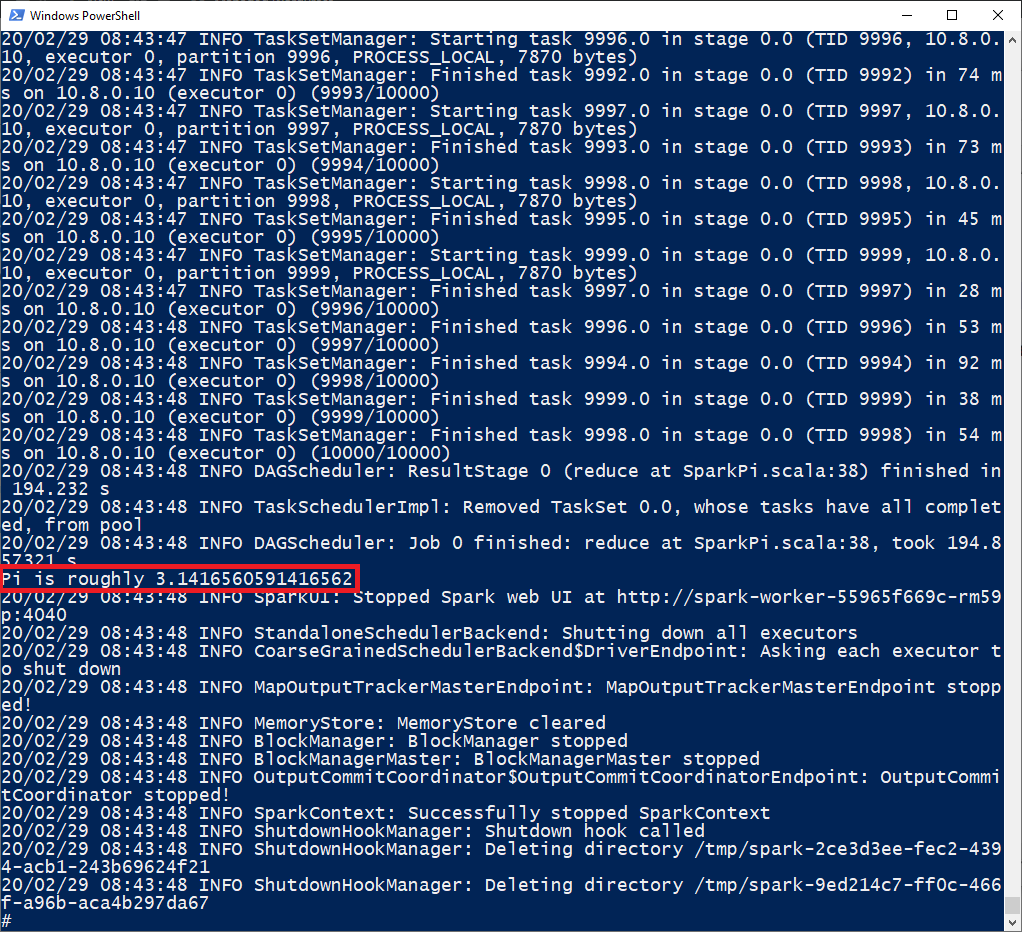
Load your data

You can then run this along with all of the other dimension and fact table DDL and COPY commands generated to perform the one-off load from parquet files. You can find the complete code below, enjoy!

Complete Code
from pathlib import Path
from pyspark.sql import SparkSession
def launch_spark_session():
return SparkSession \
.builder \
.appName("Parquet DDL Generation") \
.getOrCreate()

def stop_spark_session(spark):
spark.stop()

allTables = []
database = "PARQUET_TEST"
schema = "PUBLIC"
s3_prefix = 's3://my-bucket'
storage_int = 'my_storage_int'
kms_key_id = '4f715ec9-ee8e-44ab-b35d-8daf36c05f19'

BASE_DIR = Path(__file__).resolve().parent
directory = 'data/dim'
files = Path(directory).glob('*.gzip')
for file in files:
tableMap = {}
table = file.stem
spark = launch_spark_session()
parquetFile = spark.read.parquet("%s/%s" %(BASE_DIR, file))
data_types = parquetFile.dtypes
stop_spark_session(spark)
tableMap['name'] = table
tableMap['file'] = file
tableMap['data_types'] = data_types
allTables.append(tableMap)

# create output file for all sql
with open('all_tables.sql', 'w') as f:
for table in allTables:
print("processing %s..." % table['name'])
f.write("/*** Create %s Table***/" % table['name'].upper())
sql = """
CREATE OR REPLACE TABLE %s.%s.%s (
""" % (database, schema, table['name'].upper())
for column in table['data_types']:
sql += " %s %s,\n" % (column[0], column[1])
sql = sql[:-2] + "\n);"
f.write(sql)
f.write("\n\n")

f.write("/*** Create %s Stage***/" % table['name'].upper())
sql = """
CREATE OR REPLACE STAGE %s.%s.%s_STAGE
url='%s/%s'
storage_integration = %s
encryption=(type='AWS_SSE_KMS' kms_key_id = '%s');
""" % (database, schema, table['name'].upper(), s3_prefix, table['file'], storage_int, kms_key_id)
f.write(sql)
f.write("\n\n")

f.write("/*** Copying Data into %s ***/" % table['name'].upper())
sql = """
COPY INTO %s.%s.%s
(\n""" % (database, schema, table['name'].upper())
for column in table['data_types']:
sql += " %s,\n" % column[0]
sql = sql[:-2] + "\n)"
sql += " FROM (\nSELECT\n"
for column in table['data_types']:
sql += " $1:%s::%s,\n" % (column[0], column[1])
sql = sql[:-2] + "\nFROM\n"
sql += "@%s.%s.%s_STAGE)\n" % (database, schema, table['name'].upper())
sql += " file_format = (TYPE = parquet);"
f.write(sql)
f.write("\n\n")

f.write("/*** Dropping stage for %s ***/" % table['name'].upper())
sql = """
DROP STAGE %s.%s.%s_STAGE;
""" % (database, schema, table['name'].upper())
f.write(sql)
f.write("\n\n")

if you have enjoyed this post, please consider buying me a coffee ☕ to help me keep writing!

· 4 min read
Jeffrey Aven

Structured Streaming in Spark provides a powerful framework for stream processing an analysis, such as streaming transformations, stateful streaming or sliding window operations.

Kafka is a common streaming source and sink for Spark Streaming and Structured Streaming operations. However, there may be situations where a data warehouse (such as Snowflake) is a more appropriate target for streaming operations, especially where there is a reporting or long-term storage requirement on the data derived from the streaming source.

This article will demonstrate just how easy this is to implement using Python.

Design

The following diagram illustrates the ingestion design for this example:

Spark Structured Streaming using Kafka and Snowflake

Snowflake Setup

Some prerequisites for Snowflake:

  1. You will need to create a user (or use an existing user), in either case the user will need to be identified by a private key. You will need to generate a key pair as follows:
openssl genrsa 2048 | openssl pkcs8 -topk8 -inform PEM -out rsa_key.p8 -nocrypt
openssl rsa -in rsa_key.p8 -pubout -out rsa_key.pub

copy the contents of the rsa_key.pub file, remove the -----BEGIN PUBLIC KEY----- and -----END PUBLIC KEY----- strings, then remove the line breaks to form one string, use this string as the RSA_PUBLIC_KEY in a CREATE USER or ALTER USER statement in Snowflake, like:

ALTER USER youruser SET RSA_PUBLIC_KEY='MIIBI...';
  1. Now setup the target database, schema and table you will use to write out your stream data (the schema for the table must match the schema for the Data Stream you will use the DataStreamWriter to emit records to Snowflake

The user you will be using (that you setup the key pair authentication for) will need to be assigned a default role to which the appropriate write permissions are granted to the target objects in Snowflake. You will also need to designate a virtual warehouse (which your user must have USAGE permissions to.

The Code

Now that we have the objects and user setup in Snowflake, we can construct our Spark application.

First, you will need to start your Spark session (either using pyspark or spark-submit) including the packages that Spark will need to connect to Kafka and to Snowflake.

The Snowflake packages include a JDBC driver and the Snowflake Connector for Spark, see Snowflake Connector for Spark.

An example is shown here (package versions may vary depending upon the version of Spark you are using):

pyspark \
--packages \
net.snowflake:snowflake-jdbc:3.13.14,\
net.snowflake:spark-snowflake_2.12:2.10.0-spark_3.1,\
org.apache.spark:spark-sql-kafka-0-10_2.12:3.2.1

Now that we have a spark session with the necessary packages, lets go...

# import any required functions, set the checkpoint directory, and log level (optional)
from pyspark.sql.functions import split
spark.sparkContext.setLogLevel("ERROR")
spark.conf.set("spark.sql.streaming.checkpointLocation", "file:///tmp")

setup connection options for Snowflake by creating an sfOptions dictionary

sfOptions = {
"sfURL" : sfUrl,
"sfUser" : "avensolutions",
"pem_private_key": private_key,
"sfDatabase" : "SPARK_SNOWFLAKE_DEMO",
"sfSchema" : "PUBLIC",
"sfWarehouse" : "COMPUTE_WH",
"streaming_stage" : "mystage"
}

set a variable for the Snowflake Spark connector

SNOWFLAKE_SOURCE_NAME = "net.snowflake.spark.snowflake"

read messages from Kafka:

lines = spark \
.readStream \
.format("kafka") \
.option("kafka.bootstrap.servers", "kafkabroker:9092") \
.option("subscribe", "weblogs") \
.load()

perform necessary transformations (the fields and data types in the resultant data structure must match the target table you created in Snowflake:

log_recs = lines.select(
split(lines.value.cast("string"), " ").alias("data")
)

log_data = log_recs.selectExpr(
"CAST(data[0] as string) as date",
"CAST(data[1] as string) as time",
"CAST(data[2] as string) as c_ip",
"CAST(data[3] as string) as cs_username",
"CAST(data[4] as string) as s_sitename",
"CAST(data[5] as string) as s_computername",
"CAST(data[6] as string) as s_ip",
"CAST(data[7] as int) as s_port",
"CAST(data[8] as string) as cs_method",
"CAST(data[9] as string) as cs_uri_stem",
"CAST(data[10] as string) as cs_uri_query",
"CAST(data[11] as int) as sc_status",
"CAST(data[12] as int) as time_taken",
"CAST(data[13] as string) as cs_version",
"CAST(data[14] as string) as cs_host",
"CAST(data[15] as string) as User_Agent",
"CAST(data[16] as string) as Referer",
)

write to Snowflake!

query = log_data\
.writeStream\
.format(SNOWFLAKE_SOURCE_NAME) \
.options(**sfOptions) \
.option("dbtable", "WEB_LOGS") \
.trigger(processingTime='30 seconds') \
.start()

query.awaitTermination()
info

Note that I have included the processingTime trigger of 30 seconds (this is akin to the batchInterval in the DStream API), you should tune this to get a balance between batch sizes to ingest into Snowflake (which will benefit from larger batches) and latency.

The Results

Spark Structured Streaming into Snowflake

Enjoy!

if you have enjoyed this post, please consider buying me a coffee ☕ to help me keep writing!

· 6 min read
Jeffrey Aven

Apache Spark in GCP

In the previous post in this series Spark in the Google Cloud Platform Part 1, we started to explore the various ways in which we could deploy Apache Spark applications in GCP. The first option we looked at was deploying Spark using Cloud DataProc, a managed Hadoop cluster with various ecosystem components included.

In this post, we will look at another option for deploying Spark in GCP – a Spark Standalone cluster running on GKE.

Spark Standalone refers to the in-built cluster manager provided with each Spark release. Standalone can be a bit of a misnomer as it sounds like a single instance – which it is not, standalone simply refers to the fact that it is not dependent upon any other projects or components – such as Apache YARN, Mesos, etc.

A Spark Standalone cluster consists of a Master node or instance and one of more Worker nodes. The Master node serves as both a master and a cluster manager in the Spark runtime architecture.

The Master process is responsible for marshalling resource requests on behalf of applications and monitoring cluster resources.

The Worker nodes host one or many Executor instances which are responsible for carrying out tasks.

Deploying a Spark Standalone cluster on GKE is reasonably straightforward. In the example provided in this post we will set up a private network (VPC), create a GKE cluster, and deploy a Spark Master pod and two Spark Worker pods (in a real scenario you would typically have many Worker pods).

Once the network and GKE cluster have been deployed, the first step is to create Docker images for both the Master and Workers.

The Dockerfile below can be used to create an image capable or running either the Worker or Master daemons:

Note the shell scripts included in the Dockerfile: spark-master and spark-worker. These will be used later on by K8S deployments to start the relative Master and Worker daemon processes in each of the pods.

Next, we will use Cloud Build to build an image using the Dockerfile are store this in GCR (Google Container Registry), from the Cloud Build directory in our project we will run:

gcloud builds submit --tag gcr.io/spark-demo-266309/spark-standalone

Next, we will create Kubernetes deployments for our Master and Worker pods.

Firstly, we need to get cluster credentials for our GKE cluster named ‘spark-cluster’:

gcloud container clusters get-credentials spark-cluster --zone australia-southeast1-a --project spark-demo-266309

Now from within the k8s-deployments\deploy folder of our project we will use the kubectl command to deploy the Master pod, service and the Worker pods

Starting with the Master deployment, this will deploy our Spark Standalone image into a container running the Master daemon process:

To deploy the Master, run the following:

kubectl create -f spark-master-deployment.yaml

The Master will expose a web UI on port 8080 and an RPC service on port 7077, we will need to deploy a K8S service for this, the YAML required to do this is shown here:

To deploy the Master service, run the following:

kubectl create -f spark-master-service.yaml

Now that we have a Master pod and service up and running, we need to deploy our Workers which are preconfigured to communicate with the Master service.

The YAML required to deploy the two Worker pods is shown here:

To deploy the Worker pods, run the following:

kubectl create -f spark-worker-deployment.yaml

You can now inspect the Spark processes running on your GKE cluster.

kubectl get deployments

Shows...

NAME           READY   UP-TO-DATE   AVAILABLE   AGE
spark-master 1/1 1 1 7m45s
spark-worker 2/2 2 2 9s
kubectl get pods

Shows...

NAME                            READY   STATUS    RESTARTS   AGE
spark-master-f69d7d9bc-7jgmj 1/1 Running 0 8m
spark-worker-55965f669c-rm59p 1/1 Running 0 24s
spark-worker-55965f669c-wsb2f 1/1 Running 0 24s

Next, as we need to expose the Web UI for the Master process we will create a LoadBalancer resource. The YAML used to do this is provided here:

To deploy the LB, you would run the following:

kubectl create -f spark-ui-lb.yaml

NOTE This is just an example, for simplicity we are creating an external LoadBalancer with a public IP, this configuration is likely not be appropriate in most real scenarios, alternatives would include an internal LoadBalancer, retraction of Authorized Networks, a jump host, SSH tunnelling or IAP.

Now you’re up and running!

You can access the Master web UI from the Google Console link shown here:

Accessing the Spark Master UI from the Google Cloud Console

The Spark Master UI should look like this:

Spark Master UI

Next we will exec into a Worker pod, get a shell:

kubectl exec -it spark-worker-55965f669c-rm59p -- sh

Now from within the shell environment of a Worker – which includes all of the Spark client libraries, we will submit a simple Spark application:

spark-submit --class org.apache.spark.examples.SparkPi \
--master spark://10.11.250.98:7077 \
/opt/spark/examples/jars/spark-examples*.jar 10000

You can see the results in the shell, as shown here:

Spark Pi Estimator Example

Additionally, as all of the container logs go to Stackdriver, you can view the application logs there as well:

Container Logs in StackDriver

This is a simple way to get a Spark cluster running, it is not without its downsides and shortcomings however, which include the limited security mechanisms available (SASL, network security, shared secrets).

In the final post in this series we will look at Spark on Kubernetes, using Kubernetes as the Spark cluster manager and interacting with Spark using the Kubernetes API and control plane, see you then.

Full source code for this article is available at: https://github.com/gamma-data/spark-on-gcp

The infrastructure coding for this example uses Powershell and Terraform, and is deployed as follows:

PS > .\run.ps1 private-network apply <gcp-project> <region>
PS > .\run.ps1 gke apply <gcp-project> <region>

if you have enjoyed this post, please consider buying me a coffee ☕ to help me keep writing!

· 6 min read
Jeffrey Aven

Apache Spark in GCP

I have been an avid Spark enthusiast since 2014 (the early days..). Spark has featured heavily in every project I have been involved with from data warehousing, ETL, feature extraction, advanced analytics to event processing and IoT applications. I like to think of it as a Swiss army knife for distributed processing.

Curiously enough, the first project I had been involved with for some years that did not feature the Apache Spark project was a green field GCP project which got me thinking… where does Spark fit into the GCP landscape?

Unlike the other major providers who use Spark as the backbone of their managed distributed ETL services with examples such as AWS Glue or the Spark integration runtime option in Azure Data Factory, Google’s managed ETL solution is Cloud DataFlow. Cloud DataFlow which is a managed Apache Beam service does not use a Spark runtime (there is a Spark Runner however this is not an option when using CDF). So where does this leave Spark?

My summation is that although Spark is not a first-class citizen in GCP (as far as managed ETL), it is not a second-class citizen either. This article will discuss the various ways Spark clusters and applications can be deployed within the GCP ecosystem.

Quick Primer on Spark

Every Spark application contains several components regardless of deployment mode, the components in the Spark runtime architecture are:

  • the Driver
  • the Master
  • the Cluster Manager
  • the Executor(s), which run on worker nodes or Workers

Each component has a specific role in executing a Spark program and all of the Spark components run in Java virtual machines (JVMs).

Spark Runtime Architecture

Cluster Managers schedule and manage distributed resources (compute and memory) across the nodes of the cluster. Cluster Managers available for Spark include:

  • Standalone
  • YARN (Hadoop)
  • Mesos
  • Kubernetes

Spark on DataProc

This is perhaps the simplest and most integrated approach to using Spark in the GCP ecosystem.

DataProc is GCP’s managed Hadoop Service (akin to AWS EMR or HDInsight on Azure). DataProc uses Hadoop/YARN as the Cluster Manager. DataProc clusters can be deployed on a private network (VPC using RFC1918 address space), supports encryption at Rest using Google Managed or Customer Managed Keys in KMS, supports autoscaling and the use of Preemptible Workers, and can be deployed in a HA config.

Furthermore, DataProc clusters can enforce strong authentication using Kerberos which can be integrated into other directory services such as Active Directory through the use of cross realm trusts.

Deployment

DataProc clusters can be deployed using the gcloud dataproc clusters create command or using IaC solutions such as Terraform. For this article I have included an example in the source code using the gcloud command to deploy a DataProc cluster on a private network which was created using Terraform.

Integration

The beauty of DataProc is its native integration into IAM and the GCP service plane. Having been a long-time user of AWS EMR, I have found that the usability and integration are in many ways superior in GCP DataProc. Let’s look at some examples...

IAM and IAP (TCP Forwarding)

DataProc is integrated into Cloud IAM using various coarse grained permissions use as dataproc.clusters.use and simplified IAM Roles such as dataproc.editor or dataproc.admin. Members with bindings to the these roles can perform tasks such as submitting jobs and creating workflow templates (which we will discuss shortly), as well as accessing instances such as the master node instance or instances in the cluster using IAP (TCP Forwarding) without requiring a public IP address or a bastion host.

DataProc Jobs and Workflows

Spark jobs can be submitted using the console or via gcloud dataproc jobs submit as shown here:

Submitting a Spark Job using gcloud dataproc jobs submit

Cluster logs are natively available in StackDriver and standard out from the Spark Driver is visible from the console as well as via gcloud commands.

Complex Workflows can be created by adding Jobs as Steps in Workflow Templates using the following command:

gcloud dataproc workflow-templates add-job spark

Optional Components and the Component Gateway

DataProc provides you with a Hadoop cluster including YARN and HDFS, a Spark runtine – which includes Spark SQL and SparkR. DataProc also supports several optional components including Anaconda, Jupyter, Zeppelin, Druid, Presto, and more.

Web interfaces to some of these components as well as the management interfaces such as the Resource Manager UI or the Spark History Server UI can be accessed through the Component Gateway.

This is a Cloud IAM integrated gateway (much like IAP) which can allow access through an authenticated and authorized console session to web UIs in the cluster – without the need for SSH tunnels, additional firewall rules, bastion hosts, or public IPs. Very cool.

Links to the component UIs as well as built in UIs like the YARN Resource Manager UI are available directly from through the console.

Jupyter

Jupyter is a popular notebook application in the data science and analytics communities used for reproducible research. DataProc’s Jupyter component provides a ready-made Spark application vector using PySpark. If you have also installed the Anaconda component you will have access to the full complement of scientific and mathematic Python packages such as Pandas and NumPy which can be used in Jupyter notebooks as well. Using the Component Gateway, Jupyer notebooks can be accessed directly from the Google console as shown here:

Jupyter Notebooks using DataProc

From this example you can see that I accessed source data from a GCS bucket and used HDFS as local scratch space.

Furthermore, notebooks are automagically saved in your integrated Cloud Storage DataProc staging bucket and can be shared amongst analysts or accessed at a later time. These notebooks also persist beyond the lifespan of the cluster.

Next up we will look at deploying a Spark Standalone cluster on a GKE cluster, see you then!

if you have enjoyed this post, please consider buying me a coffee ☕ to help me keep writing!

· 9 min read
Jeffrey Aven

CDC using Spark

Change Data Capture (CDC) is one of the most challenging processing patterns to implement at scale. I personally have had several cracks at this using various different frameworks and approaches, the most recent of which was implemented using Spark – and I think I have finally found the best approach. Even though the code examples referenced use Spark, the pattern is language agnostic – the focus is on the approach not the specific implementation (as this could be applied to any framework or runtime).

The first challenge you are faced with, is to compare a very large dataset (representing the current state of an object) with another potentially very large dataset (representing new or incoming data). Ideally, you would like the process to be configuration driven and accommodate such things as composite primary keys, or operational columns which you would like to restrict from change detection. You may also want to implement a pattern to segregate sensitive attributes from non-sensitive attributes.

Overview

This pattern (and all my other recent attempts) is fundamentally based upon calculating a deterministic hash of the key and non-key attribute(s), and then using this hash as the basis for comparison. The difference between this pattern and my other attempts is in the distillation and reconstitution of data during the process, as well as breaking the pattern into discrete stages (designed to minimize the impact to other applications). This pattern can be used to process delta or full datasets.

A high-level flowchart representing the basic pattern is shown here:

CDC Flowchart

The Example

The example provided uses the Synthetic CDC Data Generator application, configuring an incoming set with 5 uuid columns acting as a composite key, and 10 random number columns acting as non key values. The initial days payload consists of 10,000 records, the subsequent days payload consists of another 10,000 records. From the initial dataset, a DELETE operation was performed at the source system for 20% of records, an UPDATE was performed on 40% of the records and the remaining 40% of records were unchanged. In this case the 20% of records that were deleted at the source, were replaced by new INSERT operations creating new keys.

After creating the synthesized day 1 and day 2 datasets, the files are processed as follows:

$ spark-submit cdc.py config.yaml data/day1 2019-06-18
$ spark-submit cdc.py config.yaml data/day2 2019-06-19

Where config.yaml is the configuration for the dataset, data/day1 and data/day2 represent the different data files, and 2019-06-18 and 2019-06-19 represent a business effective date.

The Results

You should see the following output from running the preceding commands for day 1 and day 2 respectively:

Day 1:

Day 2:

A summary analysis of the resultant dataset should show:

Pattern Details

Details about the pattern and its implementation follow.

Current and Historical Datasets

The output of each operation will yield a current dataset (that is the current stateful representation of a give object) and a historical dataset partition (capturing the net changes from the previous state in an appended partition).

This is useful, because often consumers will primarily query the latest state of an object. The change sets (or historical dataset partitions) can be used for more advanced analysis by sophisticated users.

Type 2 SCDs (sort of)

Two operational columns are added to each current and historical object:

  • OPERATION : Represents the last known operation to the record, valid values include :
    • I (INSERT)
    • U (UPDATE)
    • D (DELETE – hard DELETEs, applies to full datasets only)
    • X (Not supplied, applies to delta processing only)
    • N (No change)
  • EFF_START_DATE

Since data structures on most big data or cloud storage platforms are immutable, we only store the effective start date for each record, this is changed as needed with each coarse-grained operation on the current object. The effective end date is inferred by the presence of a new effective start date (or change in the EFF_START_DATE value for a given record).

The Configuration

I am using a YAML document to store the configuration for the pattern. Important attributes to include in your configuration are a list of keys and non keys and their datatype (this implementation does type casting as well). Other important attributes include the table names and file paths for the current and historical data structures.

The configuration is read at the beginning of a routine as an input along with the path of an incoming data file (a CSV file in this case) and a business effective date (which will be used as the EFF_START_DATE for new or updated records).

Processing is performed using the specified key and non key attributes and the output datasets (current and historical) are written to columnar storage files (parquet in this case). This is designed to make subsequent access and processing more efficient.

The Algorithm

I have broken the process into stages as follows:

Stage 1 – Type Cast and Hash Incoming Data

The first step is to create deterministic hashes of the configured key and non key values for incoming data. The hashes are calculated based upon a list of elements representing the key and non key values using the MD5 algorithm. The hashes for each record are then stored with the respective record. Furthermore, the fields are casted their target datatype as specified in the configuration. Both of these operations can be performed in a single pass of each row using a map() operation.

Importantly we only calculate hashes once upon arrival of new data, as the hashes are persisted for the life of the data – and the data structures are immutable – the hashes should never change or be invalidated.

Stage 2 – Determine INSERTs

We now compare Incoming Hashes with previously calculated hash values for the (previous day’s) current object. If no current object exists for the dataset, then it can be assumed this is a first run. In this case every record is considered as an INSERT with an EFF_START_DATE of the business effective date supplied.

If there is a current object, then the key and non key hash values (only the hash values) are read from the current object. These are then compared to the respective hashes of the incoming data (which should still be in memory).

Given the full outer join:

incoming_data(keyhash, nonkeyhash) FULL OUTER JOIN
current_data(keyhash, nonkeyhash) ON keyhash

Keys which exist in the left entity which do not exist in the right entity must be the results of an INSERT operation.

Tag these records with an operation of I with an EFF_START_DATE of the business effective date, then rejoin only these records with their full attribute payload from the incoming dataset. Finally, write out these records to the current and historical partition in overwrite mode.

Stage 3 - Determine DELETEs or Missing Records

Referring the previous full outer join operation, keys which exist in the right entity (current object) which do not appear in the left entity (incoming data) will be the result of a (hard) DELETE operation if you are processing full snapshots, otherwise if you are processing deltas these would be missing records (possibly because there were no changes at the source).

Tag these records as D or X respectively with an EFF_START_DATE of the business effective date, rejoin these records with their full attribute payload from the current dataset, then write out these records to the current and historical partition in append mode.

Stage 4 - Determine UPDATEs or Unchanged Records

Again, referring to the previous full outer join, keys which exist in both the incoming and current datasets must be either the result of an UPDATE or they could be unchanged. To determine which case they fall under, compare the non key hashes. If the non key hashes differ, it must have been a result of an UPDATE operation at the source, otherwise the record would be unchanged.

Tag these records as U or N respectively with an EFF_START_DATE of the business effective date (in the case of an update - otherwise maintain the current EFF_START_DATE), rejoin these records with their full attribute payload from the incoming dataset, then write out these records to the current and historical partition in append mode.

Key Callouts

A summary of the key callouts from this pattern are:

  • Use the RDD API for iterative record operations (such as type casting and hashing)
  • Persist hashes with the records
  • Use Dataframes for JOIN operations
  • Only perform JOINs with the keyhash and nonkeyhash columns – this minimizes the amount of data shuffled across the network
  • Write output data in columnar (Parquet) format
  • Break the routine into stages, covering each operation, culminating with a saveAsParquet() action – this may seem expensive but for large datsets it is more efficient to break down DAGs for each operation
  • Use caching for objects which will be reused between actions

Metastore Integration

Although I did not include this in my example, you could easily integrate this pattern with a metastore (such as a Hive metastore or AWS Glue Catalog), by using table objects and ALTER TABLE statements to add historical partitions.

Further optimisations

If the incoming data is known to be relatively small (in the case of delta processing for instance), you could consider a broadcast join where the smaller incoming data is distributed to all of the different Executors hosting partitions from the current dataset.

Also you could add a key to the column config to configure a column to be nullable or not.

Happy CDCing!

Full source code for this article can be found at: https://github.com/avensolutions/cdc-at-scale-using-spark

if you have enjoyed this post, please consider buying me a coffee ☕ to help me keep writing!