So you're using BigQuery (BQ). It's all set up and humming perfectly. Maybe now, you want to run an ELT job whenever a new table partition is created, or maybe you want to retrain your ML model whenever new rows are inserted into the BQ table.
In my previous article on EventArc, we went through how Logging can help us create eventing-type functionality in your application. Let's take it a step further and walk through how we can couple BigQuery and Cloud Run.
Let's create a temporary dataset within BigQuery named tmp_bq_to_cr.
In that same dataset, let's create a table in which we will insert some rows to test our BQ audit log. Let's grab some rows from a BQ public dataset to create this table:
CREATEORREPLACETABLE tmp_bq_to_cr.cloud_run_trigger AS SELECT date, country_name, new_persons_vaccinated, population from`bigquery-public-data.covid19_open_data.covid19_open_data` where country_name='Australia' AND date>'2021-05-31' LIMIT100
Following this, let's run an insert query that will help us build our mock database trigger:
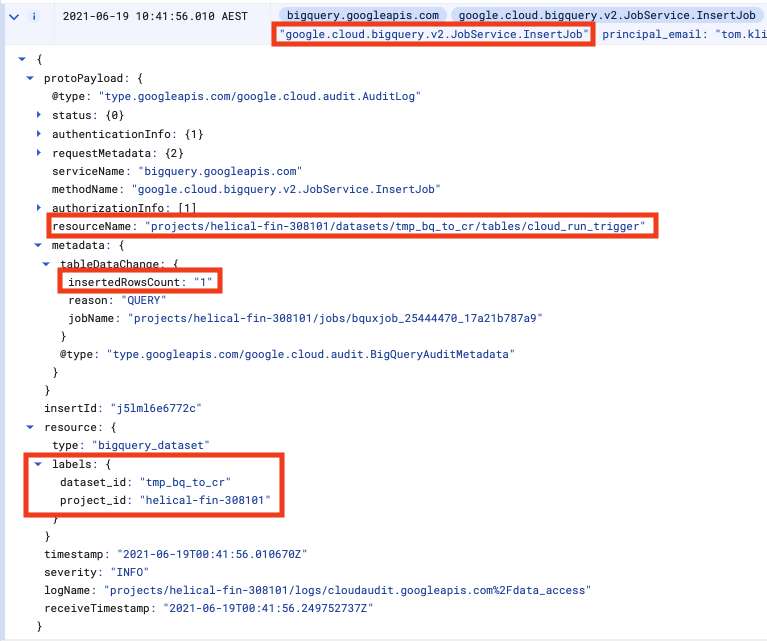
Now, in another browser tab let's navigate to BQ Audit Events and look for our INSERT INTO event:
There will be several audit logs for any given BQ action. Only after a query is parsed does BQ know which table we want to interact with, so the initial log will, for e.g., not have the table name.
We don't want any old audit log, so we need to ensure we look for a unique set of attributes that clearly identify our action, such as in the diagram above.
In the case of inserting rows, the attributes are a combination of
The method is google.cloud.bigquery.v2.JobService.InsertJob
The name of the table being inserted to is the protoPayload.resourceName
The dataset id is available as resource.labels.dataset_id
The number of inserted rows is protoPayload.metadata.tableDataChanged.insertedRowsCount
Now that we've identified the payload that we're looking for, we can write the action for Cloud Run. We've picked Python and Flask to help us in this instance. (full code is on GitHub).
First, let's filter out the noise and find the event we want to process
@app.route('/', methods=['POST']) defindex(): # Gets the Payload data from the Audit Log content = request.json try: ds = content['resource']['labels']['dataset_id'] proj = content['resource']['labels']['project_id'] tbl = content['protoPayload']['resourceName'] rows =int(content['protoPayload']['metadata'] ['tableDataChange']['insertedRowsCount']) if ds =='cloud_run_tmp'and \ tbl.endswith('tables/cloud_run_trigger')and rows >0: query = create_agg() return"table created",200 except: # if these fields are not in the JSON, ignore pass return"ok",200
Now that we've found the event we want, let's execute the action we need. In this example, we'll aggregate and write out to a new table created_by_trigger:
defcreate_agg(): client = bigquery.Client() query =""" CREATE OR REPLACE TABLE tmp_bq_to_cr.created_by_trigger AS SELECT count_name, SUM(new_persons_vaccinated) AS n FROM tmp_bq_to_cr.cloud_run_trigger """ client.query(query) return query
The Dockerfile for the container is simply a basic Python container into which we install Flask and the BigQuery client library:
Important to note here is that we're triggering on any Insert log created by BQ That's why in this action we had to filter these events based on the payload.
Take it for a spin
Now, try out the BigQuery -> Cloud Run trigger and action. Go to the BigQuery console and insert a row or two:
Metadata Hub (MDH) is intended to be the source of truth for metadata around the Company’s platform. It has the ability to load metadata configuration from yaml, and serve that information up via API. It will also be the store of information for pipeline information while ingesting files into the platform.
Config-Driven. Anyone who has been authorized to do so, should be able to add another ‘table-info.yaml’ in to MDH without the need to update any code in the system
Here’s how table information makes its way into MDH:
Before we jump right into Entity Groups in Datastore, it is important to first go over the basics and establish a common vocabulary. Datastore holds entities, which are objects, that can contain various key/value pairs, called properties. Each entity must contain a unique identifier, known as a key. When creating an entity, a user can choose to specify a custom key or let Datastore create a key. If a user decides to specify a custom key, it will contain two fields: a kind, which represents a category such as ‘Toy’ or ‘Marital Status’, and a name, which is the identifying value. If a user decides to only specify a kind when creating a key, and does not specify a unique identifier, Datastore automatically generates an ID behind the scenes. Below is an example of a Python3 script which illustrates this identifier concept.
from google.cloud import datastore

client = datastore.Client()
#Custom key- specify my kind=item and a unique_id of broker
custom_key_entry = datastore.Entity(client.key("table","broker"))
client.put(custom_key_entry)

#Only specify kind=item, let datastore generate unique_id
datastore_gen_key_entry = datastore.Entity(client.key("table"))
client.put(datastore_gen_key_entry)
In your GCP Console under Datastore, you will then see your two entities of kind “table”. One will contain your custom key and one will contain the automatically generated key.
Ancestors and Entity Groups
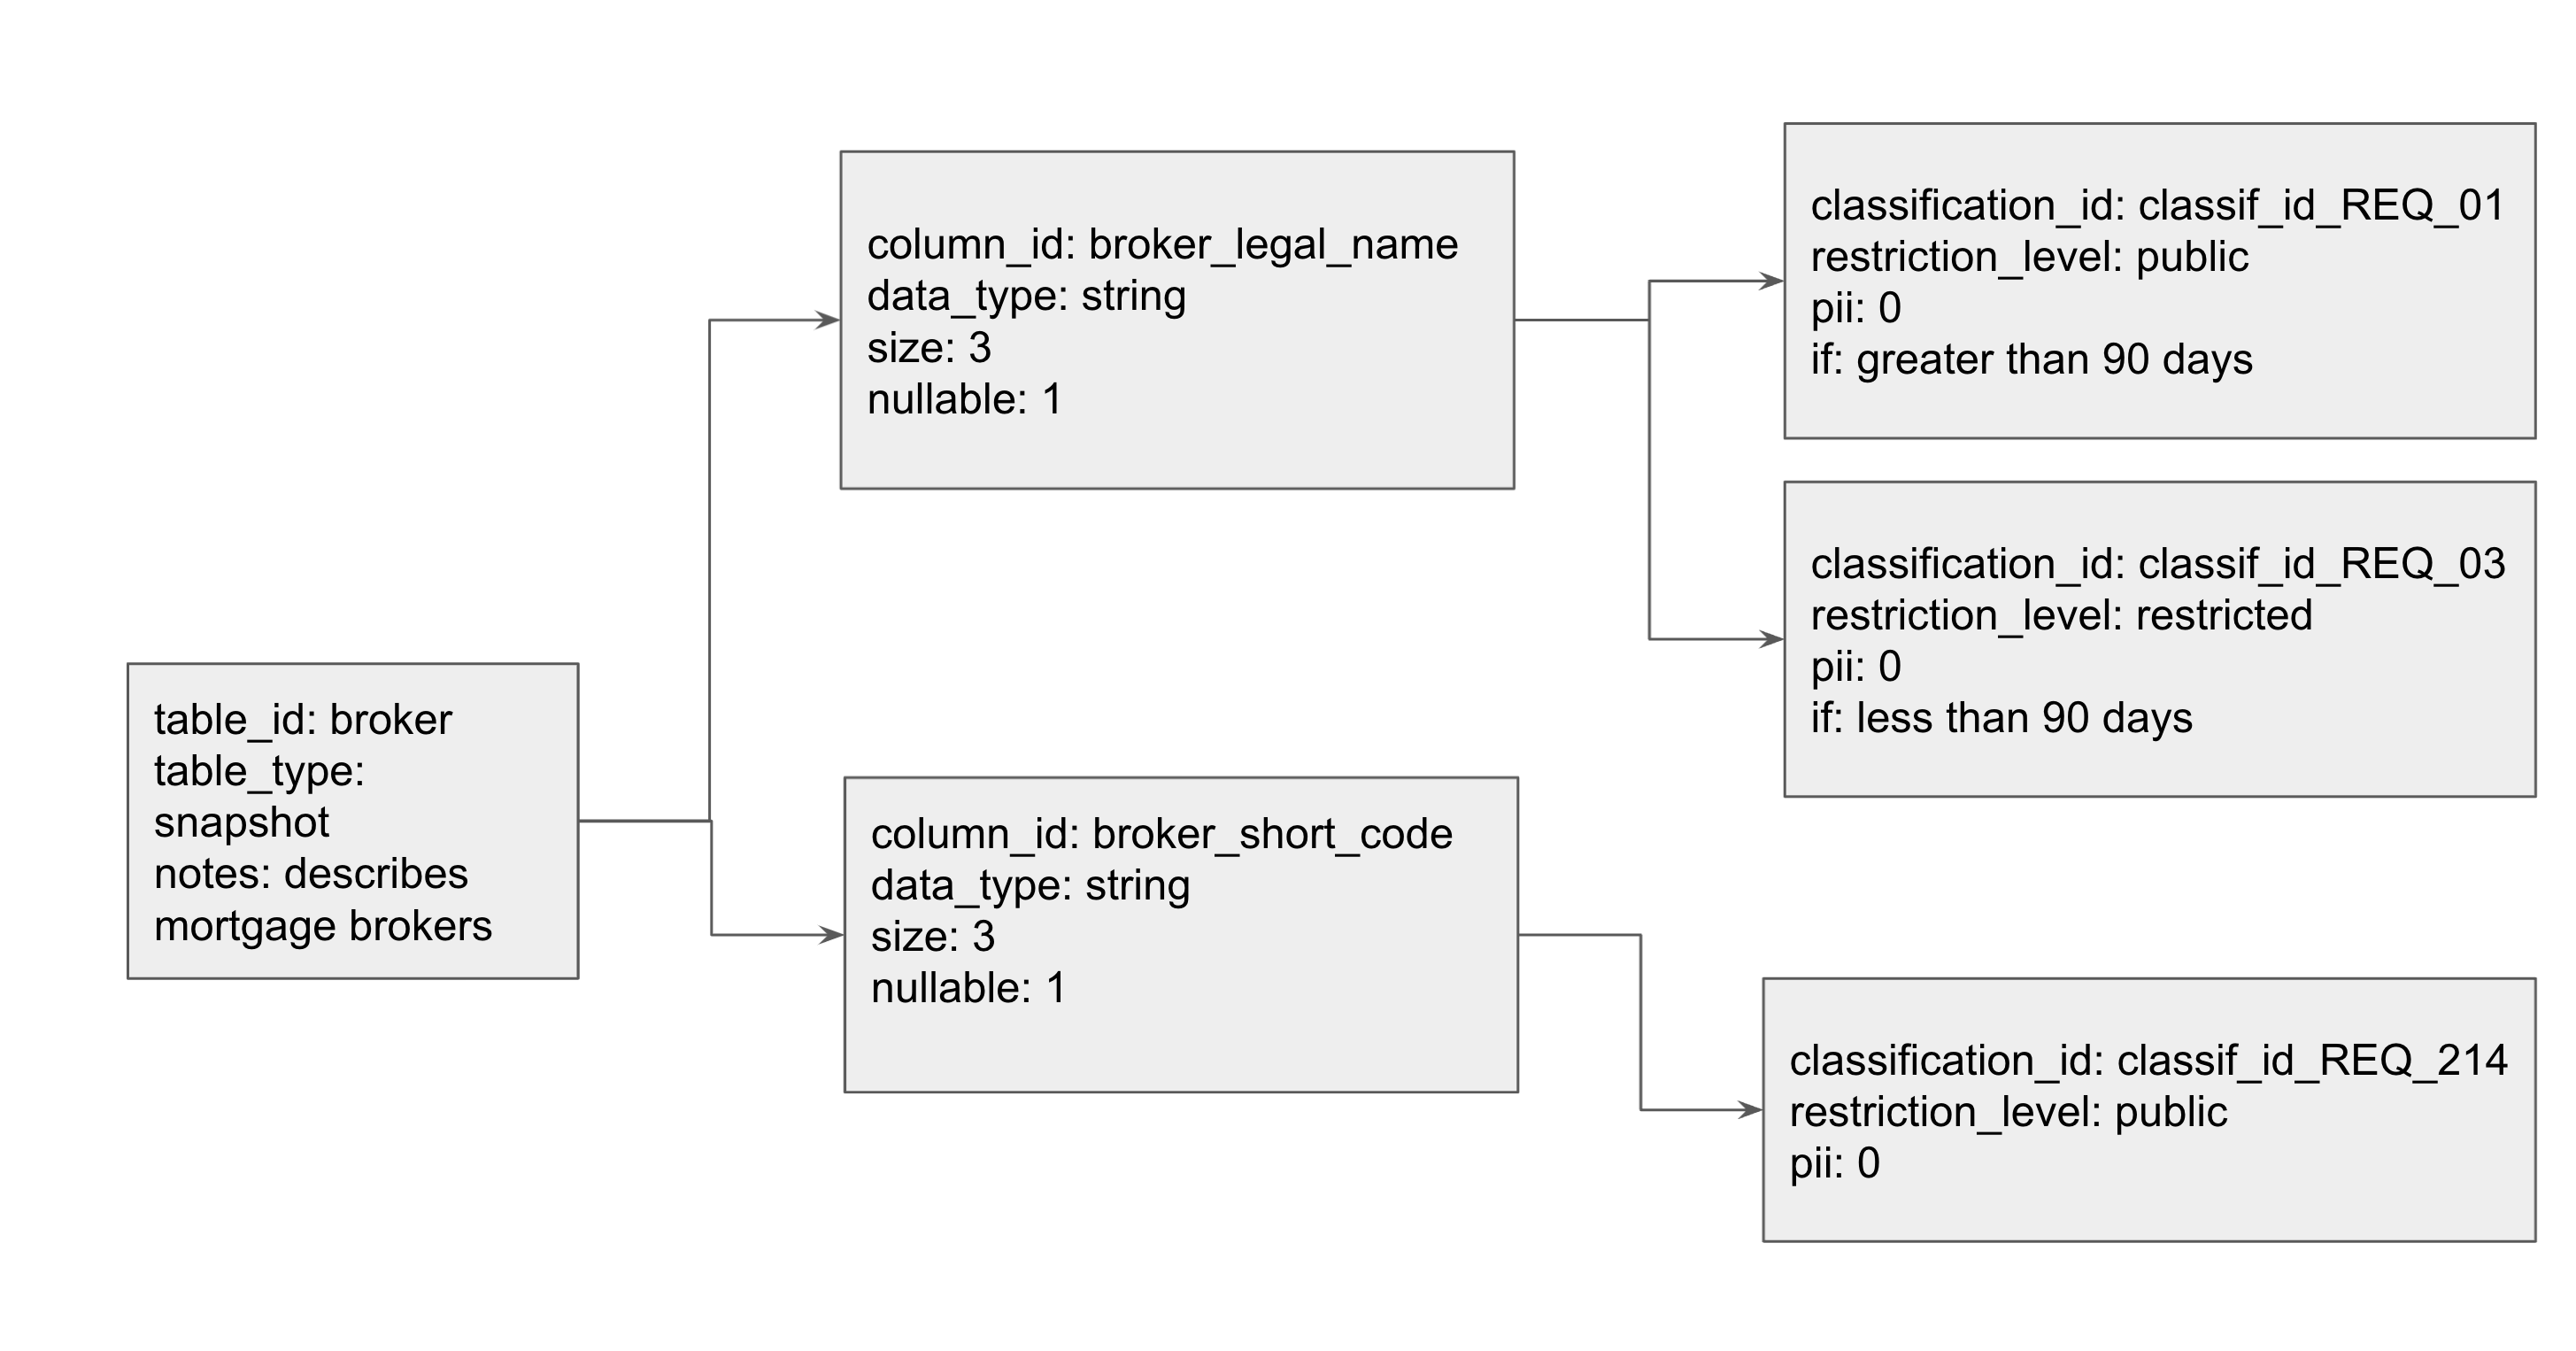
For highly related or hierarchical data, Datastore allows entities to be stored in a parent/child relationship. This is known as an entity group or ancestor/descendent relationship.
This is an example of an entity group with kinds of types: table, column, and classification. The ‘Grandparent’ in this relationship is the ‘table’. In order to configure this, one must first create the table entity. Then, a user can create a column, and specify that the parent is a table key. In order to create the grandchild, a user then creates a classification and sets its parent to be a column key. To further add customizable attributes, a user can specify additional key-value pairs such as pii and data_type. These key-value pairs are stored as properties. We model this diagram in Datastore in our working example below.
One can create entity groups by setting the ‘parent’ parameter while creating an entity key for a child. This command adds the parent key to be part of the child entity key. The child’s key is represented as a tuple (‘parent_key’, ‘child_key’), such that the parents’ key is the prefix of the key, which is followed by its own unique identifier. For example, follow the diagram above:
Printing the variable table_key will display: ("table", "broker","column", "broker_legal_name")
Datastore also supports chaining of parents, which can lead to very large keys for descendants with a long lineage of ancestors. Additionally, parents can have multiple children (representing a one-to-many relationship). However, there is no native support for entities to have multiple parents (representing a many-to-many relationship). Once you have configured this ancestral hierarchy, it is easy to retrieve all descendants for a given parent. You can do this by querying on the parent key by using the ‘ancestor’ parameter. For example, given the entity table_key created above, I can query for all of the tables
As per our Key Philosophies - Config-Driven - anyone should be able to add a new table to be processed and landed in a target-table somewhere within MDH with our yaml syntax. Below is a full working python3 example of the table/column/classification hierarchical model described above.
from google.cloud import datastore datastore_client = datastore.Client() # Entities with kinds- table, column, classification my_entities =[ {"kind":"table","table_id":"broker","table_type":"snapshot", "notes":"describes mortgage brokers"}, {"kind":"column","column_id":"broker_legal_name","table_id":"broker", "data_type":"string","size":20,"nullable":1}, {"kind":"column","column_id":"broker_short_code","table_id":"broker", "data_type":"string","size":3,"nullable":1}, {"kind":"classification","classification_id":"classif_id_REQ_01", "restriction_level":"public","pii":0,"if":"greater than 90 days", "column_id":"broker_legal_name","table_id":"broker"}, {"kind":"classification","classification_id":"classif_id_REQ_03", "restriction_level":"restricted","pii":0,"if":"less than 90 days", "column_id":"broker_legal_name","table_id":"broker"}, {"kind":"classification","classification_id":"classif_id_REQ_214", "restriction_level":"public","pii":0,"column_id":"broker_short_code", "table_id":"broker"}, ] # traverse my_entities, set parents and add those to datastore for entity in my_entities: kind = entity['kind'] parent_key =None if kind =="column": parent_key = datastore_client.key("table", entity["table_id"]) elif kind =="classification": parent_key = datastore_client.key("table", entity["table_id"], "column", entity["column_id"]) key = datastore_client.key(kind, entity[kind+"_id"], parent=parent_key) datastore_entry = datastore.Entity(key) datastore_entry.update(entity) print("Saving: {}".format(entity)) datastore_client.put(datastore_entry)
The code above assumes that you’ve set yourself up with a working Service Account or authorised yourself in, and that your GCP project has been set.
Now let’s do some digging around our newly minted Datastore model. Let’s grab the column ‘broker_legal_name’
Now that we have the column entity, let’s locate it’s parent id.
column =list(query1.fetch())[0] print("This column belongs to: "+str(column.key.parent.id_or_name))
Further to this, we can also get all data classification elements attributed to a single column using the ancestor clause query.
query2 = datastore_client.query(kind="classification", ancestor=column.key) for classification inlist(query2.fetch()): print(classification.key) print(classification["restriction_level"])
For more complex queries, Datastore has the concept of indexes being set, usually via it’s index.yaml configuration. The following is an example of an index.yaml file:
indexes: -kind: Cat ancestor: no properties: -name: name -name: age direction: desc -kind: Cat properties: -name: name direction: asc -name: whiskers direction: desc -kind: Store ancestor: yes properties: -name: business direction: asc -name: owner direction: asc
Indexes are important when attempting to add filters on more than one particular attribute within a Datastore entity. For example, the following code will fail:
# Adding a '>' filter will cause this to fail. Sidenote; it will work # without an index if you add another '=' filter. query2 = datastore_client.query(kind="classification", ancestor=column.key) query2.add_filter("pii",">",0) for classification inlist(query2.fetch()): print(classification.key) print(classification["classification_id"])
To rectify this issue, you need to create an index.yaml that looks like the following:
The official pypi package for google-cloud-datastore can be found here: https://pypi.org/project/google-cloud-datastore/. At the time of writing, Firestore in Datastore-mode will be the way forward, as per the release note from January 31, 2019.
Cloud Firestore is now Generally Available. Cloud Firestore is the new version of Cloud Datastore and includes a backwards-compatible Datastore mode.
If you intend to use the Cloud Datastore API in a new project, use Cloud Firestore in Datastore mode. Existing Cloud Datastore databases will be automatically upgraded to Cloud Firestore in Datastore mode.
Except where noted, the Cloud Datastore documentation now describes behavior for Cloud Firestore in Datastore mode.
We’ve purposefully created MDH in Datastore to show you how it was done originally, and we’ll be migrating the Datastore code to Firestore in an upcoming post.
Creating and deleting indexes within Datastore will need to be done through the REST API via googleapiclient.discovery, as this function doesn’t exist via the google-cloud-datastore API. Working with the discovery api client can be a bit daunting for a first-time user, so here’s the code to add an index on Datastore:
import os from google.oauth2 import service_account from googleapiclient.discovery import build from google.cloud import datastore SCOPES =['https://www.googleapis.com/auth/cloud-platform'] SERVICE_ACCOUNT_FILE = os.getenv('GOOGLE_APPLICATION_CREDENTIALS') PROJECT_ID = os.getenv("PROJECT_ID") credentials = service_account .Credentials .from_service_account_file(SERVICE_ACCOUNT_FILE, scopes=SCOPES) datastore_api = build('datastore','v1', credentials=credentials) body ={ 'ancestor':'ALL_ANCESTORS', 'kind':'classification', 'properties':[{ 'name':'pii', 'direction':'DESCENDING' }] } response = datastore_api.projects() .indexes() .create(projectId=PROJECT_ID, body=body) .execute()
How did we craft this API request? We can use the Google API Discovery Service to build client libraries, IDE plugins, and other tools that interact with Google APIs. The Discovery API provides a list of Google APIs and a machine-readable "Discovery Document" for each API. Features of the Discovery API:
A directory of supported APIs schemas based on JSON Schema.
A machine-readable "Discovery Document" for each of the supported APIs. Each document contains:
A list of API methods and available parameters for each method.
A list of available OAuth 2.0 scopes.
Inline documentation of methods, parameters, and available parameter values.
Navigating to the API reference page for Datastore and going to the ‘Datastore Admin’ API page, we can see references to the Indexes and RESTful endpoints we can hit for those Indexes. Therefore, looking at the link for the Discovery document for Datastore:
From this, we can build out our instantiation for the google api discovery object build('datastore', 'v1', credentials=credentials)
With respect to building out the body aspect of the request, I’ve found crafting that part within the ‘Try this API’ section of https://cloud.google.com/datastore/docs/reference/admin/rest/v1/projects.indexes/create pretty valuable.
With this code, your index should show up in your Datastore console! You can also retrieve them within gcloud with gcloud datastore indexes list if you’d like to verify the indexes outside our python code. So there you have it: a working example of entity groups, ancestors, indexes and Metadata within Datastore. Have fun coding!
When defining event-driven architectures, it's always good to keep up with how the landscape is changing. How do you connect microservices in your architecture? Is Pub/Sub the end-game for all events? To dive a bit deeper, let's talk through the benefits of having a single orchestrator, or perhaps a choreographer is better?
Should there really be a central orchestrator controlling all interactions between services.....or, should each service work independently and only interact through events?
Orchestration is usually viewed as a domain-wide central service that defines the flow and control of communication between services. In this paradigm, in becomes easier to change and ultimately monitor policies across your org.
Choreography has each service registering and emitting events as they need to. It doesn't direct or define the flow of communication, but using this method usually has a central broker passing around messages and allows services to be truly independent.
Enter Workflows, which is suited for centrally orchestrated services. Not only Google Cloud service such as Cloud Functions and Cloud Run, but also external services.
How about choreography? Pub/Sub and Eventarc are both suited for this. We all know and love Pub/Sub, but how do I use EventArc?
Announced in October-2020, it was introduced as eventing functionality that enables you, the developer, to send events to Cloud Run from more than 60 Google Cloud sources.
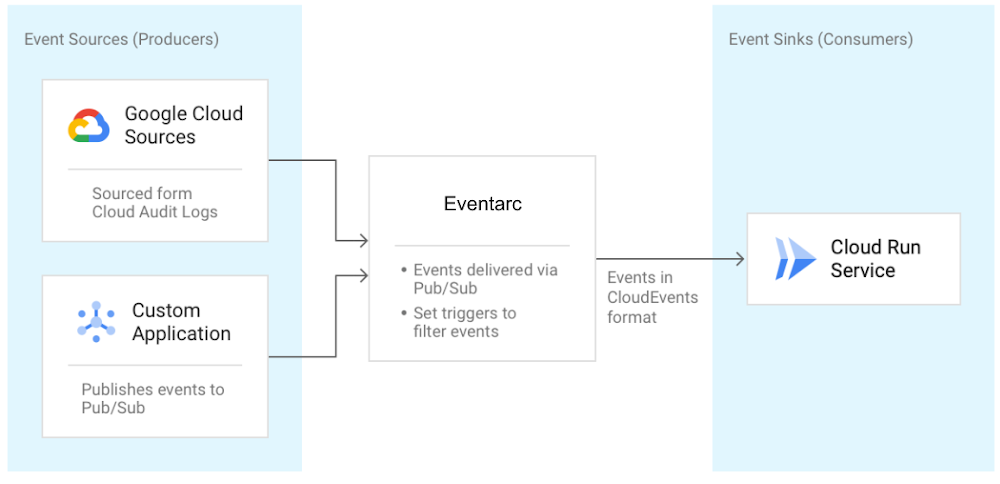
Eventing is done by reading those sweet sweet Audit Logs, from various sources, and sending them to Cloud Run services as events in Cloud Events format. Quick primer on Cloud Events: its a specification for describing event data in a common way. The specification is now under the Cloud Native Computing Foundation. Hooray! It can also read events from Pub/Sub topics for custom applications. Here's a diagram I graciously ripped from Google Cloud Blog:
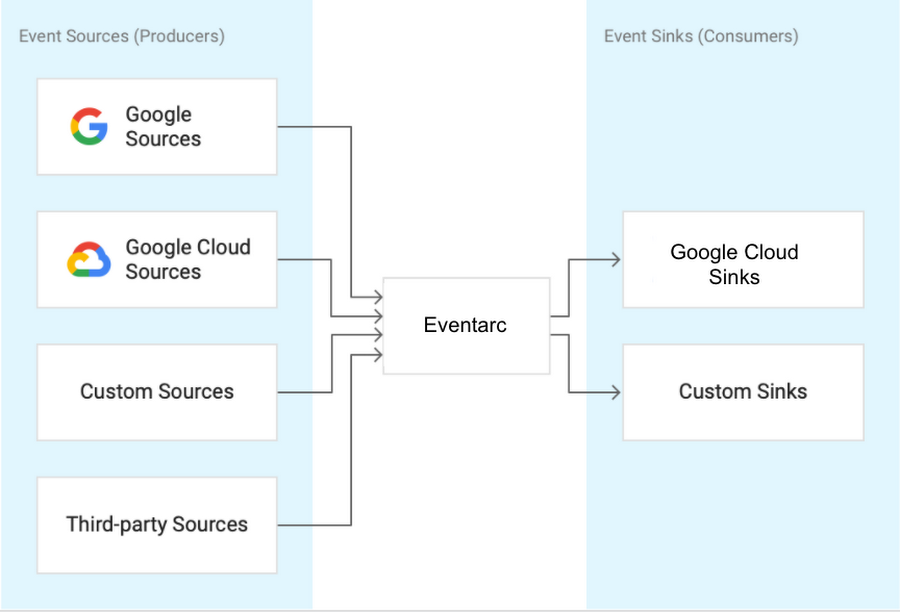
Good question. Eventarc provides and easier path to receive events not only from Pub/Sub topics but from a number of Google Cloud sources with its Audit Log and Pub/Sub integration. Actually, any service that has Audit Log integration can be an event source for Eventarc. Beyond easy integration, it provides consistency and structure to how events are generated, routed and consumed. Things like:
They specify routing rules from events sources, to event sinks. Listen for new object creation in GCS and route that event to a service in Cloud Run by creating an Audit-Log-Trigger. Create triggers that also listen to Pub/Sub. Then list all triggers in one, central place in Eventarc:
Using the CloudEvent-compliant specification will allow for event data in a common way, increasing the movement towards the goal of consistency, accessibility and portability. Makes it easier for different languages to read the event and Google Events Libraries to parse fields.
This means that the long-term vision of Eventarc to be the hub of events, enabling a unified eventing story for Google Cloud and beyond.
In the future, you can excpect to forego Audit Log and read these events directly and send these out to even more sinks within GCP and any HTTP target.
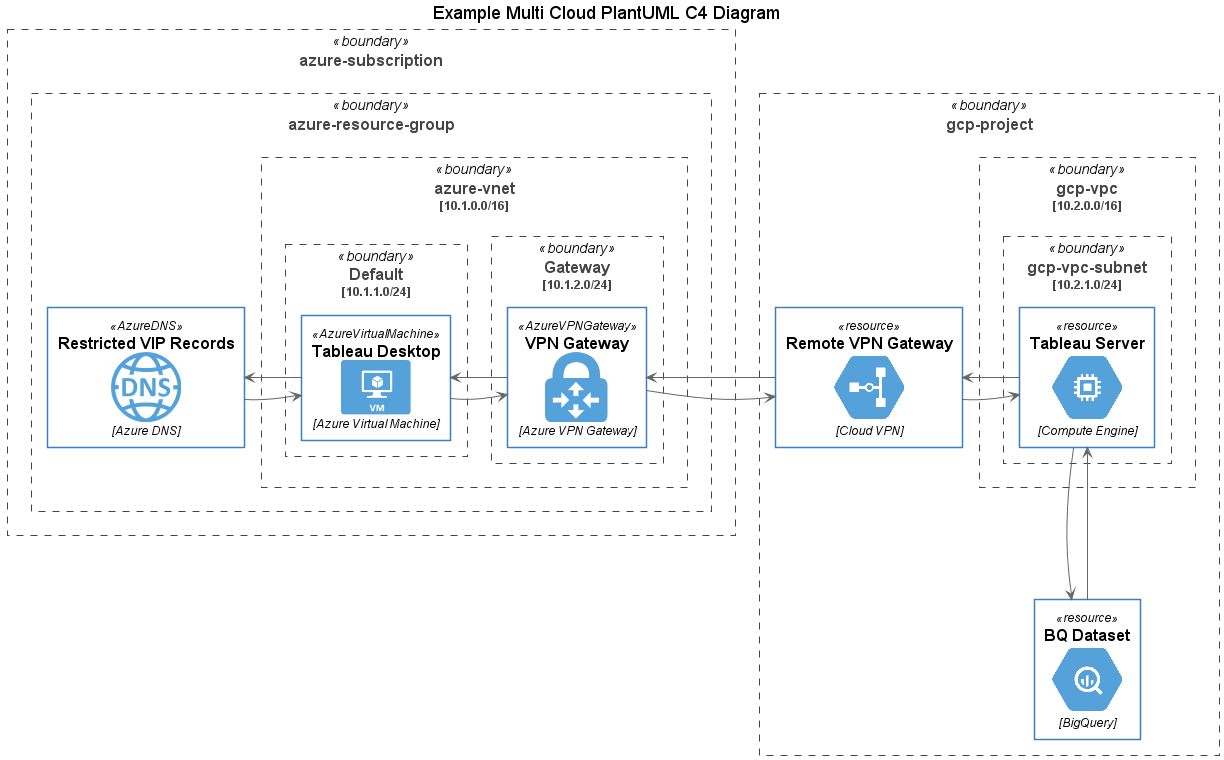
Following on from the recent post GCP Templates for C4 Diagrams using PlantUML, cloud architects are often challenged with producing diagrams for architectures spanning multiple cloud providers, particularly as you elevate to enterprise level diagrams.
In this post, with the magic of !includeurl we have brought PlantUML template libraries together for AWS, Azure and GCP icon sets, allowing us to produce multi cloud C4 diagrams using PlantUML like this one:
Creating a multi cloud diagram is simple, start by adding the following include statements after the @startuml label in a new PlantUML C4 diagram:
Then add references to the required services from different providers…
Then include the predefined resources from your different cloud providers in your diagram as shown here (describing a client server application over a cloud to cloud VPN between Azure and GCP)...
In this article we will cover schema design and row key selection in Bigtable – arguably the most critical design decision to make when employing Bigtable in a cloud data architecture.
Recall from the previous post where the Bigtable data model was introduced that tables in Bigtable are comprised of rows and columns - much like a table in any other RDBMS. Every row is uniquely identified by a rowkey – again akin to a primary key in a table in an RDBMS. But this is where the similarities end.
Unlike a table in an RDBMS, columns only ever exist when they are inserted, and NULLs are not stored. See the illustration below:
Data in Bigtable is distributed by row keys. Row keys are physically stored in tablets in lexographic order. Recall that row keys are your ONLY indexes to data in Bigtable.
As row keys are your only indexes to retrieve or update rows in Bigtable, row key design must take the access patterns for the data to be stored and served via Bigtable into consideration, specifically the following must be considered when designing a Bigtable application:
Search patterns (returning data for a specific entity)
Scan patterns (returning batches of data)
Queries that use the row key, a row prefix, or a row range are the most efficient. Queries that do not include a row key will typically scan GB or TB of data and would not be suitable for operational use cases.
Row key performance will be biased towards your specific access patterns and application functional requirements. For example if you are performing sequential reads or scan operations then sequential keys will perform the best, however their write performance will not be optimal. Conversely, random keys (such as a uuid) will perform best for writes but poor for scan or sequential read operations.
Adding salts to keys (or additional data), similar to the use of salts in cryptography as well as promoting other field keys to be part of a composite row key can help achieve a “Goldilocks” scenario for both reads and writes, see the diagram below:
Use reverse timestamps when your most common query is for the latest values. Typically you would append the reverse timestamp to the key, this will ensure that the same related records are grouped together, for instance if you are storing events for a customer using the customer id along with an appended reverse timestamp (for example <customer_id>#<reverse_ts>) would allow you to quickly serve the latest events for a customer in descending order as within each group (customer_id), rows will be sorted so most recent insert will be located at the top.
A reverse timestamp can be generalised as:
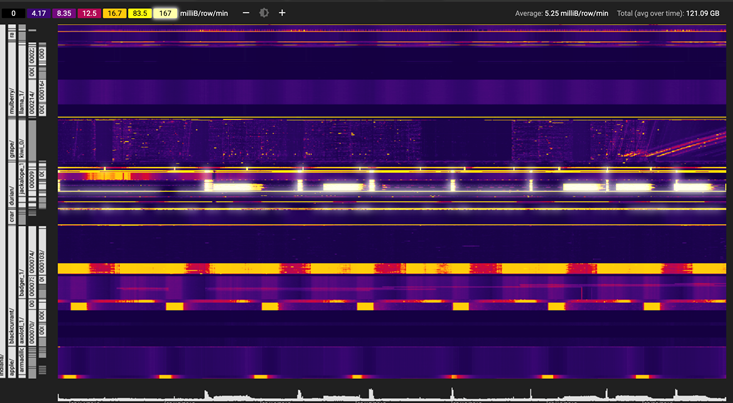
Google provides a neat tool to visualize your row key distribution in Cloud Bigtable. You need to have at least 30 GB of data in your table to enable this feature.
The Key Visualizer is shown here:
The Key Visualizer will help you find and prevent hotspots, find rows with too much data and show if your key schema is balanced.
Bigtable is one of the original and best (massively) distributed NoSQL platforms available. Schema and moreover row key design play a massive part in ensuring low latency and query performance. Go forth and conquer with Cloud Bigtable!
if you have enjoyed this post, please consider buying me a coffee ☕ to help me keep writing!