12 posts tagged with "aws"

View All Tags

· 6 min read
Jeffrey Aven

AWS and Google (and Microsoft Azure) have services called IAM, which stands for Identity and Access Management. The IAM service serves roughly the same purpose in each provider: to authorize principals (users, groups, or service accounts) to access and use services and resources on the respective platform. There are subtle yet significant differences and distinctions across the major cloud providers.

This article will look at the differences between IAM in AWS and IAM in Google.

Identity Management

Firstly, Google's IAM is a slight misnomer regarding the I as it does not manage identities (with the single exception of service accounts). Google identities are sourced from Google accounts created and managed outside the Google Cloud Platform. Google identities (users and groups) are Google accounts which could be accounts in a Google Workspace domain, a Google Cloud Identity domain, or Gmail accounts. Still, these accounts are NOT created or managed using the Google IAM service.

Conversely, AWS IAM creates and manages identities for use in the AWS platform (IAM Users), which can be used to access AWS resources using the AWS console or programmatically using API keys.

Overview of IAM entities in AWS and Google

It can be confusing for people coming from AWS to Google or vice-versa. Some of the same terms exist in both providers but mean different things. The table below summarises the difference in the meaning of terms in both providers. We will unpack this in more detail in the sections that follow.

AWSGoogle*
RoleService Account
Managed PolicyPredefined Role
Customer Managed PolicyCustom Role
Policy AttachmentIAM Binding
* nearest equivalent

Roles and Policies in AWS

An AWS IAM Role is an identity that can be assumed by trusted entities using short-lived credentials (issued by the AWS Security Token Service or STS API). A trusted entity could be an IAM User, Group, or a service (such as Lambda or EC2).

Permissions are assigned to IAM Roles (and IAM Users and Groups) through the attachment of IAM Policies.

AWS Policies are collections of permissions in different services which can be used to Allow or Deny access (Effect); these can be scoped to a resource or have conditions attached. The following is an example of an AWS Policy:

{
"Version": "2012-10-17",
"Statement": [
{
"Effect": "Allow",
"Action": "ec2:Describe*",
"Resource": "*"
},
{
"Effect": "Allow",
"Action": "autoscaling:Describe*",
"Resource": "*"
}
]
}

Policies in AWS can be Managed Policies (created and managed by AWS) or Customer Managed Policies - where the customer defines and manages these policies.

An IAM Role that is used by a service such as Lambda or EC2 will have a Trust Policy attached, which will look something like this:

{
"Version": "2012-10-17",
"Statement": [
{
"Effect": "Allow",
"Principal": {
"Service": "lambda.amazonaws.com"
},
"Action": "sts:AssumeRole"
}
]
}

Roles and Policies in Google

Roles in Google IAM are NOT identities ; they are collections of permissions (similar to Policies in AWS). Roles can be of the following types:

Basic Roles (also referred to as Legacy or Primitive Roles)

Basic Roles are coarse-grained permissions set at a Project level across all services, such as Owner, Editor, and Viewer. Support for Basic Roles is maintained by Google, however, Google does not recommend using Basic Roles after a Project is created.

Predefined Roles

Predefined Roles are pre-curated sets of permissions that align with a role that an actor (human or service account) would play, such as BigQuery Admin. Predefined roles are considered best practice in Google as the permissions for these roles are maintained by Google. Predefined Roles in Google would be the nearest equivalent to Managed Policies in AWS.

Custom Roles

Custom Roles are user-specified and managed sets of permissions. These roles are scoped within your Project in Google and are your responsibility to maintain. Custom Roles are typically used when the permissions granted through a Predefined Role are too broad. Custom Roles would be the nearest equivalent of Customer Managed Policies in AWS.

Google IAM Bindings

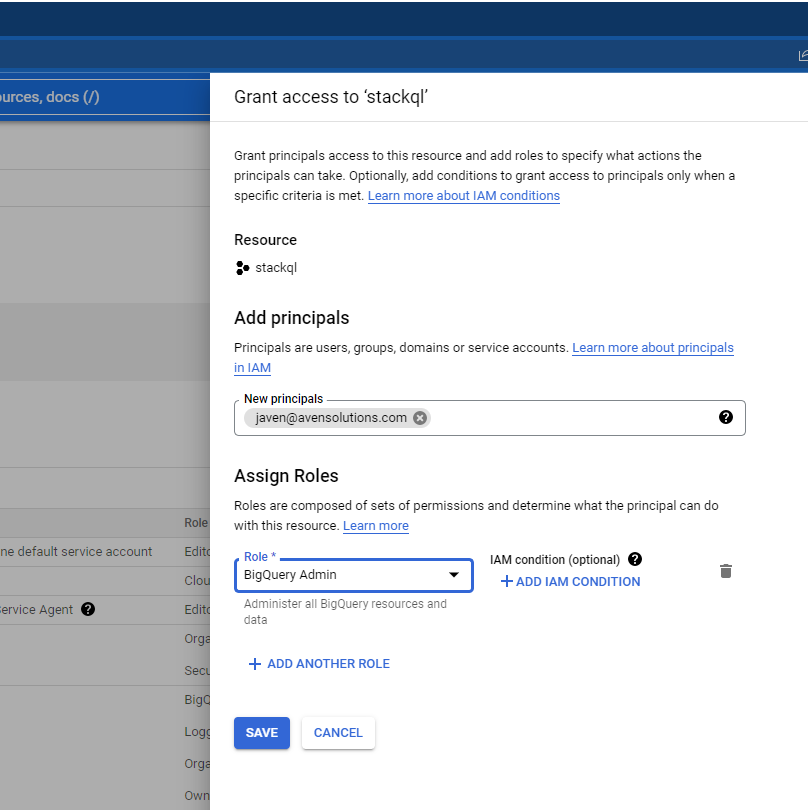
Roles (collections of permissions) are attached to Principals (Identities such as users (Google accounts), groups and service accounts through IAM bindings. The example below shows a binding between a user principal (a Google Workspace account) and a predefined role (BigQuery Admin) within a GCP project:

Google IAM Binding

Policies in Google

A Policy in Google is a collection of IAM Bindings between members (principals) and roles. An example policy would be:

{
"bindings": [
{
"members": [
"user:javen@avensolutions.com"
],
"role": "bigquery.admin"
},
... another binding ...
]
}

Service Accounts in Google

A Service Account in GCP is a password-less identity created in a GCP Project that can be used to access GCP resources (usually by a process or service). Service accounts are identified by an email address, but these are NOT Google accounts (like the accounts used for users or groups). Service accounts can be associated with services such as Compute Engine, Cloud Functions, or Cloud Run (in much the same way as AWS Roles can be assigned to services such as Lambda functions or EC2 instances). Google Service accounts can use keys created in the IAM service, which are exchanged for short-lived credentials, or service accounts can use get tokens directly, which include OAuth 2.0 access tokens and OpenID Connect ID tokens. Service accounts in Google are the nearest equivalent to AWS IAM Roles.

Inheritance

AWS (save AWS Organizations) is a flat structure with no inherent hierarchy and is oriented around regions that are seperate API endpoints (almost providers unto themselves); IAM, however, is a global service in AWS.

In contrast, GCP is hierarchical and globally scoped for all services, including IAM. Resources (such as Google Compute Engine Instances or Big Query Datasets) are created in Projects (similar to Resource Groups in Azure). Projects are nested under a resource hierarchy, starting at the root (the organization or org). Organizations can contain folders, which can be nested, and these folders can contain Projects.

IAM Bindings (and the permissions they enable) are inherited from ancestor nodes in the GCP hierarchy. A Principal's net effective permissions are the union of the permissions assigned through IAM Bindings in the Project and the permissions set through IAM Bindings in all ancestor nodes (including Folders and the Org itself).

Summary

IAM governs access and entitlements to services and resources in cloud providers, although the design, implementation, and terminology are quite different as you get into the details. This is not to say one approach is better than the other, but as a multi-cloud warrior, you should understand the differences.

if you have enjoyed this post, please consider buying me a coffee ☕ to help me keep writing!
· 7 min read
Jeffrey Aven

When you want the SFTP service without the SFTP Server.

In implementing data platforms with external data providers, it is common to use a managed file transfer platform or an SFTP gateway as an entry point for providers to supply data to your system.

Often in past implementations this would involve deploying a sever (typically a Linux VM) and provisioning and configuring an SFTP service. If you wanted the data sent by clients to be copied to another storage medium (such as S3 or EFS) you would need to roll your own code or subscribe to a marketplace offering to do so.

I recently trialled the AWS Transfer Family SFTP gateway offering from AWS and sharing my adventures here.

Architecture

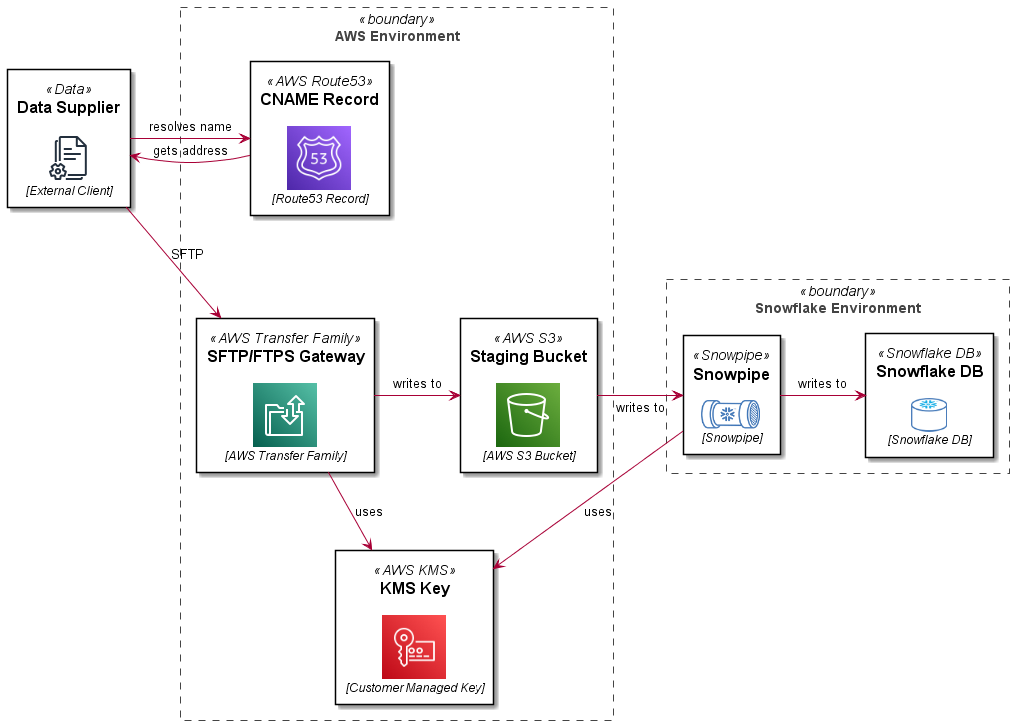
In this reference architecture, we are deploying an SFTP service which uses a path in an S3 bucket as a user’s home directory. Objects in the bucket are encrypted with a customer managed KMS key. The SFTP server front end address is mapped to a vanity URL using Route53. The bucket and path are integrated with a STORAGE INTEGRATION, STAGE and PIPE definition in Snowflake. The Snowflake bits are covered in more detail in this blog: Automating Snowflake Role Based Storage Integration for AWS. This article just details the AWS Transfer Family SFTP setup.

AWS Transfer SFTP Architecture

Setup

The steps to set up this pattern are detailed below.

info

This example uses the Jsonnet/CloudFormation pattern described in this article: Simplifying Large CloudFormation Templates using Jsonnet. This is a useful pattern for breaking up a monolithic CloudFormation template at design time to more manageable resource scoped documents, then pre-processing these in a CI routine (GitLab CI, GitHub Actions, etc) to create a complete template.

Setup the Service

To setup the SFTP transfer service use the AWS::Transfer::Server resource type as shown below:

note

Use the tags shown to display the custom hostname (used as a vanity url) in the Transfer UI in the AWS console.

Create the S3 Bucket

Create a bucket which will be used to store incoming files sent via SFTP.

note

This example logs to a logging bucket, not shown for brevity.

Create a Customer Managed KMS Key

Create a customer managed KMS key which will be used to encrypt data stored in the S3 bucket created in the previous step.

Create an IAM role to access the bucket

Create an IAM role which will be assumed by the AWS Transfer Service to read and write to the S3 staging bucket.

info

You must assign permissions to use the KMS key created previously, failure to do so will result in errors such as:

remote readdir(): Permission denied

User Directory Mappings

An SFTP users home directory is mapped to a path in your S3 bucket. It is recommended to use the LOGICAL HomeDirectoryType. This will prevent SFTP users from:

  • seeing or being able to access other users home directories
  • seeing the bucket name or paths in the bucket above their home directory

There are some trade offs for this which can make deployment a little more challenging but we will cover off the steps from here.

Create a Scoped Down Policy

A "scoped down" policy prevents users from seeing or accessing objects in other users home directories. This is a text file that will be sourced as a string into the Policy parameter of each SFTP user you create.

info

Using the LOGICAL HomeDirectoryType you don't have access to variables which represent the bucket, so this needs to be hard coded in the policy.txt document.

Also if you are using a customer managed KMS key to encrypt the data in the bucket (which you should be), you need to add permissions to the key - which again cannot be represented by a variable.

Failure to do so will result in errors when trying to ls, put, etc into the user's home directory such as:

Couldn't read directory: Permission denied
Couldn't close file: Permission denied

Since these properties are unlikely to change for the lifetime of your service this should not be an issue.

Create a user

Users are identified by a username and an SSH key, providing the public key to the server. A sample user is shown here:

tip

As discussed previously, it is recommended to use LOGICAL home directory mappings, which prevents users from seeing information about the bucket or other directories on the SFTP server (including other users directories).

Create a Route 53 CNAME record

Ideally you want to use a vanity url for users to access your SFTP service, such as sftp.yourcompany.com. This can be accomplished by using a Route 53 CNAME record as shown here:

Create some shared Tags

You would have noticed a shared Tags definition in many of the libsonnet files shown, an example Tags source file is shown here:

Pull it all together!

Now that we have all of the input files, lets pull them all together in a jsonnet file, which will be preprocessed in a CI process to create a template we can deploy with AWS CloudFormation.

Your customers would now connect to your service using they private key which corresponds to the public key they supplied to you in one of the previous steps, for example:

sftp -i mysftpkey jeffrey_aven@sftp.yourdomain.com

Add more users and enjoy!

if you have enjoyed this post, please consider buying me a coffee ☕ to help me keep writing!
· 5 min read
Jeffrey Aven

Background

AWS Lambda instances will return UTC/GMT time for any date time object created using the Date.now() function in JavaScript as shown here:

let now = new Date();
const tzOffset = now.getTimezoneOffset();
console.log(`Default Timezone Offset: ${tzOffset}`);
// results in ...
// Default Timezone Offset: 0

Moreover, Lambda instances are stateless and have no concept of local time. This can make dealing with dates more challenging.

This is compounded for localities which have legislated Daylight Savings Time during part of the year.

Solution

A simple (vanilla JavaScript - no third party libraries or external API calls) to adjust the time to local time adjusted for Daylight Savings Time is provided here:

function getGmtDstTransitionDate(year, month, transitionDay, hour){
const firstDayOfTheMonth = new Date(year, month, 1);
let transitionDate = new Date(firstDayOfTheMonth);
// find the first transition day of the month if the first day of the month is not a transition day
if (firstDayOfTheMonth.getDay() !== transitionDay) {
transitionDate = new Date(firstDayOfTheMonth.setDate(firstDayOfTheMonth.getDate() + (transitionDay - firstDayOfTheMonth.getDay())));
};
// return the transition date and time
return new Date(transitionDate.getTime() + (hour * 60 * 60000));
};

function getLocalDateTime(date) {
// default to GMT+11 for AEDT
let offsetInHours = 11;
// if month is between April and October check further, if not return AEDT offset
// remeber getMonth is zero based!
if (date.getMonth() >= 3 && date.getMonth() <= 9) {
// DST starts at 0200 on the First Sunday in October, which is 1600 (16) on the First Saturday (6) in October (9) GMT
const dstStartDate = getGmtDstTransitionDate(date.getFullYear(), 9, 6, 16);
// DST ends at 0300 on the First Sunday in April, which is 1600 (16) on the First Saturday (6) in April (3) GMT
const dstEndDate = getGmtDstTransitionDate(date.getFullYear(), 3, 6, 16);
if (date >= dstEndDate && date < dstStartDate) {
offsetInHours = 10;
};
};
// return the date and time in local time
return new Date(date.getTime() + (offsetInHours * 60 * 60000));
}

// get current timestamp
let now = new Date();
console.log(`UTC Date: ${now}`);
now = getLocalDateTime(now);
console.log(`Local toLocaleString: ${now.toLocaleString()}`);

Breaking it down

This solution is comprised of two functions for DRY purposes.

The main function getLocalDateTime takes a date object representing the current time in UTC and returns a date object representing the local (DST adjusted) time.

The getLocalDateTime function sets a default DST adjusted offset in hours (11 in the case of AEDT), if the month is between April and October the getGmtDstTransitionDate is used to determine the exact boundaries between Standard Time and Daylight Savings Time.

In the case of AEST/AEDT this is the first Sunday in October at 0200 to enter Daylight Savings Time and the first Sunday in April at 0300 to end Daylight Savings Time (both dates and times are adjusted to their equivalent GMT times) and return to Standard Time (10 hours in the cases of AEST).

The offsetInHours variable and the arguments for getGmtDstTransitionDate can be easily modified for other timezones.

Tests

Some simple tests to run to check if the code is working correctly, to help with this I have set up the following unit test function:

function unitTest(inputDate, expOutputDate, testCase) {
if (getLocalDateTime(inputDate).toUTCString() === expOutputDate.toUTCString()) {
console.log(`TEST PASSED ${testCase}`)
} else {
console.log(`TEST FAILED ${testCase} : input date in GMT ${inputDate} should equal ${expOutputDate}`)
};
};

first create dates representing the beginning of Daylight Savings Time (immediately before the beginning, at the beginning and immediately after the beginning):

unitTest(new Date(2022, 9, 1, 15, 59, 59, 999), new Date(2022, 9, 2, 1, 59, 59, 999), "one ms before dst start");
// returns...
// ... INFO TEST PASSED one ms before dst start
unitTest(new Date(2022, 9, 1, 16, 0, 0, 0), new Date(2022, 9, 2, 3, 0, 0, 0), "dst start");
// returns...
// ... INFO TEST PASSED dst start
unitTest(new Date(2022, 9, 1, 16, 0, 0, 1), new Date(2022, 9, 2, 3, 0, 0, 1), "one ms after dst start");
// returns...
// ... INFO TEST PASSED one ms after dst start

next create dates similar tests representing the end of Daylight Savings Time (or beginning of Standard Time):

unitTest(new Date(2022, 3, 2, 15, 59, 59, 999), new Date(2022, 3, 3, 2, 59, 59, 999), "one ms before dst end");
// returns...
// ... INFO TEST PASSED one ms before dst end
unitTest(new Date(2022, 3, 2, 16, 0, 0, 0), new Date(2022, 3, 3, 2, 0, 0, 0), "dst end");
// returns...
// ... INFO TEST PASSED dst end
unitTest(new Date(2022, 3, 2, 16, 0, 0, 1), new Date(2022, 3, 3, 2, 0, 0, 1), "one ms after dst end");
// returns...
// ... INFO TEST PASSED one ms after dst end

Enjoy

if you have enjoyed this post, please consider buying me a coffee ☕ to help me keep writing!
· 5 min read
Jeffrey Aven

I have used the instructions here to configure Snowpipe for several projects.

Although it is accurate, it is entirely click-ops oriented. I like to automate (and script) everything, so I have created a fully automated implementation using PowerShell, the aws and snowsql CLIs.

The challenge is that you need to go back and forth between AWS and Snowflake, exchanging information from each platform with the other.

Overview

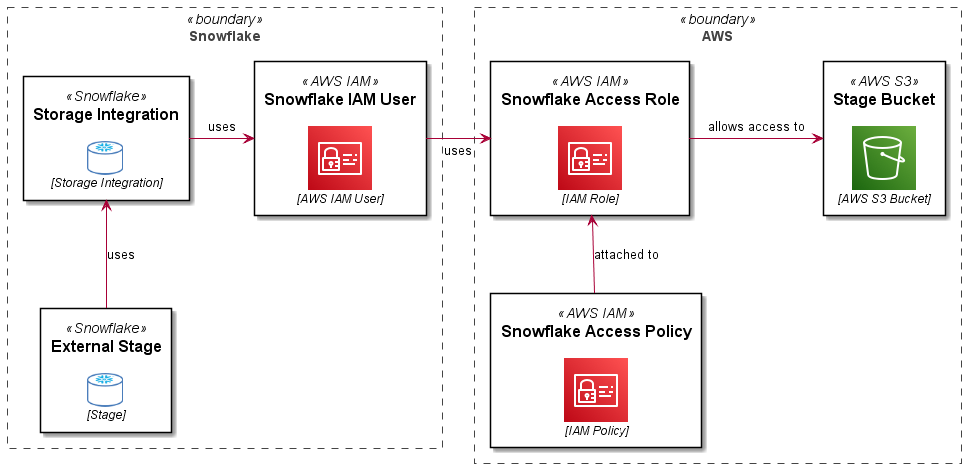
A Role Based Storage Integration in Snowflake allows a user (an AWS user arn) in your Snowflake account to use a role in your AWS account, which in turns enables access to S3 and KMS resources used by Snowflake for an external stage.

The following diagram explains this (along with the PlantUML code used to create the diagram..):

Snowflake S3 Storage Integration

Setup

Some prerequisites (removed for brevity):

  1. set the following variables in your script:
  • $accountid – your AWS account ID
  • $bucketname – the bucket you are letting Snowflake use as an External Stage
  • $bucketarn – used in policy statements (you could easily derive this from the bucket name)
  • $kmskeyarn – assuming you are used customer managed encryption keys, your Snowflake storage integration will need to use these to decrypt data in the stage
  • $prefix – if you want to set up granular access (on a key/path basis)
  1. Configure Snowflake access credentials using environment variables or using the ~/.snowsql/config file (you should definitely use the SNOWSQL_PWD env var for your password however)
  2. Configure access to AWS using aws configure
note

The actions performed in both AWS and Snowflake required privileged access on both platforms.

The Code

I have broken this into steps, the complete code is included at the end of the article.

Create Policy Documents

You will need to create the policy documents to allow the role you will create to access objects in the target S3 bucket, you will also need an initial “Assume Role” policy document which will be used to create the role and then updated with information you will get from Snowflake later.

Create Snowflake Access Policy

Use the snowflake_policy_doc.json policy document created in the previous step to create a managed policy, you will need the arn returned in a subsequent statement.

Create Snowflake IAM Role

Use the initial assume_role_policy_doc.json created to create a new Snowflake access role, you will need the arn for this resource when you configure the Storage Integration in Snowflake.

Attach S3 Access Policy to the Role

Now you will attach the snowflake-access-policy to the snowflake-access-role using the $policyarn captured from the policy creation statement.

Create Storage Integration in Snowflake

Use the snowsql CLI to create a Storage Integration in Snowflake supplying the $rolearn captured from the role creation statement.

Get STORAGE_AWS_IAM_USER_ARN and STORAGE_AWS_EXTERNAL_ID

You will need the STORAGE_AWS_IAM_USER_ARN and STORAGE_AWS_EXTERNAL_ID values for the storage integration you created in the previous statement, these will be used to updated the assume role policy in your snowflake-access-role.

Update Snowflake Access Policy

Using the STORAGE_AWS_IAM_USER_ARN and STORAGE_AWS_EXTERNAL_ID values retrieved in the previous statements, you will update the assume-role-policy for the snowflake-access-role.

Test the Storage Integration

To test the connectivity between your Snowflake account and your AWS external stage using the Storage Integartion just created, create a stage as shown here:

Now list objects in the stage (assuming there are any).

list @my_stage;

This should just work! You can use your storage integration to create different stages for different paths in your External Stage bucket and use both of these objects to create Snowpipes for automated ingestion. Enjoy!

Complete Code

The complete code for this example is shown here:

if you have enjoyed this post, please consider buying me a coffee ☕ to help me keep writing!
· 3 min read
Jeffrey Aven

CloudFormation templates in large environments can grow beyond a manageable point. This article provides one approach to breaking up CloudFormation templates into modules which can be imported and used to create a larger template to deploy a complex AWS stack – using Jsonnet.

Jsonnet is a json pre-processing and templating library which includes features including user defined and built-in functions, objects, and inheritance amongst others. If you are not familiar with Jsonnet, here are some good resources to start with:

Advantages

Using Jsonnet you can use imports to break up large stacks into smaller files scoped for each resource. This approach makes CloudFormation template easier to read and write and allows you to apply the DRY (Do Not Repeat Yourself) coding principle (not possible with native CloudFormation templates.

Additionally, although as the template fragments are in Jsonnet format, you can add annotations or comments to your code similar to YAML (not possible with a JSON template alone), although the rendered template is in legal CloudFormation Json format.

Process Overview

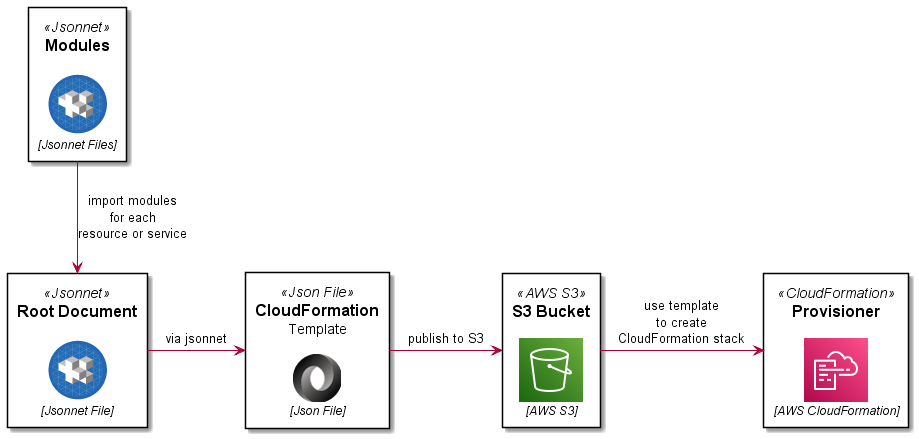
The process is summarised here:

CloudFormation and Jsonnet

Code

This example will deploy a stack with a VPC and an S3 bucket with logging. The project directory structure would look like this:

templates/
├─ includes/
│ ├─ vpc.libsonnet
│ ├─ s3landingbucket.libsonnet
│ ├─ s3loggingbucket.libsonnet
│ ├─ tags.libsonnet
├─ template.jsonnet

Lets look at all of the constituent files:

template.jsonnet

This is the root document which will be processed by Jsonnet to render a legal CloudFormation JSON template. It will import the other files in the includes directory.

includes/tags.libsonnet

This code module is used to generate re-usable tags for other resources (DRY).

includes/vpc.libsonnet

This code module defines a VPC resource to be created with CloudFormation.

includes/s3loggingbucket.libsonnet

This code module defines an S3 bucket resource to be created in the stack which will be used for logging for other buckets.

includes/s3landingbucket.libsonnet

This code module defines an S3 landing bucket resource to be created in the stack.

Testing

To test the pre-processing, you will need a Jsonnet binary/executable for your environment. You can find Docker images which include this for you, or you could build it yourself.

Once you have a compiled binary, you can run the following to generate a rendered CloudFormation template.

jsonnet template.jsonnet -o template.json

You can validate this template using the AWS CLI as shown here:

aws cloudformation validate-template --template-body file://template.json

Deployment

In a previous article, Simplified AWS Deployments with CloudFormation and GitLab CI, I demonstrated an end-to-end deployment pipeline using GitLab CI. Jsonnet pre-processing can be added to this pipeline as an initial ‘preprocess’ stage and job. A snippet from the .gitlab-ci.yml file is included here:

Enjoy!

if you have enjoyed this post, please consider buying me a coffee ☕ to help me keep writing!