
2 posts tagged with "jsonnet"

View All Tags

· 3 min read
Jeffrey Aven

CloudFormation templates in large environments can grow beyond a manageable point. This article provides one approach to breaking up CloudFormation templates into modules which can be imported and used to create a larger template to deploy a complex AWS stack – using Jsonnet.

Jsonnet is a json pre-processing and templating library which includes features including user defined and built-in functions, objects, and inheritance amongst others. If you are not familiar with Jsonnet, here are some good resources to start with:

Advantages

Using Jsonnet you can use imports to break up large stacks into smaller files scoped for each resource. This approach makes CloudFormation template easier to read and write and allows you to apply the DRY (Do Not Repeat Yourself) coding principle (not possible with native CloudFormation templates.

Additionally, although as the template fragments are in Jsonnet format, you can add annotations or comments to your code similar to YAML (not possible with a JSON template alone), although the rendered template is in legal CloudFormation Json format.
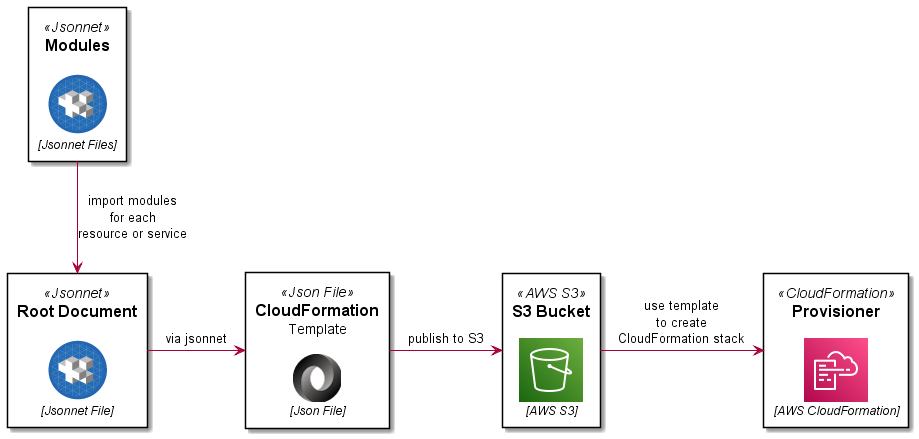
Process Overview

The process is summarised here:

CloudFormation and Jsonnet

Code

This example will deploy a stack with a VPC and an S3 bucket with logging. The project directory structure would look like this:

templates/
├─ includes/
│ ├─ vpc.libsonnet
│ ├─ s3landingbucket.libsonnet
│ ├─ s3loggingbucket.libsonnet
│ ├─ tags.libsonnet
├─ template.jsonnet

Lets look at all of the constituent files:

template.jsonnet

This is the root document which will be processed by Jsonnet to render a legal CloudFormation JSON template. It will import the other files in the includes directory.

includes/tags.libsonnet

This code module is used to generate re-usable tags for other resources (DRY).

includes/vpc.libsonnet

This code module defines a VPC resource to be created with CloudFormation.

includes/s3loggingbucket.libsonnet

This code module defines an S3 bucket resource to be created in the stack which will be used for logging for other buckets.

includes/s3landingbucket.libsonnet

This code module defines an S3 landing bucket resource to be created in the stack.

Testing

To test the pre-processing, you will need a Jsonnet binary/executable for your environment. You can find Docker images which include this for you, or you could build it yourself.

Once you have a compiled binary, you can run the following to generate a rendered CloudFormation template.

jsonnet template.jsonnet -o template.json

You can validate this template using the AWS CLI as shown here:

aws cloudformation validate-template --template-body file://template.json

Deployment

In a previous article, Simplified AWS Deployments with CloudFormation and GitLab CI, I demonstrated an end-to-end deployment pipeline using GitLab CI. Jsonnet pre-processing can be added to this pipeline as an initial ‘preprocess’ stage and job. A snippet from the .gitlab-ci.yml file is included here:

Enjoy!

if you have enjoyed this post, please consider buying me a coffee ☕ to help me keep writing!

· 4 min read
Mark Stella

Everytime I start a new project I try and optimise how the application can work across multiple envronments. For those who don't have the luxury of developing everything in docker containers or isolated spaces, you will know my pain. How do I write code that can run on my local dev environment, migrate to the shared test and ci environment and ultimately still work in production.

In the past I tried exotic options like dynamically generating YAML or JSON using Jinja. I then graduated to HOCON which made my life so much easier. This was until I stumbled across Jsonnet. For those who have not seen this in action, think JSON meets Jinja meets HOCON (a Frankenstein creation that I have actually built in the past)

To get a feel for how it looks, below is a contrived example where I require 3 environments (dev, test and production) that have different paths, databases and vault configuration.

Essentially, when this config is run through the Jsonnet templating engine, it will expect a variable 'ENV' to ultimately refine the environment entry to the one we specifically want to use.

A helpful thing I like to do with my programs is give users a bit of information as to what environments can be used. For me, running a cli that requires args should be as informative as possible - so listing out all the environments is mandatory. I achieve this with a little trickery and a lot of help from the click package!

local exe = "application.exe";

local Environment(prefix) = {
root: "/usr/" + prefix + "/app",
path: self.root + "/bin/" + exe,
database: std.asciiUpper(prefix) + "_DB",
tmp_dir: "/tmp/" + prefix
};

local Vault = {
local uri = "http://127.0.0.1:8200/v1/secret/app",
_: {},
dev: {
secrets_uri: uri,
approle: "local"
},
tst: {
secrets_uri: uri,
approle: "local"
},
prd: {
secrets_uri: "https://vsrvr:8200/v1/secret/app",
approle: "sa_user"
}
};

{

environments: {
_: {},
dev: Environment("dev") + Vault[std.extVar("ENV")],
tst: Environment("tst") + Vault[std.extVar("ENV")],
prd: Environment("prd") + Vault[std.extVar("ENV")]
},

environment: $["environments"][std.extVar("ENV")],
}

The trick I perform is to have a placeholder entry '_' that I use to initially render the template. I then use the generated JSON file and get all the environment keys so I can feed that directly into click.

from typing import Any, Dict
import click
import json
import _jsonnet
from pprint import pprint

ENV_JSONNET = 'environment.jsonnet'
ENV_PFX_PLACEHOLDER = '_'

def parse_environment(prefix: str) -> Dict[str, Any]:
_json_str = _jsonnet.evaluate_file(ENV_JSONNET, ext_vars={'ENV': prefix})
return json.loads(_json_str)

_config = parse_environment(prefix=ENV_PFX_PLACEHOLDER)

_env_prefixes = [k for k in _config['environments'].keys() if k != ENV_PFX_PLACEHOLDER]


@click.command(name="EnvMgr")
@click.option(
"-e",
"--environment",
required=True,
type=click.Choice(_env_prefixes, case_sensitive=False),
help="Which environment this is executing on",
)
def cli(environment: str) -> None:
config = parse_environment(environment)
pprint(config['environment'])


if __name__ == "__main__":
cli()

This now allows me to execute the application with both list checking (has the user selected an allowed environment?) and the autogenerated help that click provides.

Below shows running the cli with no arguments:

$> python cli.py

Usage: cli.py [OPTIONS]
Try 'cli.py --help' for help.

Error: Missing option '-e' / '--environment'. Choose from:
dev,
prd,
tst

Executing the application with a valid environment:

$> python cli.py -e dev

{'approle': 'local',
'database': 'DEV_DB',
'path': '/usr/dev/app/bin/application.exe',
'root': '/usr/dev/app',
'secrets_uri': 'http://127.0.0.1:8200/v1/secret/app',
'tmp_dir': '/tmp/dev'}

Executing the application with an invalid environment:

$> python cli.py -e prd3

Usage: cli.py [OPTIONS]
Try 'cli.py --help' for help.

Error: Invalid value for '-e' / '--environment': 'prd3' is not one of 'dev', 'prd', 'tst'.

This is only the tip of what Jsonnet can provide, I am continually learning more about the templating engine and the tool.

if you have enjoyed this post, please consider buying me a coffee ☕ to help me keep writing!