
10 posts tagged with "python"

View All Tags

· 3 min read
Jeffrey Aven

We were looking to implement a variant of the %sql magic command in Jupyter without using the default sqlalchemy module (in our case, just using psycopg2 to connect to a local server - a StackQL postrges wire protocol server).

Create the extension module

We named our extension and cell magic command stackql, so start by creating a file named stackql.py. We made this file in a directory name ext in the Jupyter working directory.

Write the magic extension

Magic commands can be line-based or cell-based or line-or-cell-based; in this example, we will use line-or-cell-based magic, meaning the decorator %stackql will be used to evaluate a line of code and the %%stackql decorator will be used to evaluate the entire contents of the cell it is used in.

The bare-bones class and function definitions required for this extension are described below:

Create a Magic Class

We will need to define a magics class, which we will use to define the magic commands. The class name is arbitrary, but it must be a subclass of IPython.core.magic.Magics. An example is below:

from IPython.core.magic import (Magics, magics_class, line_cell_magic)

@magics_class
class StackqlMagic(Magics):

@line_cell_magic
def stackql(self, line, cell=None):
if cell is None:
# do something with line
else:
# do something with cell
return results

Load and register the extension

To register the magic functions in the StackqlMagic class we created above, use a function named load_ipython_extension, like the following:

def load_ipython_extension(ipython):
ipython.register_magics(StackqlMagic)

Complete extension code

The complete code for our extension is shown here:

from __future__ import print_function
import pandas as pd
import psycopg2, json
from psycopg2.extras import RealDictCursor
from IPython.core.magic import (Magics, magics_class, line_cell_magic)
from io import StringIO
from string import Template

conn = psycopg2.connect("dbname=stackql user=stackql host=localhost port=5444")

@magics_class
class StackqlMagic(Magics):

def get_rendered_query(self, data):
t = Template(StringIO(data).read())
rendered = t.substitute(self.shell.user_ns)
return rendered

def run_query(self, query):
cur = conn.cursor(cursor_factory=RealDictCursor)
cur.execute(query)
rows = cur.fetchall()
cur.close()
return pd.read_json(json.dumps(rows))

@line_cell_magic
def stackql(self, line, cell=None):
if cell is None:
results = self.run_query(self.get_rendered_query(line))
else:
results = self.run_query(self.get_rendered_query(cell))
return results

def load_ipython_extension(ipython):
ipython.register_magics(StackqlMagic)

Load the magic extension

To use our extension, we need to use the %load_ext magic command referencing the extension we created.

%load_ext ext.stackql

Note that since our extension was a file named stackql.py in a directory named ext we reference it using ext.stackql.

Use the magic function in a cell

To use the magic function in a cell (operating on all contents of the cell), we use the %% decorator, like:

%%stackql
SHOW SERVICES IN azure

Use the magic function on a line

To use the magic function on a line, we use the % decorator, like:

%stackql DESCRIBE aws.ec2.instances
Using Variable Expansion

In our example, we implemented variable expansion using the "batteries included" String templating capabilities in Python3. This allows for variables to be set globally in our notebooks and then used in our queries. For example, we can set a variable in a cell like:

project = 'stackql-demo'
zone = 'australia-southeast1-a'

Then use those variables in our queries like:

%%stackql
SELECT status, count(*) as num_instances
FROM google.compute.instances
WHERE project = '$project'
AND zone = '$zone'
GROUP BY status

An example is shown here:

Using a Custom Jupyter Magic Command

The complete code can be found at stackql/stackql-jupyter-demo.

if you have enjoyed this post, please consider buying me a coffee ☕ to help me keep writing!

· 7 min read
Jeffrey Aven

Loading Parquet format files into BigQuery is straightforward, you just need to specify the file location (local, Google Cloud Storage, Drive, Amazon S3 or Azure Blob storage) and thats pretty much it, BigQuery works the rest out from there.

bq load \
--location=australia-southeast2 \
--project_id=parquet-demo \
--source_format=PARQUET \
parquet_test.dim_calendar \
.\Calendar.gzip

In Snowflake, however, it is not as simple, I'll share my approach to automating this here.

info

Parquet is a self-describing, column-oriented storage format commonly used in distributed systems for input and output. Data in Parquet files is serialised for optimised consumption from Parquet client libraries and packages such as pandas, pyarrow, fastparquet, dask, and pyspark.

Background

Data in a Parquet file is stored in a single column for a self-contained dataset. If you were to ingest this into Snowflake without knowing the schema you could do something like this...

CREATE OR REPLACE TABLE PARQUET_TEST.PUBLIC.DIM_CALENDAR (
Data variant
);

COPY INTO PARQUET_TEST.PUBLIC.DIM_CALENDAR
(
Data
) FROM (
SELECT
*
FROM
@PARQUET_TEST.PUBLIC.DIM_CALENDAR_STAGE)
file_format = (TYPE = parquet);

You would end up with something like...

RowData
1{"CalMonthOfYearNo": 6, "CalYear": 2020, ... }
2{"CalMonthOfYearNo": 6, "CalYear": 2020, ... }
......

You could then have a second stage of processing to convert this into a normal relational structure.

Or you could do this in one step, with a little prep work ahead of time. In my scenario I was given several parquet files from a client for a one-off load into Snowflake, several files for a fact table and multiple single files representing different dimension tables.

Streamlined Ingestion for Parquet Files into Snowflake

To collapse the formatting and uploading of Parquet files into a materialized table into one step, we need to do a couple of things:

  1. Create the target table with the correct schema (column names and data types); and
  2. perform a projection in our COPY command from the single column containing all of the data (represented by $1 in Snowflake) into columns defined in step 1

Since this is technically a transformation and only named stages are supported for COPY transformations, we need to create a stage for the copy. In my case there is a pre-existing Storage Integration in place that can be used by the stage.

Generate Table DDL

To automate the generation of the DDL to create the table and stage and the COPY command, I used Python and Spark (which has first class support for Parquet files). Parquet datatypes are largely the same as Snowflake, but if we needed to, we could create a map and modify the target types during the DDL generation.

First copy specimen Parquet formatted files to a local directory, the script we are creating can then iterate through the parquet files and generate all of the commands we will need saved to a .sql file.

With some setup information provided (not shown for brevity), we will first go through each file in the directory, capture metadata along with the schema (column name and data type) as shown here:

for file in files:
tableMap = {}
table = file.stem
spark = launch_spark_session()
parquetFile = spark.read.parquet("%s/%s" %(BASE_DIR, file))
data_types = parquetFile.dtypes
stop_spark_session(spark)
tableMap['name'] = table
tableMap['file'] = file
tableMap['data_types'] = data_types
allTables.append(tableMap)

The allTables list looks something like this...

[{'name': 'Calendar', 'file': PosixPath('data/dim/Calendar.gzip'), 'data_types': [('Time_ID', 'bigint'), ('CalYear', 'bigint'), ('CalMonthOfYearNo', 'bigint'), ('FinYear', 'bigint'), ('FinWeekOfYearNo', 'bigint')]}, ... ]

Next we generate the CREATE TABLE statement using the allTables list:

# create output file for all sql
with open('all_tables.sql', 'w') as f:
for table in allTables:
print("processing %s..." % table['name'])
f.write("/*** Create %s Table***/" % table['name'].upper())
sql = """
CREATE OR REPLACE TABLE %s.%s.%s (
""" % (database, schema, table['name'].upper())
for column in table['data_types']:
sql += " %s %s,\n" % (column[0], column[1])
sql = sql[:-2] + "\n);"
f.write(sql)
f.write("\n\n")

Generate Named Stage DDL

Then we generate the stage in S3 from which the files will be loaded:

        f.write("/*** Create %s Stage***/" % table['name'].upper())
sql = """
CREATE OR REPLACE STAGE %s.%s.%s_STAGE
url='%s/%s'
storage_integration = %s
encryption=(type='AWS_SSE_KMS' kms_key_id = '%s');
""" % (database, schema, table['name'].upper(), s3_prefix, table['file'], storage_int, kms_key_id)
f.write(sql)
f.write("\n\n")

Generate COPY commands

Then we generate the COPY commands...

        f.write("/*** Copying Data into %s ***/" % table['name'].upper())
sql = """
COPY INTO %s.%s.%s
(\n""" % (database, schema, table['name'].upper())
for column in table['data_types']:
sql += " %s,\n" % column[0]
sql = sql[:-2] + "\n)"
sql += " FROM (\nSELECT\n"
for column in table['data_types']:
sql += " $1:%s::%s,\n" % (column[0], column[1])
sql = sql[:-2] + "\nFROM\n"
sql += "@%s.%s.%s_STAGE)\n" % (database, schema, table['name'].upper())
sql += " file_format = (TYPE = parquet);"
f.write(sql)
f.write("\n\n")

Since this is a one off load, we will go ahead and drop the stage we created as it is no longer needed (this step is optional)..

        f.write("/*** Dropping stage for %s ***/" % table['name'].upper())
sql = """
DROP STAGE %s.%s.%s_STAGE;
""" % (database, schema, table['name'].upper())
f.write(sql)
f.write("\n\n")

The resultant file created looks like this..

/*** Create CALENDAR Table***/
CREATE OR REPLACE TABLE PARQUET_TEST.PUBLIC.DIM_CALENDAR (
Time_ID bigint,
CalYear bigint,
CalMonthOfYearNo bigint,
FinYear bigint,
FinWeekOfYearNo bigint
);

/*** Create DIM_CALENDAR Stage***/
CREATE OR REPLACE STAGE PARQUET_TEST.PUBLIC.DIM_CALENDAR_STAGE
url='s3://my-bucket/data/dim/Calendar.gzip'
storage_integration = my_storage_int
encryption=(type='AWS_SSE_KMS' kms_key_id = '4f715ec9-ee8e-44ab-b35d-8daf36c05f19');

/*** Copying Data into DIM_CALENDAR ***/
COPY INTO PARQUET_TEST.PUBLIC.DIM_CALENDAR
(
Time_ID,
CalYear,
CalMonthOfYearNo,
FinYear,
FinWeekOfYearNo
) FROM (
SELECT
$1:Time_ID::bigint,
$1:CalYear::bigint,
$1:CalMonthOfYearNo::bigint,
$1:FinYear::bigint,
$1:FinWeekOfYearNo::bigint
FROM
@PARQUET_TEST.PUBLIC.DIM_CALENDAR_STAGE)
file_format = (TYPE = parquet);

/*** Dropping stage for DIM_CALENDAR ***/
DROP STAGE PARQUET_TEST.PUBLIC.DIM_CALENDAR_STAGE;

Load your data

You can then run this along with all of the other dimension and fact table DDL and COPY commands generated to perform the one-off load from parquet files. You can find the complete code below, enjoy!

Complete Code
from pathlib import Path
from pyspark.sql import SparkSession
def launch_spark_session():
return SparkSession \
.builder \
.appName("Parquet DDL Generation") \
.getOrCreate()

def stop_spark_session(spark):
spark.stop()

allTables = []
database = "PARQUET_TEST"
schema = "PUBLIC"
s3_prefix = 's3://my-bucket'
storage_int = 'my_storage_int'
kms_key_id = '4f715ec9-ee8e-44ab-b35d-8daf36c05f19'

BASE_DIR = Path(__file__).resolve().parent
directory = 'data/dim'
files = Path(directory).glob('*.gzip')
for file in files:
tableMap = {}
table = file.stem
spark = launch_spark_session()
parquetFile = spark.read.parquet("%s/%s" %(BASE_DIR, file))
data_types = parquetFile.dtypes
stop_spark_session(spark)
tableMap['name'] = table
tableMap['file'] = file
tableMap['data_types'] = data_types
allTables.append(tableMap)

# create output file for all sql
with open('all_tables.sql', 'w') as f:
for table in allTables:
print("processing %s..." % table['name'])
f.write("/*** Create %s Table***/" % table['name'].upper())
sql = """
CREATE OR REPLACE TABLE %s.%s.%s (
""" % (database, schema, table['name'].upper())
for column in table['data_types']:
sql += " %s %s,\n" % (column[0], column[1])
sql = sql[:-2] + "\n);"
f.write(sql)
f.write("\n\n")

f.write("/*** Create %s Stage***/" % table['name'].upper())
sql = """
CREATE OR REPLACE STAGE %s.%s.%s_STAGE
url='%s/%s'
storage_integration = %s
encryption=(type='AWS_SSE_KMS' kms_key_id = '%s');
""" % (database, schema, table['name'].upper(), s3_prefix, table['file'], storage_int, kms_key_id)
f.write(sql)
f.write("\n\n")

f.write("/*** Copying Data into %s ***/" % table['name'].upper())
sql = """
COPY INTO %s.%s.%s
(\n""" % (database, schema, table['name'].upper())
for column in table['data_types']:
sql += " %s,\n" % column[0]
sql = sql[:-2] + "\n)"
sql += " FROM (\nSELECT\n"
for column in table['data_types']:
sql += " $1:%s::%s,\n" % (column[0], column[1])
sql = sql[:-2] + "\nFROM\n"
sql += "@%s.%s.%s_STAGE)\n" % (database, schema, table['name'].upper())
sql += " file_format = (TYPE = parquet);"
f.write(sql)
f.write("\n\n")

f.write("/*** Dropping stage for %s ***/" % table['name'].upper())
sql = """
DROP STAGE %s.%s.%s_STAGE;
""" % (database, schema, table['name'].upper())
f.write(sql)
f.write("\n\n")

if you have enjoyed this post, please consider buying me a coffee ☕ to help me keep writing!

· 8 min read
Chris Ottinger

Container images provide an ideal software packaging solution for DataOps and python based data pipeline workloads. Containers enable Data Scientists and Data Engineers to incorporate the latest packages and libraries without the issues associated with introducing breaking changes into shared environments. A Data Engineer or Data Scienctist can quickly release new functionality with the best tools available.

Container images provide safer developer environments but as the number of container images used for production workloads grow, a maintenance challenge can emerge. Whether using pip or poetry to manage python packages and dependencies, updating a container definition requires edits to the explicit package versions as well as to the pinned or locked versions of the package dependencies. This process can be error prone without automation and a repeatable CICD workflow.

A workflow pattern based on docker buildkit / moby buildkit multi-stage builds provides an approach that maintains all the build specifications in a single Dockerfile, while build tools like make provide a simple and consistent interface into the container build stages. The data pipeline challenges addresses with a multi-stage build pattern include:

  • automating lifecycle management of the Python packages used by data pipelines
  • integrating smoke testing of container images to weed out compatibility issues early
  • simplifying the developer experience with tools like make that can be used both locally and in CI/CD pipelines

The Dockerfile contains the definitions of the different target build stages and order of execution from one stage to the next. The Makefile wraps the Dockerfile build targets into a standard set of workflow activities, following a similar to $ config && make && make install

The DataOps Container Lifecycle Workflow

A typical dataops/gitops style workflow for maintaining container images includes actions in the local environment to define the required packages and produce the pinned dependency poetry.lock file or requirements.txt packages list containing the full set of pinned dependent packages.

Given and existing project in a remote git repository with a CI/CD pipeline defined, the following workflow would be used to update package versions and dependencies:

Multi-stage build workflow

The image maintainer selects the packages to update or refresh using a local development environment, working from a feature branch. This includes performing an image smoke-test to validate the changes within the container image.

Once refreshed image has been validated, the lock file or full pinned package list is commited back to the repository and pushed to the remote repository. The CI/CD pipeline performs a trial build and conducts smoke testing. On merge into the main branch, the target image is built, re-validated, and pushed to the container image registry.

The multi-stage build pattern can support both defining both the declared packages for an environment as well as the dependent packages, but poetry splits the two into distinct files, a pyproject.toml file containing the declated packages and a poetry.lock file that contains the full set of declared and dependent packages, including pinned versions. pip supports loading packages from different files, but requires a convention for which requirements file contains the declared packages and while contains the full set of pinned package versions produced by pip freeze. The example code repo contains examples using both pip and poetry.

The following example uses poetry in a python:3.8 base image to illustrate managing the dependencies and version pinning of python packages.

Multi-stage Dockerfile

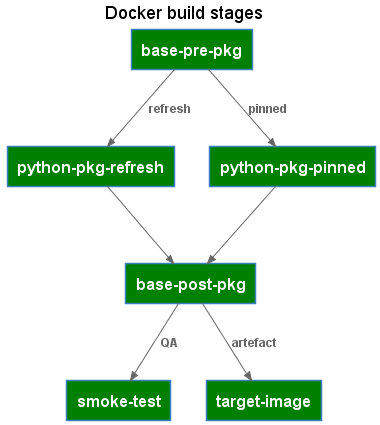
The Dockerfile defines the build stages used for both local refresh and by the CICD pipelines to build the target image.

Dockerfile Stages

The Dockerfile makes use of the docker build arguments feature to pass in whether the build should refresh package versions or build the image from pinned packages.

Build Stage: base-pre-pkg

Any image setup and pre-python package installation steps. For poetry, this includes setting the config option to skip the creation of a virtual environment as the container already provides the required isolation.

ARG PYTHON_PKG_VERSIONS=pinned
FROM python:3.8 as base-pre-pkg

RUN install -d /src && \
pip install --no-cache-dir poetry==1.1.13 && \
poetry config virtualenvs.create false
WORKDIR /src

Build Stage: python-pkg-refresh

The steps to generate a poetry.lock file containing the pinned package versions.

FROM base-pre-pkg as python-pkg-refresh
COPY pyproject.toml poetry.lock /src/
RUN poetry update && \
poetry install

Build Stage: python-pkg-pinned

The steps to install packages using the pinned package versions.

FROM base-pre-pkg as python-pkg-pinned
COPY pyproject.toml poetry.lock /src/
RUN poetry install

Build Stage: base-post-pkg

A consolidation build target that can refer to either the python-pkg-refresh or the python-pkg-pinned stages, depending on the docker build argument and includes any post-package installation steps.

FROM python-pkg-${PYTHON_PKG_VERSIONS} as base-post-pkg

Build Stage: smoke-test

Simple smoke tests and validation commands to validate the built image.

FROM base-post-pkg as smoke-test
WORKDIR /src
COPY tests/ ./tests
RUN poetry --version && \
python ./tests/module_smoke_test.py

Build Stage: target-image

The final build target container image. Listing the target-image as the last stage in the Dockerfile has the effect of also making this the default build target.

FROM base-post-pkg as target-image

Multi-stage Makefile

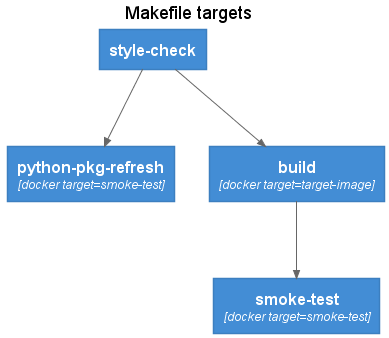
The Makefile provides a workflow oriented wrapper over the Dockerfile build stage targets. The Makefile targets can be executed both in a local development environment as well as via a CICD pipeline. The Makefile includes several variables that can either be run using default values, or overridden by the CI/CD pipeline.

Makefile targets

Make Target: style-check

Linting and style checking of source code. Can include both application code as well as the Dockerfile itself using tools such as hadolint.

style-check:
hadolint ./Dockerfile

Make Target: python-pkg-refresh

The python-pkg-refresh target builds a version of the target image with refreshed package versions. A temporary container instance is created from the target image and the poetry.lock file is copied into the local file system. The smoke-test docker build target is used to ensure image validation is also performed. The temporary container as well as the package refresh image are removed after the build.

python-pkg-refresh:
@echo ">> Update python packages in container image"
docker build ${DOCKER_BUILD_ARGS} \
--target smoke-test \
--build-arg PYTHON_PKG_VERSIONS=refresh \
--tag ${TARGET_IMAGE_NAME}:$@ .
@echo ">> Copy the new poetry.lock file with updated package versions"
docker create --name ${TARGET_IMAGE_NAME}-$@ ${TARGET_IMAGE_NAME}:$@
docker cp ${TARGET_IMAGE_NAME}-$@:/src/poetry.lock .
@echo ">> Clean working container and refresh image"
docker rm ${TARGET_IMAGE_NAME}-$@
docker rmi ${TARGET_IMAGE_NAME}:$@

Make Target: build

The standard build target using pinned python package versions.

build:
docker build ${DOCKER_BUILD_ARGS} \
--target target-image \
--tag ${TARGET_IMAGE_NAME}:${BUILD_TAG} .

Make Target: smoke-test

Builds an image and peforms smoke testing. The smoke-testing image is removed after the build.

smoke-test:
docker build ${DOCKER_BUILD_ARGS} \
--target smoke-test \
--tag ${TARGET_IMAGE_NAME}:$@ .
docker rmi ${TARGET_IMAGE_NAME}:$@

Conclusion

The toolchain combination of multi-stage container image builds with make provides a codified method for the lifecycle management of the containers used in data science and data engineering workloads.

The maintainer:

git checkout -b my-refresh-feature
make python-pkg-refresh
make smoke-test
git add pyproject.toml poetry.lock
git commit -m "python package versions updated"
git push

The CICD pipeline:

make build
make smoke-test
docker push <target-image>:<build-tag>
info

You can find the complete source code for this article at https://gitlab.com/datwiz/multistage-pipeline-image-builds

· 6 min read
Mark Stella

Recently I found myself at a client that were using a third party tool to scan all their enterprise applications in order to collate their data lineage. They had spent two years onboarding applications to the tool, resulting in a large technical mess that was hard to debug and impossible to extend. As new applications were integrated onto the platform, developers were forced to think of new ways of connecting and tranforming the data so it could be consumed.

The general approach was: setup scanner -> scan application -> modify results -> upload results -> backup results -> cleanup workspace -> delete anything older than 'X' days

Each developer had their own style of doing this - involving shell scripts, python scripts, SQL and everything in between. Worse, there was slabs of code replicated across the entire repository, with variables and paths changed depending on the use case.

My tasks was to create a framework that could orchestrate the scanning and adhered to the following philosophies:

  • DRY (Don't Repeat Yourself)
  • Config driven
  • Version controlled
  • Simple to extend
  • Idempotent

It also had to be written in Python as that was all the client was skilled in.

After looking at what was on the market (Airflow and Prefect being the main contenders) I decided to roll my own simplified orchestrator that required as little actual coding as possible and could be setup by configuration.

In choosing a configuration format, I settled on HOCON as it closely resembled JSON but has advanced features such as interpolation, substitions and the ability to include other hocon files - this would drastically reduce the amount of boilerplate configuration required.

Because I had focused so heavily on being configuration driven, I also needed the following charecteristics to be delivered:

  • Self discovery of task types (more on this later)
  • Configuration validation at startup

Tasks and self discovery

As I wanted anyone to be able to rapidly extend the framework by adding tasks, I needed to reduce as much repetition and boilerplate as possible. Ideally, I wanted a developer to just have to think about writing code and not have to deal with how to integrate this.

To achieve this, we needed a way of registering new 'tasks' that would become available to the framework. I wanted a developer to simply have to subclass the main Task class and implement a run function - the rest would be taken care of.

class TaskRegistry:

def __init__(self) -> None:
self._registry = {}

def register(self, cls: type) -> None:
n = getattr(cls, 'task_name', cls.__name__).lower()
self._registry[n] = cls

def registered(self) -> List[str]:
return list(self._registry.keys())

def has(self, name: str) -> bool:
return name in self._registry

def get(self, name: str) -> type:
return self._registry[name]

def create(self, name: str, *args, **kwargs) -> object:
try:
return self._registry[name](*args, **kwargs)
except KeyError:
raise ClassNotRegisteredException(name)


registry = TaskRegistry()

Once the registry was instantiated, any new Tasks that inherited from 'Task' would automatically be added to the registry. We could then use the create(name) function to instantiate any class - essentially a pythonic Factory Method

class Task(ABC):

def __init__(self) -> None:
self.logger = logging.getLogger(self.__class__.__name__)

def __init_subclass__(cls) -> None:
registry.register(cls)

@abstractmethod
def run(self, **kwargs) -> bool:
raise NotImplementedError

For the framework to automatically register the classes, it was important to follow the project structure. As long as the task resided in the 'tasks' module, we could scan this at runtime and register each task.

└── simple_tasker
├── __init__.py
├── cli.py
└── tasks
├── __init__.py
├── archive.py
└── shell_script.py

This was achieved with a simple dynamic module importer

modules = glob.glob(join(dirname(__file__), "*.py"))

for f in modules:
if isfile(f) and not f.endswith("__init__.py"):
__import__(f"{Task.__module__}.{basename(f)[:-3]}")

The configuration

In designing how the configuration would bind to the task, I needed to capture the name (what object to instanticate) and what args to pass to the instantiated run function. I decided to model it as below with everything under a 'tasks' array

tasks: [
{
name: shell_script
args: {
script_path: uname
script_args: -a
}
},
{
name: shell_script
args: {
script_path: find
script_args: [${CWD}/simple_tasker/tasks, -name, "*.py"]
}
},
{
name: archive
args: {
input_directory_path: ${CWD}/simple_tasker/tasks
target_file_path: /tmp/${PLATFORM}_${TODAY}.tar.gz
}
}
]

Orchestration and validation

As mentioned previously, one of the goals was to ensure the configuration was valid prior to any execution. This meant that the framework needed to validate whether tha task name referred to a registered task, and that all mandatory arguments were addressed in the configuration. Determining whether the task was registered was just a simple key check, however to validate the arguments to the run required some inspection - I needed to get all args for the run function and filter out 'self' and any asterisk args (*args, **kwargs)

def get_mandatory_args(func) -> List[str]:

mandatory_args = []
for k, v in inspect.signature(func).parameters.items():
if (
k != "self"
and v.default is inspect.Parameter.empty
and not str(v).startswith("*")
):
mandatory_args.append(k)

return mandatory_args

And finally onto the actual execution bit. The main functionality required here is to validate that the config was defined correctly, then loop through all tasks and execute them - passing in any args.

class Tasker:

def __init__(self, path: Path, env: Dict[str, str] = None) -> None:

self.logger = logging.getLogger(self.__class__.__name__)
self._tasks = []

with wrap_environment(env):
self._config = ConfigFactory.parse_file(path)


def __validate_config(self) -> bool:

error_count = 0

for task in self._config.get("tasks", []):
name, args = task["name"].lower(), task.get("args", {})

if registry.has(name):
for arg in get_mandatory_args(registry.get(name).run):
if arg not in args:
print(f"Missing arg '{arg}' for task '{name}'")
error_count += 1
else:
print(f"Unknown tasks '{name}'")
error_count += 1

self._tasks.append((name, args))

return error_count == 0

def run(self) -> bool:

if self.__validate_config():

for name, args in self._tasks:
exe = registry.create(name)
self.logger.info(f"About to execute: '{name}'")
if not exe.run(**args):
self.logger.error(f"Failed tasks '{name}'")
return False

return True
return False

Putting it together - sample tasks

Below are two examples of how easy it is to configure the framework. We have a simple folder archiver that will tar/gz a directory based on 2 input parameters.

class Archive(Task):

def __init__(self) -> None:
super().__init__()

def run(self, input_directory_path: str, target_file_path: str) -> bool:

self.logger.info(f"Archiving '{input_directory_path}' to '{target_file_path}'")

with tarfile.open(target_file_path, "w:gz") as tar:
tar.add(
input_directory_path,
arcname=os.path.basename(input_directory_path)
)
return True

A more complex example would be the ability to execute shell scripts (or os functions) by passing in some optional variables and variables that can either be a string or list.

class ShellScript(Task):

task_name = "shell_script"

def __init__(self) -> None:
super().__init__()

def run(
self,
script_path: str,
script_args: Union[str, List[str]] = None,
working_directory_path: str = None
) -> bool:

cmd = [script_path]

if isinstance(script_args, str):
cmd.append(script_args)
else:
cmd += script_args

try:

result = subprocess.check_output(
cmd,
stderr=subprocess.STDOUT,
cwd=working_directory_path
).decode("utf-8").splitlines()

for o in result:
self.logger.info(o)

except (subprocess.CalledProcessError, FileNotFoundError) as e:
self.logger.error(e)
return False

return True

You can view the entire implementation here

· 3 min read
Jeffrey Aven

Slack GCS DLP

This is a follow up to a previous blog, Google Cloud Storage Object Notifications using Slack in which we used Slack to notify us of new objects being uploaded to GCS.

In this article we will take things a step further, where uploading an object to a GCS bucket will trigger a DLP inspection of the object and if any preconfigured info types (such as credit card numbers or API credentials) are present in the object, a Slack notification will be generated.

As DLP scans are “jobs”, meaning they run asynchronously, we will need to trigger scans and inspect results using two separate Cloud Functions (one for triggering a scan [gcs-dlp-scan-trigger] and one for inspecting the results of the scan [gcs-dlp-evaluate-results]) and a Cloud PubSub topic [dlp-scan-topic] which is used to hold the reference to the DLP job.

The process is described using the sequence diagram below:

The Code

The gcs-dlp-scan-trigger Cloud Function fires when a new object is created in a specified GCS bucket. This function configures the DLP scan to be executed, including the DLP info types (for instance CREDIT_CARD_NUMBER, EMAIL_ADDRESS, ETHNIC_GROUP, PHONE_NUMBER, etc) a and likelihood of that info type existing (for instance LIKELY). DLP scans determine the probability of an info type occurring in the data, they do not scan every object in its entirety as this would be too expensive.

The primary function executed in the gcs-dlp-scan-trigger Cloud Function is named inspect_gcs_file. This function configures and submits the DLP job, supplying a PubSub topic to which the DLP Job Name will be written, the code for the inspect_gcs_file is shown here:

At this stage the DLP job is created an running asynchronously, the next Cloud Function, gcs-dlp-evaluate-results, fires when a message is sent to the PubSub topic defined in the DLP job. The gcs-dlp-evaluate-results reads the DLP Job Name from the PubSub topic, connects to the DLP service and queries the job status, when the job is complete, this function checks the results of the scan, if the min_likliehood threshold is met for any of the specified info types, a Slack message is generated. The code for the main method in the gcs-dlp-evaluate-results function is shown here:

Finally, a Slack webhook is used to send the message to a specified Slack channel in a workspace, this is done using the send_slack_notification function shown here:

An example Slack message is shown here:

Slack Notification for Sensitive Data Detected in a Newly Created GCS Object

Full source code can be found at: https://github.com/gamma-data/automated-gcs-object-scanning-using-dlp-with-notifications-using-slack

if you have enjoyed this post, please consider buying me a coffee ☕ to help me keep writing!