5 posts tagged with "terraform"

View All Tags

· 3 min read
Jeffrey Aven

Slack GCS DLP

This is a follow up to a previous blog, Google Cloud Storage Object Notifications using Slack in which we used Slack to notify us of new objects being uploaded to GCS.

In this article we will take things a step further, where uploading an object to a GCS bucket will trigger a DLP inspection of the object and if any preconfigured info types (such as credit card numbers or API credentials) are present in the object, a Slack notification will be generated.

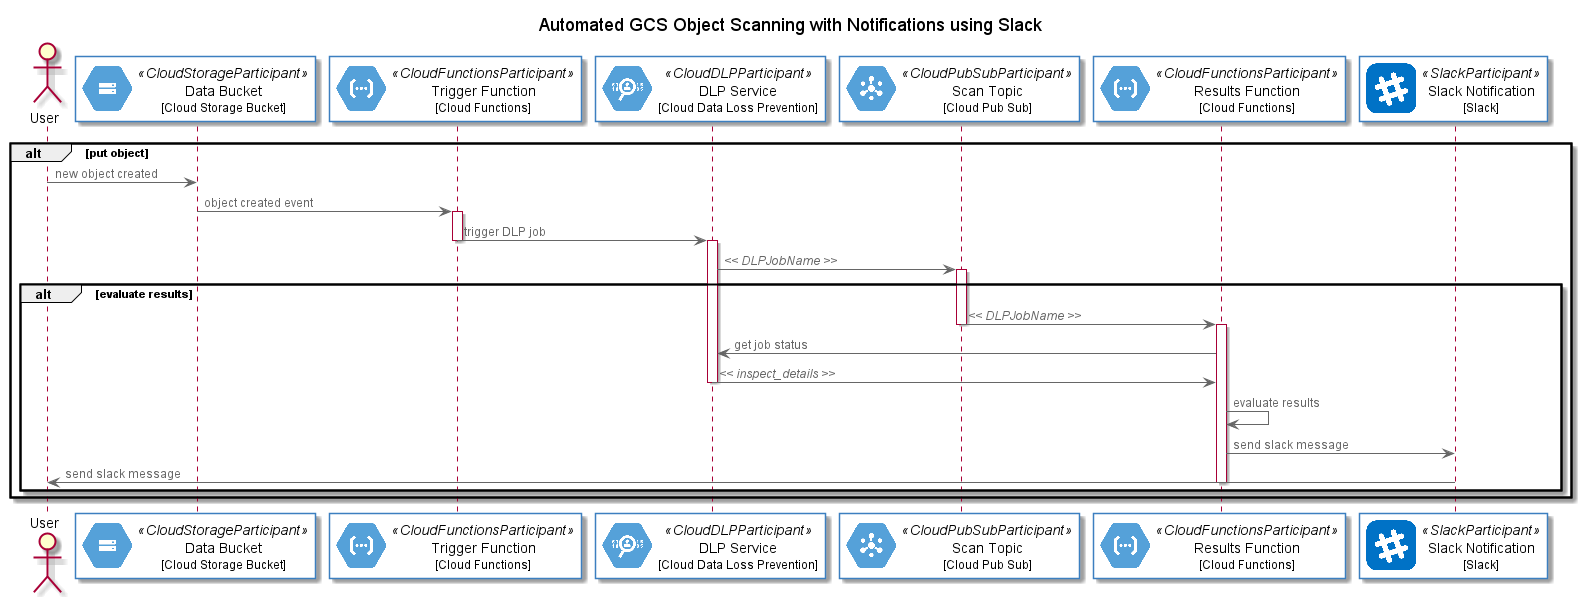
As DLP scans are “jobs”, meaning they run asynchronously, we will need to trigger scans and inspect results using two separate Cloud Functions (one for triggering a scan [gcs-dlp-scan-trigger] and one for inspecting the results of the scan [gcs-dlp-evaluate-results]) and a Cloud PubSub topic [dlp-scan-topic] which is used to hold the reference to the DLP job.

The process is described using the sequence diagram below:

The Code

The gcs-dlp-scan-trigger Cloud Function fires when a new object is created in a specified GCS bucket. This function configures the DLP scan to be executed, including the DLP info types (for instance CREDIT_CARD_NUMBER, EMAIL_ADDRESS, ETHNIC_GROUP, PHONE_NUMBER, etc) a and likelihood of that info type existing (for instance LIKELY). DLP scans determine the probability of an info type occurring in the data, they do not scan every object in its entirety as this would be too expensive.

The primary function executed in the gcs-dlp-scan-trigger Cloud Function is named inspect_gcs_file. This function configures and submits the DLP job, supplying a PubSub topic to which the DLP Job Name will be written, the code for the inspect_gcs_file is shown here:

At this stage the DLP job is created an running asynchronously, the next Cloud Function, gcs-dlp-evaluate-results, fires when a message is sent to the PubSub topic defined in the DLP job. The gcs-dlp-evaluate-results reads the DLP Job Name from the PubSub topic, connects to the DLP service and queries the job status, when the job is complete, this function checks the results of the scan, if the min_likliehood threshold is met for any of the specified info types, a Slack message is generated. The code for the main method in the gcs-dlp-evaluate-results function is shown here:

Finally, a Slack webhook is used to send the message to a specified Slack channel in a workspace, this is done using the send_slack_notification function shown here:

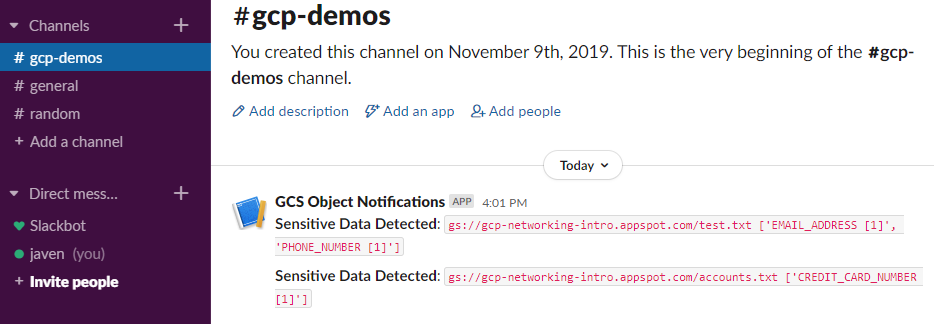
An example Slack message is shown here:

Slack Notification for Sensitive Data Detected in a Newly Created GCS Object

Full source code can be found at: https://github.com/gamma-data/automated-gcs-object-scanning-using-dlp-with-notifications-using-slack

if you have enjoyed this post, please consider buying me a coffee ☕ to help me keep writing!

· 9 min read
Daniel Hussey

Forseti Terraform

Terraform is a powerful tool for managing your Infrastructure as Code. Declare your resources once, define their variables per environment and sleep easy knowing your CI pipeline will take care of the rest.

But… one night you wake up in a sweat. The details are fuzzy but you were browsing your favourite cloud provider’s console - probably GCP ;) - and thought you saw a bucket had been created outside of your allowed locations! Maybe it even had risky access controls.

You go brush it off and try to fall back to sleep, but you can’t quite push the thought from your mind that somewhere in all that Terraform code, someone could be declaring resources in unapproved locations, and your CICD pipeline would do nothing to stop it. Oh the regulatory implications.

Enter Terraform Validator by Forseti

Terraform Validator by Forseti allows you to declare your Policy as Code, check compliance of your Terraform plans against said Policy, and automatically fail violating plans in a CI step. All without setting up servers or agents.

You’re going to learn how to enforce policy on GCP resources like BigQuery, IAM, networks, MySQL, Google Kubernetes Engine (GKE) and more. If you’re particularly crafty, you may be able to go beyond GCP.

Forseti’s suite of solutions are GCP focused and allow a wide range of live config validation, monitoring and more using the Policy Library we’re going to set up. These additional capabilities require additional infrastructure. But we’re going one step at a time, starting with enforcing policy during deployment.

Getting Started

Let’s assume you already have an established CICD pipeline that uses Terraform, or that you are content to validate your Terraform plans locally for now. In that case, we need just two things:

  1. A Policy Library
  2. Terraform Validator

It’s that simple! No new servers, agents, firewall rules, extra service accounts or other nonsense. Just add Policy Library, the Validator tool and you can enforce policy on your Terraform deployments.

We’re going to tinker with some existing GCP-focused sample policies (aka Constraints) that Forseti makes available. These samples cover a wide range of resources and use cases, so it is easy to adjust what’s provided to define your own Constraints.

Policy Library

First let's open up some of Forseti's pre-defined constraints. We’ll copy them into our own Git repository and adjust to create policies that match our needs. Repeatable and configurable - that’s Policy as Code at work.

Concepts

In the world of Forseti and in particular Terraform Validator, Policies are defined and understood via easy to read YAML files known as Constraints

There is just enough information in a Constraint file for to make clear its purpose and effect, and by tinkering lightly with a pre-written Constraint you can achieve a lot without looking too deeply into the inner workings . But there’s more happening than meets the eye.

Constraints are built on Templates - which are like forms with some extra bits waiting to be completed to make a Constraint. Except there’s a lot more hidden away that’s pretty cool if you want to understand it.

Think of a Template as a ‘Class’ in the OOP sense, and of a Constraint as an instantiated Template with all the key attributes defined.

E.g. A generic Template for policy on bucket locations and a Constraint to specify which locations are relevant in a given instance. Again, buckets and locations are just the basic example - the potential applications are far greater.

Now the real magic is that just like a ‘Class’, a Template contains logic that makes everything abstracted away in the Constraint possible. Templates contain inline Rego (ray-go), borrowed lovingly by Forseti from the Open Policy Agent (OPA) team.

Learn more about Rego and OPA here to understand the relationship to our Terraform Validator.

But let’s begin.

Set up your Policies

Create your Policy Library repository

Create your Policy Library repository by cloning https://github.com/forseti-security/policy-library into your own VCS.

This repo contains templates and sample constraints which will form the basis of your policies. So get it into your Git environment and clone it to local for the next step.

Customise sample constraints to fit your needs

As discussed in Concepts, Constraints are defined Templates, which make use of Rego policy language. Nice. So let’s take a sample Constraint, put it in our Policy Library and set the values to what we need. It’s that easy - no need to write new templates or learn Rego if your use case is covered.

In a new branch…

  1. Copy the sample Constraint storage_location.yaml to your Constraints folder.
$ cp policy-library/samples/storage_location.yaml policy-library/policies/constraints/storage_location.yaml
  1. Replace the sample location (asia-southeast1) in storage_location.yaml with australia-southeast1.
  spec:  
severity: high
match:
target: ["organization/*"]
parameters:
mode: "allowlist"
locations:
- australia-southeast1
exemptions: []
  1. Push back to your repo - not Forseti’s!
$ git push https://github.com/<your-repository>/policy-library.git

Policy review

There you go - you’ve customised a sample Constraint. Now you have your own instance of version controlled Policy-as-Code and are ready to apply the power of OPA’s Rego policy language that lies within the parent Template. Impressively easy right?

That’s a pretty simple example. You can browse the rest of Forseti’s Policy Library to view other sample Constraints, Templates and the Rego logic that makes all of this work. These can be adjusted to cover all kinds of use cases across GCP resources.

I suggest working with and editing the sample Constraints before making any changes to Templates.

If you were to write Rego and Templates from scratch, you might even be able to enforce Policy as Code against non-GCP Terraform code.

Terraform Validator

Now, let’s set up the Terraform Validator tool and have it compare a sample piece of Terraform code against the Constraint we configured above. Keep in mind you’ll want to translate what’s done here into steps in your CICD pipeline.

Once the tool is in place, we really just run terraform plan and feed the output into Terraform Validator. The Validator compares it to our Constraints, runs all the abstracted logic we don’t need to worry about and returns 0 or 2 when done for pass / fail respectively. Easy.

So using Terraform if I try to make a bucket in australia-southeast1 it should pass, if I try to make one in the US it should fail. Let’s set up the tool, write some basic Terraform and see how we go.

Setup Terraform Validator

Check for the latest version of terraform-validator from the official terraform-validator GCS bucket.

Very important when using tf version 0.12 or greater. This is the easy way - you can pull from the Terraform Validator Github and make it yourself too.

$ gsutil ls -r gs://terraform-validator/releases

Copy the latest version to the working dir

$ gsutil cp gs://terraform-validator/releases/2020-03-05/terraform-validator-linux-amd64 .

Make it executable

$ chmod 755 terraform-validator-linux-amd64

Ready to go!

Review your Terraform code

We’re going to make a ridiculously simple piece of Terraform that tries to create one bucket in our project to keep things simple.

# main.tf

resource "google_storage_bucket" "tf-validator-demo-bucket" {  
name          = "tf-validator-demo-bucket"
  location      = "US"
  force_destroy = true

  lifecycle_rule {
    condition {
      age = "3"
    }
    action {
      type = "Delete"
    }
  }
}

This is a pretty standard bit of Terraform for a GCS bucket, but made very simple with all the values defined directly in main.tf. Note the location of the bucket - it violates our Constraint that was set to the australia-southeast1 region.

Make the Terraform plan

Warm up Terraform.
Double check your Terraform code if there are any hiccups.

$ terraform init

Make the Terraform plan and store output to file.

$ terraform plan --out=terraform.tfplan

Convert the plan to JSON

$ terraform show -json ./terraform.tfplan > ./terraform.tfplan.json

Validate the non-compliant Terraform plan against your Constraints, for example

$ ./terraform-validator-linux-amd64 validate ./tfplan.tfplan.json --policy-path=../repos/policy-library/

TA-DA!

Found Violations:

Constraint allow_some_storage_location on resource //storage.googleapis.com/tf-validator-demo-bucket: //storage.googleapis.com/tf-validator-demo-bucket is in a disallowed location.

Validate the compliant Terraform plan against your Constraints

Let’s see what happens if we repeat the above, changing the location of our GCS bucket to australia-southeast1.

$ ./terraform-validator-linux-amd64 validate ./tfplan.tfplan.json --policy-path=../repos/policy-library/

Results in..

No violations found.

Success!!!

Now all that’s left to do for your Policy as Code CICD pipeline is to configure the rest of your Constraints and run this check before you go ahead and terraform apply. Be sure to make the apply step dependent on the outcome of the Validator.

Wrap Up

We’ve looked at how to apply Policy as Code to validate our Infrastructure as Code. Sounds pretty modern and DevOpsy doesn’t it.

To recap, we learned about Constraints, which are fully defined instances of Policy as Code. They’re based on YAML Templates that refer to the OPA policy language Rego, but we didn’t have to learn it :)

We created our own version controlled Policy Library.

Using the above learning and some handy pre-existing samples, we wrote policies (Constraints) for GCP infrastructure, specifying a whitelist for locations in which GCS buckets could be deployed.

As mentioned there are dozens upon dozens of samples across BigQuery, IAM, networks, MySQL, Google Kubernetes Engine (GKE) and more to work with.

Of course, we stored these configured Constraints in our version-controlled Policy Library.

  • We looked at a simple set of Terraform code to define a GCS bucket, and stored the Terraform plan to a file before applying it.
  • We ran Forseti’s Terraform Validator against the Terraform plan file, and had the Validator compare the plan to our Policy Library.
  • We saw that the results matched our expectations! Compliance with the location specified in our Constraint passed the Validator’s checks, and non-compliance triggered a violation.

Awesome. And the best part is that all this required no special permissions, no infrastructure for servers or agents and no networking.

All of that comes with the full Forseti suite of Inventory taking Config Validation of already deployed resources. We might get to that next time.

References:

https://github.com/GoogleCloudPlatform/terraform-validator https://github.com/forseti-security/policy-library https://www.openpolicyagent.org/docs/latest/policy-language/ https://cloud.google.com/blog/products/identity-security/using-forseti-config-validator-with-terraform-validator https://forsetisecurity.org/docs/latest/concepts/

· 3 min read
Jeffrey Aven

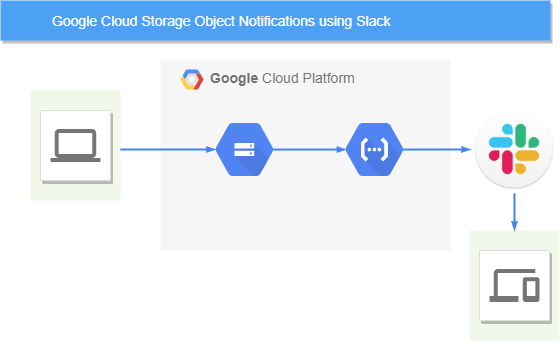
This article describes the steps to integrate Slack with Google Cloud Functions to get notified about object events within a specified Google Cloud Storage bucket.

Google Cloud Storage Object Notifications using Slack

Events could include the creation of new objects, as well as delete, archive or metadata operations performed on a given bucket.

This pattern could be easily extended to other event sources supported by Cloud Functions including:

  • Cloud Pub/Sub messages
  • Cloud Firestore and Firebase events
  • Stackdriver log entries

More information can be found at https://cloud.google.com/functions/docs/concepts/events-triggers.

The prerequisite steps to configure Slack are provided here:

  1. First you will need to create a Slack app (assuming you have already set up an account and a workspace). The following screenshots demonstrate this process:
Create a Slack app
Create a Slack app
Give the app a name and associate it with an existing Slack workspace
  1. Next you need to Enable and Activate Incoming Webhooks to your app and add this to your workspace. The following screenshots demonstrate this process:
Enable Incoming Web Hooks for the app
Activate incoming webhooks
Add the webhook to your workspace
  1. Next you need to specify a channel for notifications generated from object events.
Select a channel for the webhook
  1. Now you need to copy the Webhook url provided, you will use this later in your Cloud Function.
Copy the webhook URL to the clipboard

Treat your webhook url as a secret, do not upload this to a public source code repository

Next you need to create your Cloud Function, this example uses Python but you can use an alternative runtime including Node.js or Go.

This example templates the source code using the Terraform template_file data source. The function source code is shown here:

Within your Terraform code you need to render your Cloud Function code substituting the slack_webhook_url for it's value which you will supply as a Terraform variable. The rendered template file is then placed in a local directory along with a requirements.txt file and zipped up. The resulting Zip archive is uploaded to a specified bucket where it will be sourced to create the Cloud Function.

Now you need to create the Cloud Function, the following HCL snippet demonstrates this:

The event_trigger block in particular specifies which GCS bucket to watch and what events will trigger invocation of the function. Bucket events include:

  • google.storage.object.finalize (the creation of a new object)
  • google.storage.object.delete
  • google.storage.object.archive
  • google.storage.object.metadataUpdate

You could add additional logic to the Cloud Function code to look for specific object names or naming patterns, but keep in mind the function will fire upon every event matching the event_type and resource criteria.

To deploy the function, you would simply run:

terraform apply -var="slack_webhook_url=https://hooks.slack.com/services/XXXXXXXXX/XXXXXXXXX/XXXXXXXXXXXXXXXXXXXXXXXX"

Now once you upload a file named test-object.txt, voilà!:

Slack notification for a new object created

Full source code is available at: https://github.com/gamma-data/gcs-object-notifications-using-slack

if you have enjoyed this post, please consider buying me a coffee ☕ to help me keep writing!

· 3 min read
Jeffrey Aven

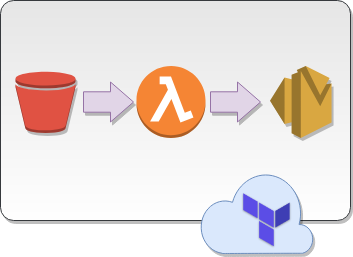
S3 object notifications using Lambda and SES with Terraform

Following on from the previous post in the Really Simple Terraform series simple-lambda-ec2-scheduler, where we used Terraform to deploy a Lambda function including the packaging of the Python function into a ZIP archive and creation of all supporting objects (roles, policies, permissions, etc) – in this post we will take things a step further by using templating to update parameters in the Lambda function code before the packaging and creation of the Lambda function.

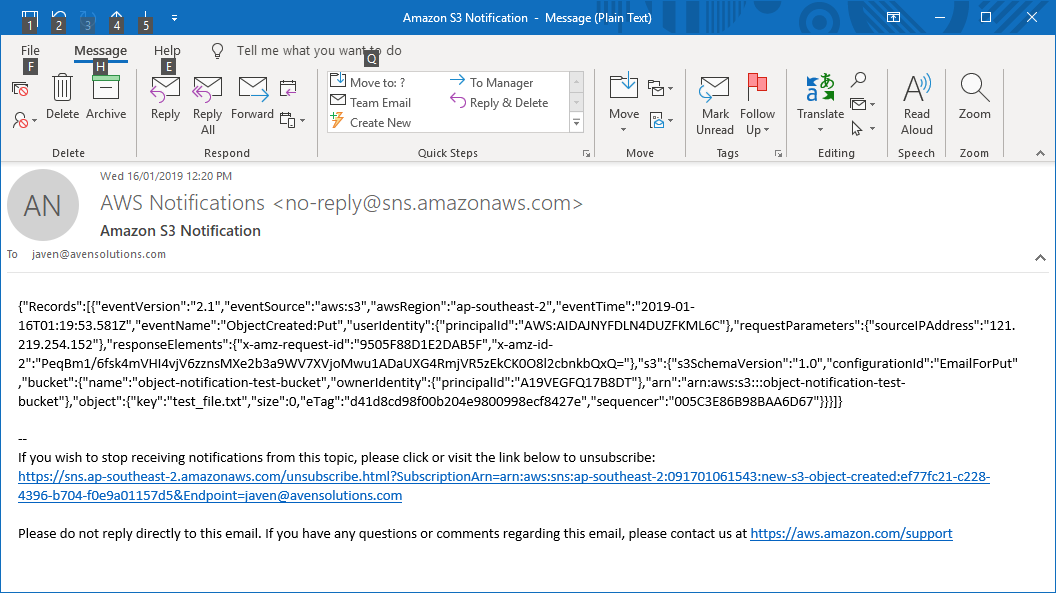
S3 event notifications can be published directly to an SNS topic which you could create an email subscription, this is quite straightforward. However the email notifications you get look something like this:

Email Notification sent via an SNS Topic Subscription

There is very little you can do about this.

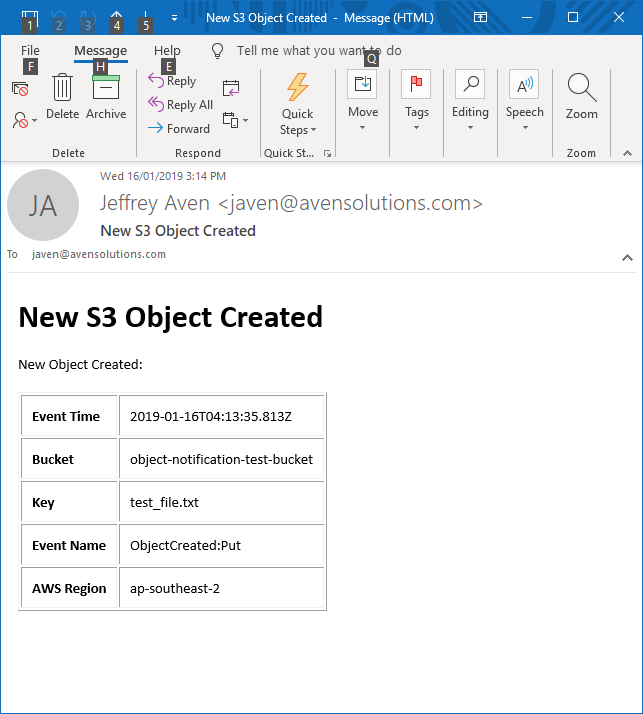
However if you take a slightly different approach by triggering a Lambda function to send an email via SES you have much more control over content and formatting. Using this approach you could get an email notification that looks like this:

Email Notification sent using Lambda and SES

Much easier on the eye!

Prerequisites

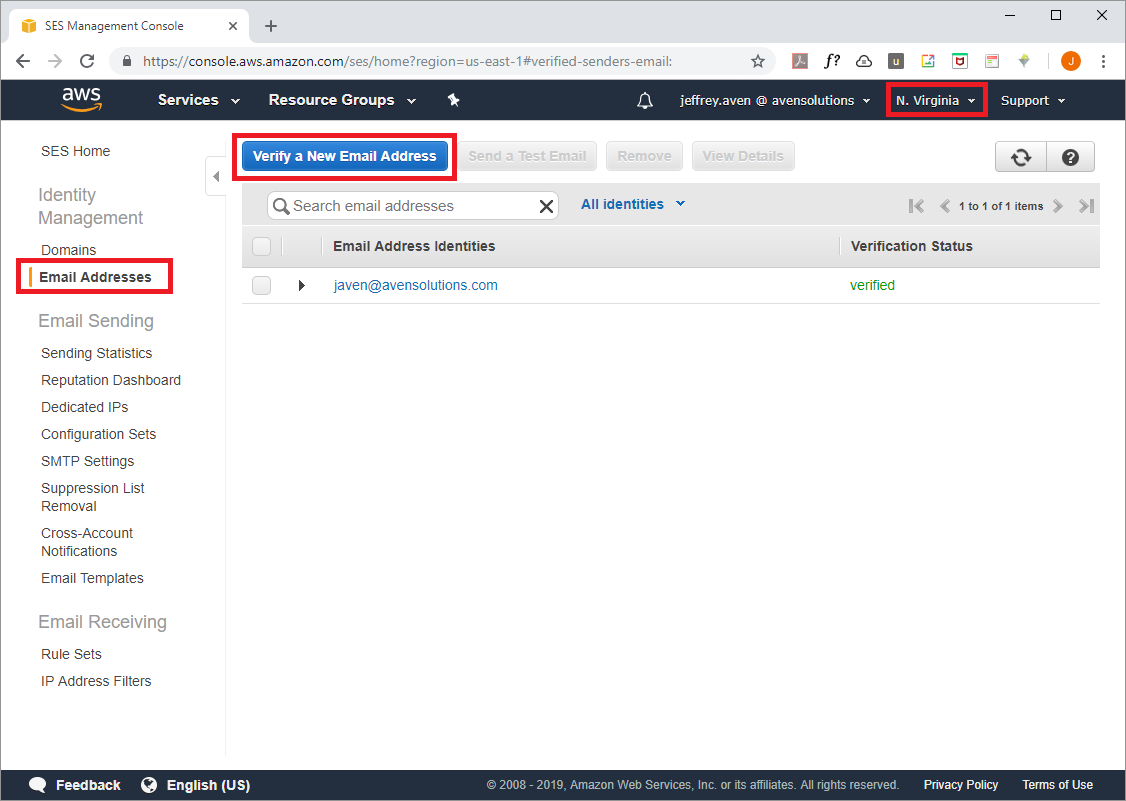
You will need verified AWS SES (Simple Email Service) email addresses for the sender and recipient’s addresses used for your object notification emails. This can be done via the console as shown here:

SES Email Address Verification

Note that SES is not available in every AWS region, pick one that is generally closest to your particular reason (but it really doesn't matter for this purpose).

Deployment

The Terraform module creates an IAM Role and associated policy for the Lambda function as shown here:

Variables in the module are substituted into the function code template, the rendered template file is then packaged as a ZIP archive to be uploaded as the Lambda function source as shown here:

As in the previous post, I will reiterate that although Terraform is technically not a build tool, it can be used for simple build operations such as this.

The Lambda function is deployed using the following code:

Finally the S3 object notification events are configured as shown here:

Use the following commands to run this example (I have created a default credentials profile, but you could supply your API credentials directly, use STS, etc):

cd simple-notifications-with-lambda-and-ses
terraform init
terraform apply

Full source code can be found at: https://github.com/avensolutions/simple-notifications-with-lambda-and-ses

if you have enjoyed this post, please consider buying me a coffee ☕ to help me keep writing!

· 3 min read
Jeffrey Aven

Automate infrastructure tasks using Lambda with Terraform

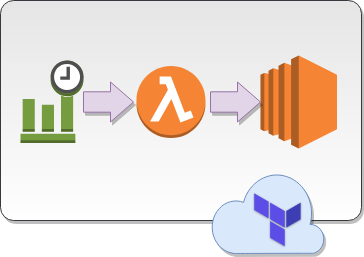
There are many other blog posts and examples available for either scheduling infrastructure tasks such as the starting or stopping of EC2 instances; or deploying a Lambda function using Terraform. However, I have found many of the other examples to be unnecessarily complicated, so I have put together a very simple example doing both.

The function itself could be easily adapted to take other actions including interacting with other AWS services using the boto3 library (the Python AWS SDK). The data payload could be modified to pass different data to the function as well.

The script only requires input variables for schedule_expression (cron schedule based upon GMT for triggering the function – could also be expressed as a rate, e.g. rate(5 minutes)) and environment (value passed to the function on each invocation). In this example the Input data is the value for the “Environment” key for an EC2 instance tag – a user defined tag to associate the instance to a particular environment (e.g. Dev, Test. Prod). The key could be changed as required, for instance if you wanted to stop instances based upon their given name or part thereof you could change the tag key to be “Name”.

When triggered, the function will stop all running EC2 instances with the given Environment tag.

The Terraform script creates:

  • an IAM Role and associated policy for the Lambda Function
  • the Lambda function
  • a Cloudwatch event rule and trigger

The IAM role and policies required for the Lambda function are deployed as shown here:

The function source code is packaged into a ZIP archive and deployed using Terraform as follows:

Admittedly Terraform is an infrastructure automation tool and not a build/packaging tool (such as Jenkins, etc), but in this case the packaging only involves zipping up the function source code, so Terraform can be used as a ‘one stop shop’ to keep things simple.

The Cloudwatch schedule trigger is deployed as follows:

Use the following commands to run this example (I have created a default credentials profile, but you could supply your API credentials directly, use STS, etc):

cd simple-lambda-ec2-scheduler
terraform init
terraform apply

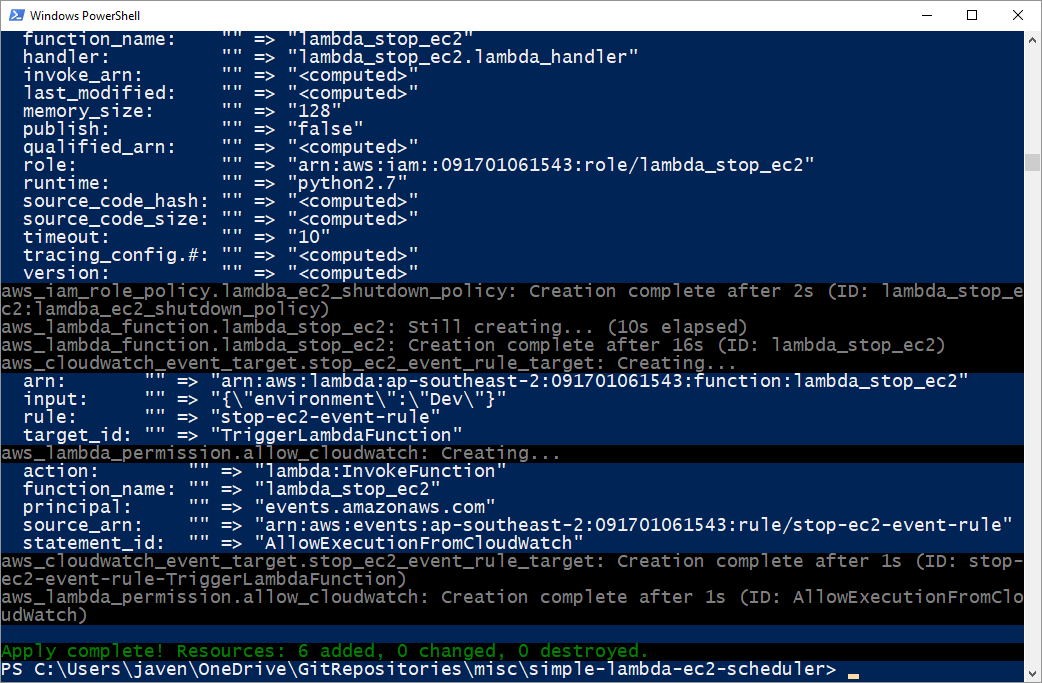
Terraform output

Full source code can be found at: https://github.com/avensolutions/simple-lambda-ec2-scheduler

if you have enjoyed this post, please consider buying me a coffee ☕ to help me keep writing!