
· One min read
Jeffrey Aven

In the stackql project we needed an API to serve configuration file packages (stackql providers) to the stackql application at runtime.

Traditional artifact repositories or package managers were unsuitable as they were mainly designed for container images, JavaScript modules, Python packages etc. The artifacts, in this case, are signed tarball sets of OpenAPI specification documents (text files).

We have recently moved our provider registry (stackql-provider-registry) to use Deno Deploy as the serving layer (the API).

The code

The code is reasonably straightforward as shown here:

The deployment

We are using GitHub Actions to push assets and code to Deno Deploy, this was straightforward as well as you can see here:

if you have enjoyed this post, please consider buying me a coffee ☕ to help me keep writing!

· 5 min read
Jeffrey Aven

Apache Beam is an open-source project which provides a unified programming model for Batch and Streaming data pipelines.

B(atch) + str(EAM) => BEAM

Beam SDK and Execution Framework

Beam SDKs allow you to define Pipelines (in languages such as Java or Python). A pipeline is essentially a graph (a DAG - Directed Acyclic Graph) of nodes that represent transformation steps.

Apache Beam Pipeline

Pipelines can then be executed on a backend service (such as your local machine, Apache Spark, or Google Cloud Dataflow) using Runners. For instance, to run a pipeline locally, you would use the DirectRunner; to run a pipeline on Google Cloud Dataflow you would use the DataflowRunner runner.

Beam Programming Model

The PCollection is the most atomic data unit in the Beam programming model, akin to the RDD in the Apache Spark core API; it is a representation of an immutable collection of items that is physically broken down into bundles (subsets of elements for parallelization).

PCollections can be bounded (which is a batch processing pattern) or unbounded (which is a stream processing pattern).

A PTransform is an operator that takes a PCollection as an input and outputs a new PCollection with transforms applied. This is the same coarse-grained transformation pattern employed by Spark.

Beam DSL

The Beam DSL is a set of higher-order functions that can be used to construct pipelines. These functions are used to construct the graph of nodes that represent the pipeline.

Map, FlatMap and Filter

The basic Map, FlatMap and Filter functions in the Beam API work similarly to their namesakes in the Spark Core API. The Map and FlatMap functions are higher-order functions (that is, functions that have arguments of other functions) that operate on each element in a collection, emitting an output element for each input element. The Filter function can be used to only emit elements from an input PCollection that satisfy a given expression.

ParDo and DoFn

ParDo is a wrapper function for parallel execution of a user-defined function called a DoFn ("do function"), ParDo's and DoFn's are used when the basic Map and FlatMap operators are not enough. DoFns are executed in parallel on a PCollection and can be used for computational transformations or transformations other than 1:1 between inputs and outputs.

Think of these as user-defined functions to operate on a PCollection in parallel.

GroupByKey, CombineByKey

GroupByKey and CombineByKey are operators that group data (key-value pairs) by the key for each element. This is typically a precursor to some aggregate operation (such as a count or sum operation).

CoGroupByKey and Flatten

CoGroupByKey is akin to a JOIN operation in SQL (by the key for each element in two PCollections). Flatten is akin to a UNION in SQL.

Side Inputs

Side Inputs can be used with ParDo and DoFn to provide additional data, which can be used to enrich your output PCollection, or utilized within the logic of your DoFn.

Sources, Sinks and Connectors

Sources represent where data is read into an Apache Beam pipeline; sinks represent destinations where data is written out from pipelines. A Beam pipeline will contain one or more sources and sinks.

Sources can be bounded (for batch processing) or unbounded for stream processing.

Connectors can be source connectors or sink connectors to read from or write to the various sources and targets used in a Beam pipeline. Examples include FileIO and TextIO for working with files or text data, BigQueryIO for reading or writing into BigQuery, PubSubIO for reading and writing messages into Google PubSub, and much more.

Streaming and Unbounded PCollections

Streaming data sources are represented by Unbounded PCollections. Unbounded PCollections support windowing operations using Fixed Windows, Sliding Windows, or Session Windows. Watermarks are used to allow for late-arriving data to be processed within its associated time window, and Triggers can be used to control the processing of windowed batches of data.

Templates

Beam templates enable the reusability of pipelines, converting compile-time pipeline parameters to run-time arguments. Jobs (invocations of pipelines) can be launched from templates.

Templates include classic templates, where the graph for the pipeline is built (compile-time) with the template, flex templates where the pipeline graph is created when the template is launched (runtime).

In addition, Google provides several templates with Cloud Dataflow (Google-provided templates), allowing you to launch routine jobs without writing any code.

Google-provided templates are available for batch, streaming, and utility pipelines, for example:

  • Kafka to BigQuery
  • Pub/Sub Topic to BigQuery
  • Text Files on Cloud Storage to BigQuery
  • Text Files on Cloud Storage to Cloud Spanner
  • Bulk Compress or Decompress Files on Cloud Storage
  • and more

5 minutes is up! I hope you enjoyed this quick introduction to Apache Beam. If you want to learn more, check out the Apache Beam documentation.

if you have enjoyed this post, please consider buying me a coffee ☕ to help me keep writing!

· 6 min read
Jeffrey Aven

AWS and Google (and Microsoft Azure) have services called IAM, which stands for Identity and Access Management. The IAM service serves roughly the same purpose in each provider: to authorize principals (users, groups, or service accounts) to access and use services and resources on the respective platform. There are subtle yet significant differences and distinctions across the major cloud providers.

This article will look at the differences between IAM in AWS and IAM in Google.

Identity Management

Firstly, Google's IAM is a slight misnomer regarding the I as it does not manage identities (with the single exception of service accounts). Google identities are sourced from Google accounts created and managed outside the Google Cloud Platform. Google identities (users and groups) are Google accounts which could be accounts in a Google Workspace domain, a Google Cloud Identity domain, or Gmail accounts. Still, these accounts are NOT created or managed using the Google IAM service.

Conversely, AWS IAM creates and manages identities for use in the AWS platform (IAM Users), which can be used to access AWS resources using the AWS console or programmatically using API keys.

Overview of IAM entities in AWS and Google

It can be confusing for people coming from AWS to Google or vice-versa. Some of the same terms exist in both providers but mean different things. The table below summarises the difference in the meaning of terms in both providers. We will unpack this in more detail in the sections that follow.

AWSGoogle*
RoleService Account
Managed PolicyPredefined Role
Customer Managed PolicyCustom Role
Policy AttachmentIAM Binding
* nearest equivalent

Roles and Policies in AWS

An AWS IAM Role is an identity that can be assumed by trusted entities using short-lived credentials (issued by the AWS Security Token Service or STS API). A trusted entity could be an IAM User, Group, or a service (such as Lambda or EC2).

Permissions are assigned to IAM Roles (and IAM Users and Groups) through the attachment of IAM Policies.

AWS Policies are collections of permissions in different services which can be used to Allow or Deny access (Effect); these can be scoped to a resource or have conditions attached. The following is an example of an AWS Policy:

{
"Version": "2012-10-17",
"Statement": [
{
"Effect": "Allow",
"Action": "ec2:Describe*",
"Resource": "*"
},
{
"Effect": "Allow",
"Action": "autoscaling:Describe*",
"Resource": "*"
}
]
}

Policies in AWS can be Managed Policies (created and managed by AWS) or Customer Managed Policies - where the customer defines and manages these policies.

An IAM Role that is used by a service such as Lambda or EC2 will have a Trust Policy attached, which will look something like this:

{
"Version": "2012-10-17",
"Statement": [
{
"Effect": "Allow",
"Principal": {
"Service": "lambda.amazonaws.com"
},
"Action": "sts:AssumeRole"
}
]
}

Roles and Policies in Google

Roles in Google IAM are NOT identities ; they are collections of permissions (similar to Policies in AWS). Roles can be of the following types:

Basic Roles (also referred to as Legacy or Primitive Roles)

Basic Roles are coarse-grained permissions set at a Project level across all services, such as Owner, Editor, and Viewer. Support for Basic Roles is maintained by Google, however, Google does not recommend using Basic Roles after a Project is created.

Predefined Roles

Predefined Roles are pre-curated sets of permissions that align with a role that an actor (human or service account) would play, such as BigQuery Admin. Predefined roles are considered best practice in Google as the permissions for these roles are maintained by Google. Predefined Roles in Google would be the nearest equivalent to Managed Policies in AWS.

Custom Roles

Custom Roles are user-specified and managed sets of permissions. These roles are scoped within your Project in Google and are your responsibility to maintain. Custom Roles are typically used when the permissions granted through a Predefined Role are too broad. Custom Roles would be the nearest equivalent of Customer Managed Policies in AWS.

Google IAM Bindings

Roles (collections of permissions) are attached to Principals (Identities such as users (Google accounts), groups and service accounts through IAM bindings. The example below shows a binding between a user principal (a Google Workspace account) and a predefined role (BigQuery Admin) within a GCP project:

Google IAM Binding

Policies in Google

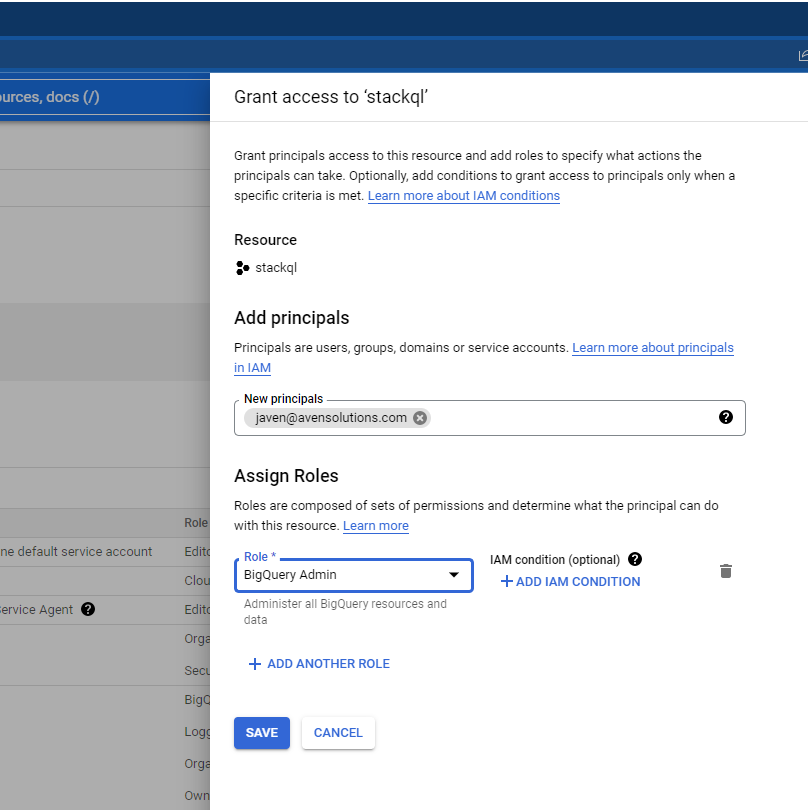
A Policy in Google is a collection of IAM Bindings between members (principals) and roles. An example policy would be:

{
"bindings": [
{
"members": [
"user:javen@avensolutions.com"
],
"role": "bigquery.admin"
},
... another binding ...
]
}

Service Accounts in Google

A Service Account in GCP is a password-less identity created in a GCP Project that can be used to access GCP resources (usually by a process or service). Service accounts are identified by an email address, but these are NOT Google accounts (like the accounts used for users or groups). Service accounts can be associated with services such as Compute Engine, Cloud Functions, or Cloud Run (in much the same way as AWS Roles can be assigned to services such as Lambda functions or EC2 instances). Google Service accounts can use keys created in the IAM service, which are exchanged for short-lived credentials, or service accounts can use get tokens directly, which include OAuth 2.0 access tokens and OpenID Connect ID tokens. Service accounts in Google are the nearest equivalent to AWS IAM Roles.

Inheritance

AWS (save AWS Organizations) is a flat structure with no inherent hierarchy and is oriented around regions that are seperate API endpoints (almost providers unto themselves); IAM, however, is a global service in AWS.

In contrast, GCP is hierarchical and globally scoped for all services, including IAM. Resources (such as Google Compute Engine Instances or Big Query Datasets) are created in Projects (similar to Resource Groups in Azure). Projects are nested under a resource hierarchy, starting at the root (the organization or org). Organizations can contain folders, which can be nested, and these folders can contain Projects.

IAM Bindings (and the permissions they enable) are inherited from ancestor nodes in the GCP hierarchy. A Principal's net effective permissions are the union of the permissions assigned through IAM Bindings in the Project and the permissions set through IAM Bindings in all ancestor nodes (including Folders and the Org itself).

Summary

IAM governs access and entitlements to services and resources in cloud providers, although the design, implementation, and terminology are quite different as you get into the details. This is not to say one approach is better than the other, but as a multi-cloud warrior, you should understand the differences.

if you have enjoyed this post, please consider buying me a coffee ☕ to help me keep writing!

· 3 min read
Jeffrey Aven

We were looking to implement a variant of the %sql magic command in Jupyter without using the default sqlalchemy module (in our case, just using psycopg2 to connect to a local server - a StackQL postrges wire protocol server).

Create the extension module

We named our extension and cell magic command stackql, so start by creating a file named stackql.py. We made this file in a directory name ext in the Jupyter working directory.

Write the magic extension

Magic commands can be line-based or cell-based or line-or-cell-based; in this example, we will use line-or-cell-based magic, meaning the decorator %stackql will be used to evaluate a line of code and the %%stackql decorator will be used to evaluate the entire contents of the cell it is used in.

The bare-bones class and function definitions required for this extension are described below:

Create a Magic Class

We will need to define a magics class, which we will use to define the magic commands. The class name is arbitrary, but it must be a subclass of IPython.core.magic.Magics. An example is below:

from IPython.core.magic import (Magics, magics_class, line_cell_magic)

@magics_class
class StackqlMagic(Magics):

@line_cell_magic
def stackql(self, line, cell=None):
if cell is None:
# do something with line
else:
# do something with cell
return results

Load and register the extension

To register the magic functions in the StackqlMagic class we created above, use a function named load_ipython_extension, like the following:

def load_ipython_extension(ipython):
ipython.register_magics(StackqlMagic)

Complete extension code

The complete code for our extension is shown here:

from __future__ import print_function
import pandas as pd
import psycopg2, json
from psycopg2.extras import RealDictCursor
from IPython.core.magic import (Magics, magics_class, line_cell_magic)
from io import StringIO
from string import Template

conn = psycopg2.connect("dbname=stackql user=stackql host=localhost port=5444")

@magics_class
class StackqlMagic(Magics):

def get_rendered_query(self, data):
t = Template(StringIO(data).read())
rendered = t.substitute(self.shell.user_ns)
return rendered

def run_query(self, query):
cur = conn.cursor(cursor_factory=RealDictCursor)
cur.execute(query)
rows = cur.fetchall()
cur.close()
return pd.read_json(json.dumps(rows))

@line_cell_magic
def stackql(self, line, cell=None):
if cell is None:
results = self.run_query(self.get_rendered_query(line))
else:
results = self.run_query(self.get_rendered_query(cell))
return results

def load_ipython_extension(ipython):
ipython.register_magics(StackqlMagic)

Load the magic extension

To use our extension, we need to use the %load_ext magic command referencing the extension we created.

%load_ext ext.stackql

Note that since our extension was a file named stackql.py in a directory named ext we reference it using ext.stackql.

Use the magic function in a cell

To use the magic function in a cell (operating on all contents of the cell), we use the %% decorator, like:

%%stackql
SHOW SERVICES IN azure

Use the magic function on a line

To use the magic function on a line, we use the % decorator, like:

%stackql DESCRIBE aws.ec2.instances
Using Variable Expansion

In our example, we implemented variable expansion using the "batteries included" String templating capabilities in Python3. This allows for variables to be set globally in our notebooks and then used in our queries. For example, we can set a variable in a cell like:

project = 'stackql-demo'
zone = 'australia-southeast1-a'

Then use those variables in our queries like:

%%stackql
SELECT status, count(*) as num_instances
FROM google.compute.instances
WHERE project = '$project'
AND zone = '$zone'
GROUP BY status

An example is shown here:

Using a Custom Jupyter Magic Command

The complete code can be found at stackql/stackql-jupyter-demo.

if you have enjoyed this post, please consider buying me a coffee ☕ to help me keep writing!

· 3 min read
Jeffrey Aven

Those who have built projects (front end or back end) with JavaScript or TypeScript would have no doubt felt pain or been frustrated with some aspect of package management - package.json, package-lock.json, node_modules, npm, npmjs, yarn etc.

Enter Deno, a "package manager-less" runtime for JavaScript and TypeScript. That's right, no package.json, no node_modules folder, no npm or yarn.

Background

Deno was created by Ryan Dahl, the creator of Node.js, who realised the monster that was created with package management and managers, dependencies, and dependency management, which in many cases is more complex than the frameworks or projects that are being implemented.

Packages

I said deno was "package manager-less"; however it is not "package-less". Deno does not use npmjs; instead, packages (js or ts) can be hosted at any reachable URL. Local imports and exports are supported too.

Deno's standard library packages ("batteries included" modules) are hosted at deno.land/std@LATEST_VERSION, a third-party hosted library is available at deno.land/x.

With deno installed, you can run something like this:

deno run https://deno.land/std@0.154.0/examples/welcome.ts

Imports

Using the Deno runtime, developers specify modules to use in their program using this import syntax:

import { Application, Router } from "https://deno.land/x/oak/mod.ts";

You can specify a version if desired in the URL, such as:

import {
Bson,
MongoClient,
} from "https://deno.land/x/mongo@v0.31.0/mod.ts";

Packages do not have to be downloaded or installed before running your code.

The first time your code is run, all packages are downloaded to a local cache and any Typescript modules are transpiled to JavaScript.

Publishing with Deno Deploy

Deno deploy is a package publishing framework that directly integrates with GitHub (no separate npm publish step). Deno deploy is backed by a CDN and a network of edge servers to make deno packages available. Packages can be published by a push to a branch, reviewed via a deployed preview, and merged to release to production.

Quickstart

To get going, you first need to download and install deno, which will vary based upon your operating system, but there are all the usual suspect installers available (homebrew, chocolatey, etc); see here.

Once you have installed deno on your system, you can create a project folder (no npm init or package.json required), and create the following file (as server.ts), which will run a very simple middleware server using a third-party module, oak.

import { Application, Router } from "https://deno.land/x/oak/mod.ts";

const router = new Router();
router
.get("/ping", (context) => {
context.response.body = "pong";
});

const app = new Application();
app.use(router.routes());
app.use(router.allowedMethods());

await app.listen({ port: 8080 });

now run your server using the following command:

deno run --allow-net server.ts

now:

curl -XGET http://localhost:8080/ping

should return:

pong

easy!

if you have enjoyed this post, please consider buying me a coffee ☕ to help me keep writing!