· 3 min read
Jeffrey Aven

CloudFormation templates in large environments can grow beyond a manageable point. This article provides one approach to breaking up CloudFormation templates into modules which can be imported and used to create a larger template to deploy a complex AWS stack – using Jsonnet.

Jsonnet is a json pre-processing and templating library which includes features including user defined and built-in functions, objects, and inheritance amongst others. If you are not familiar with Jsonnet, here are some good resources to start with:

Advantages

Using Jsonnet you can use imports to break up large stacks into smaller files scoped for each resource. This approach makes CloudFormation template easier to read and write and allows you to apply the DRY (Do Not Repeat Yourself) coding principle (not possible with native CloudFormation templates.

Additionally, although as the template fragments are in Jsonnet format, you can add annotations or comments to your code similar to YAML (not possible with a JSON template alone), although the rendered template is in legal CloudFormation Json format.

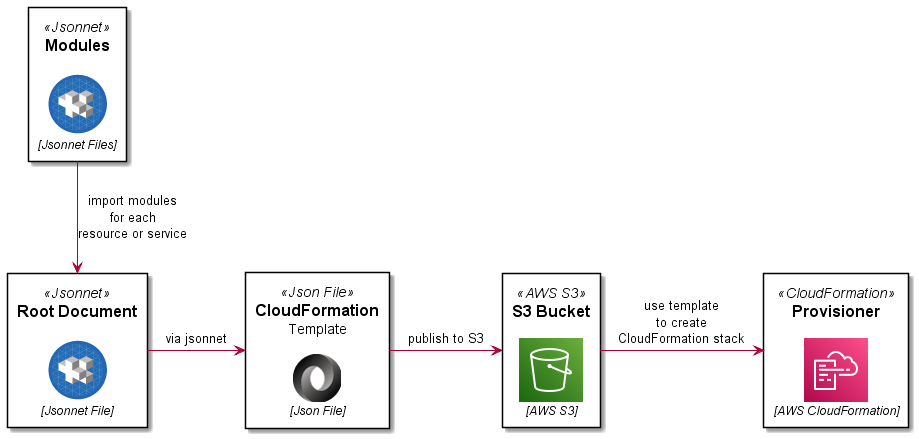
Process Overview

The process is summarised here:

CloudFormation and Jsonnet

Code

This example will deploy a stack with a VPC and an S3 bucket with logging. The project directory structure would look like this:

templates/
├─ includes/
│ ├─ vpc.libsonnet
│ ├─ s3landingbucket.libsonnet
│ ├─ s3loggingbucket.libsonnet
│ ├─ tags.libsonnet
├─ template.jsonnet

Lets look at all of the constituent files:

template.jsonnet

This is the root document which will be processed by Jsonnet to render a legal CloudFormation JSON template. It will import the other files in the includes directory.

includes/tags.libsonnet

This code module is used to generate re-usable tags for other resources (DRY).

includes/vpc.libsonnet

This code module defines a VPC resource to be created with CloudFormation.

includes/s3loggingbucket.libsonnet

This code module defines an S3 bucket resource to be created in the stack which will be used for logging for other buckets.

includes/s3landingbucket.libsonnet

This code module defines an S3 landing bucket resource to be created in the stack.

Testing

To test the pre-processing, you will need a Jsonnet binary/executable for your environment. You can find Docker images which include this for you, or you could build it yourself.

Once you have a compiled binary, you can run the following to generate a rendered CloudFormation template.

jsonnet template.jsonnet -o template.json

You can validate this template using the AWS CLI as shown here:

aws cloudformation validate-template --template-body file://template.json

Deployment

In a previous article, Simplified AWS Deployments with CloudFormation and GitLab CI, I demonstrated an end-to-end deployment pipeline using GitLab CI. Jsonnet pre-processing can be added to this pipeline as an initial ‘preprocess’ stage and job. A snippet from the .gitlab-ci.yml file is included here:

Enjoy!

if you have enjoyed this post, please consider buying me a coffee ☕ to help me keep writing!
· 3 min read
Jeffrey Aven

Managing cloud deployments and IaC pipelines can be challenging. I’ve put together a simple pattern for deploying stacks in AWS using CloudFormation templates using GitLab CI.

This deployment framework enables you to target different environments based upon refs (branches or tags) for instance deploy to a dev environment for a push or merge into develop and deploy to prod on a push or merge into main, otherwise just lint/validate (e.g., for a push to a non-protected feature branch). Templates are uploaded to a designated S3 bucket and staged for use in the pipeline and can be retained as an additional audit trail (in addition to the GitLab project history).

Furthermore, you can review changes (by inspecting change set contents) before deploying, saving you from fat finger deployments 😊.

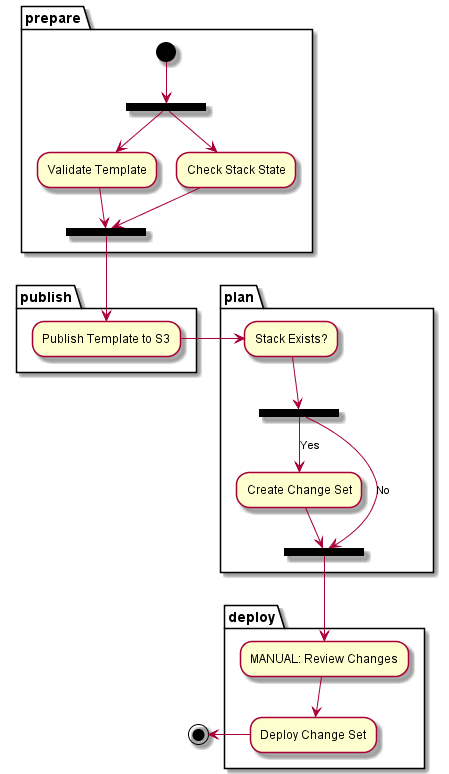
How it works

The logic is described here:

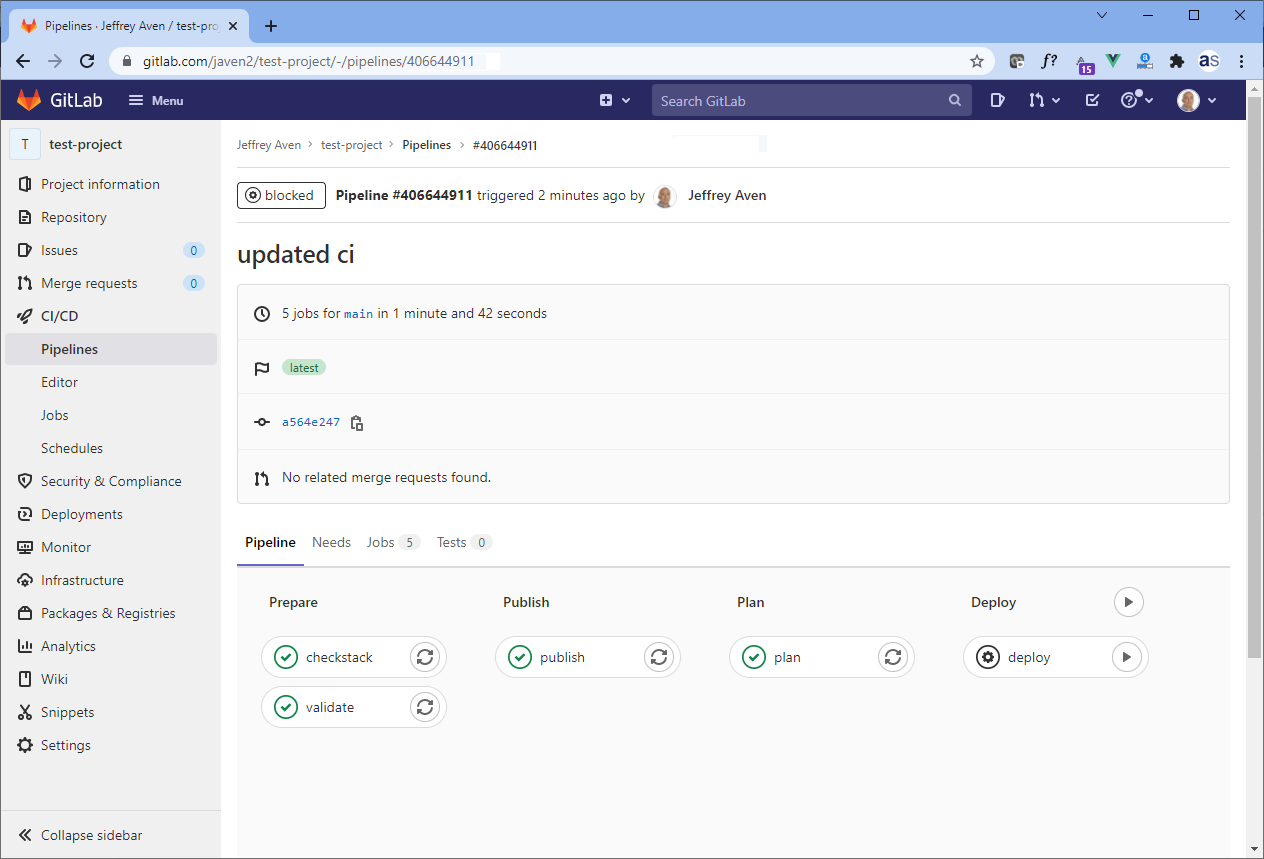
GitLab CI

The pipleline looks like this in GitLab:

GitLab CI

Prerequisites

You will need to set up GitLab CI variables for AWS_ACCESS_KEY_ID, AWS_SECRET_ACCESS_KEY and optionally AWS_DEFAULT_REGION. You can do this via Settings -> CI/CD -> Variables in your GitLab project. As AWS_ACCESS_KEY_ID and AWS_SECRET_ACCESS_KEY are secrets, they should be configured as protected (as they are only required for protected branches) and masked so they are not printed in job logs.

.gitlab-ci.yml code

The GitLab CI code is shown here:

Reviewing change sets (plans) and applying

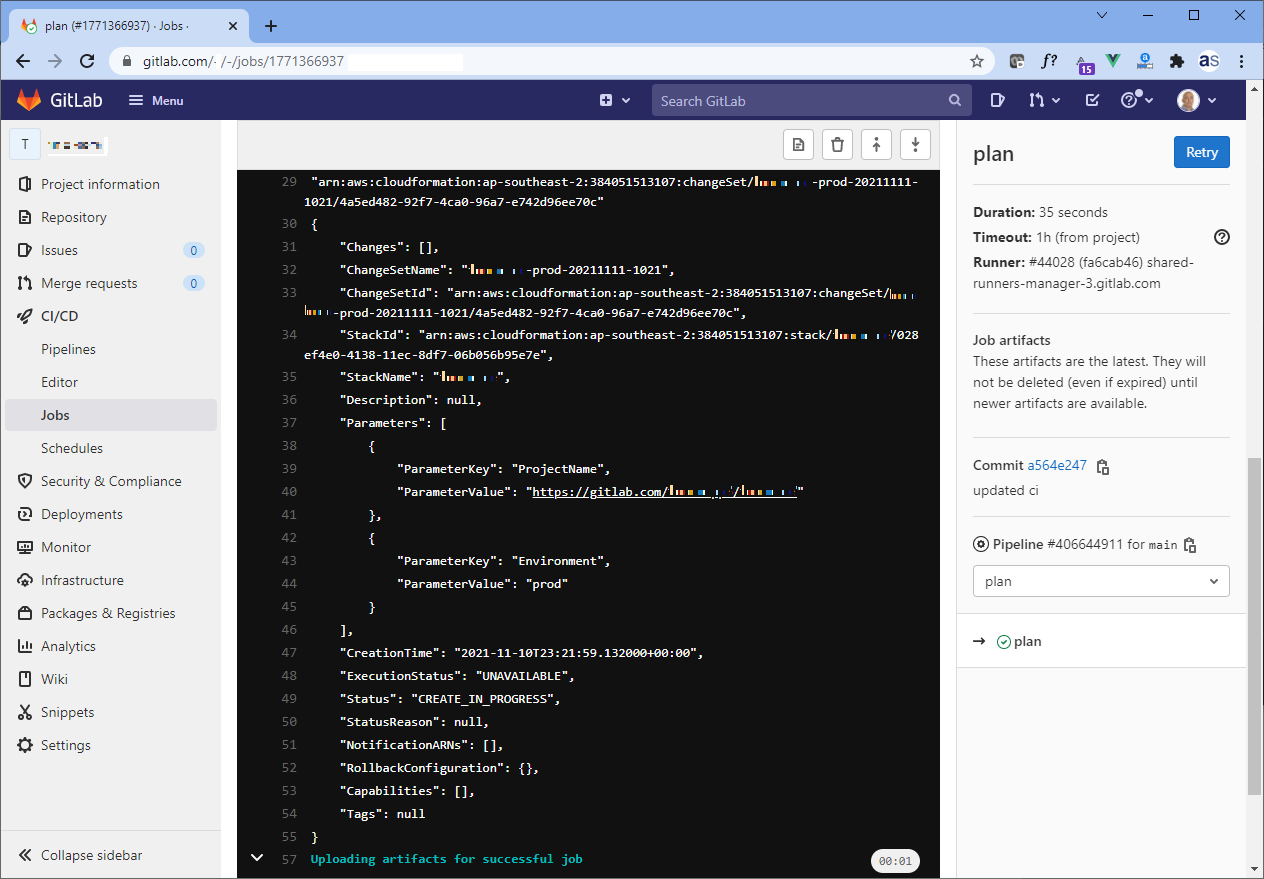
Once a pipeline is triggered for an existing stack it will run hands off until a change set (plan) is created. You can inspect the plan by clicking on the Plan GitLab CI job where you would see output like this:

Change Set

If you are OK with the changes proposed, you can simply hit the play button on the last stage of the pipeline (Deploy). Voilà, stack deployed, enjoy!

if you have enjoyed this post, please consider buying me a coffee ☕ to help me keep writing!
· 4 min read
Mark Stella

Everytime I start a new project I try and optimise how the application can work across multiple envronments. For those who don't have the luxury of developing everything in docker containers or isolated spaces, you will know my pain. How do I write code that can run on my local dev environment, migrate to the shared test and ci environment and ultimately still work in production.

In the past I tried exotic options like dynamically generating YAML or JSON using Jinja. I then graduated to HOCON which made my life so much easier. This was until I stumbled across Jsonnet. For those who have not seen this in action, think JSON meets Jinja meets HOCON (a Frankenstein creation that I have actually built in the past)

To get a feel for how it looks, below is a contrived example where I require 3 environments (dev, test and production) that have different paths, databases and vault configuration.

Essentially, when this config is run through the Jsonnet templating engine, it will expect a variable 'ENV' to ultimately refine the environment entry to the one we specifically want to use.

A helpful thing I like to do with my programs is give users a bit of information as to what environments can be used. For me, running a cli that requires args should be as informative as possible - so listing out all the environments is mandatory. I achieve this with a little trickery and a lot of help from the click package!

local exe = "application.exe";

local Environment(prefix) = {
root: "/usr/" + prefix + "/app",
path: self.root + "/bin/" + exe,
database: std.asciiUpper(prefix) + "_DB",
tmp_dir: "/tmp/" + prefix
};

local Vault = {
local uri = "http://127.0.0.1:8200/v1/secret/app",
_: {},
dev: {
secrets_uri: uri,
approle: "local"
},
tst: {
secrets_uri: uri,
approle: "local"
},
prd: {
secrets_uri: "https://vsrvr:8200/v1/secret/app",
approle: "sa_user"
}
};

{

environments: {
_: {},
dev: Environment("dev") + Vault[std.extVar("ENV")],
tst: Environment("tst") + Vault[std.extVar("ENV")],
prd: Environment("prd") + Vault[std.extVar("ENV")]
},

environment: $["environments"][std.extVar("ENV")],
}

The trick I perform is to have a placeholder entry '_' that I use to initially render the template. I then use the generated JSON file and get all the environment keys so I can feed that directly into click.

from typing import Any, Dict
import click
import json
import _jsonnet
from pprint import pprint

ENV_JSONNET = 'environment.jsonnet'
ENV_PFX_PLACEHOLDER = '_'

def parse_environment(prefix: str) -> Dict[str, Any]:
_json_str = _jsonnet.evaluate_file(ENV_JSONNET, ext_vars={'ENV': prefix})
return json.loads(_json_str)

_config = parse_environment(prefix=ENV_PFX_PLACEHOLDER)

_env_prefixes = [k for k in _config['environments'].keys() if k != ENV_PFX_PLACEHOLDER]


@click.command(name="EnvMgr")
@click.option(
"-e",
"--environment",
required=True,
type=click.Choice(_env_prefixes, case_sensitive=False),
help="Which environment this is executing on",
)
def cli(environment: str) -> None:
config = parse_environment(environment)
pprint(config['environment'])


if __name__ == "__main__":
cli()

This now allows me to execute the application with both list checking (has the user selected an allowed environment?) and the autogenerated help that click provides.

Below shows running the cli with no arguments:

$> python cli.py

Usage: cli.py [OPTIONS]
Try 'cli.py --help' for help.

Error: Missing option '-e' / '--environment'. Choose from:
dev,
prd,
tst

Executing the application with a valid environment:

$> python cli.py -e dev

{'approle': 'local',
'database': 'DEV_DB',
'path': '/usr/dev/app/bin/application.exe',
'root': '/usr/dev/app',
'secrets_uri': 'http://127.0.0.1:8200/v1/secret/app',
'tmp_dir': '/tmp/dev'}

Executing the application with an invalid environment:

$> python cli.py -e prd3

Usage: cli.py [OPTIONS]
Try 'cli.py --help' for help.

Error: Invalid value for '-e' / '--environment': 'prd3' is not one of 'dev', 'prd', 'tst'.

This is only the tip of what Jsonnet can provide, I am continually learning more about the templating engine and the tool.

if you have enjoyed this post, please consider buying me a coffee ☕ to help me keep writing!
· 4 min read
Tom Klimovski

So you're using BigQuery (BQ). It's all set up and humming perfectly. Maybe now, you want to run an ELT job whenever a new table partition is created, or maybe you want to retrain your ML model whenever new rows are inserted into the BQ table.

In my previous article on EventArc, we went through how Logging can help us create eventing-type functionality in your application. Let's take it a step further and walk through how we can couple BigQuery and Cloud Run.

In this article you will learn how to

  • Tie together BigQuery and Cloud Run
  • Use BigQuery's audit log to trigger Cloud Run
  • With those triggers, run your required code

Let's go!

Let's create a temporary dataset within BigQuery named tmp_bq_to_cr.

In that same dataset, let's create a table in which we will insert some rows to test our BQ audit log. Let's grab some rows from a BQ public dataset to create this table:

CREATE OR REPLACE TABLE tmp_bq_to_cr.cloud_run_trigger AS
SELECT
date, country_name, new_persons_vaccinated, population
from `bigquery-public-data.covid19_open_data.covid19_open_data`
where country_name='Australia'
AND
date > '2021-05-31'
LIMIT 100

Following this, let's run an insert query that will help us build our mock database trigger:

INSERT INTO tmp_bq_to_cr.cloud_run_trigger
VALUES('2021-06-18', 'Australia', 3, 1000)

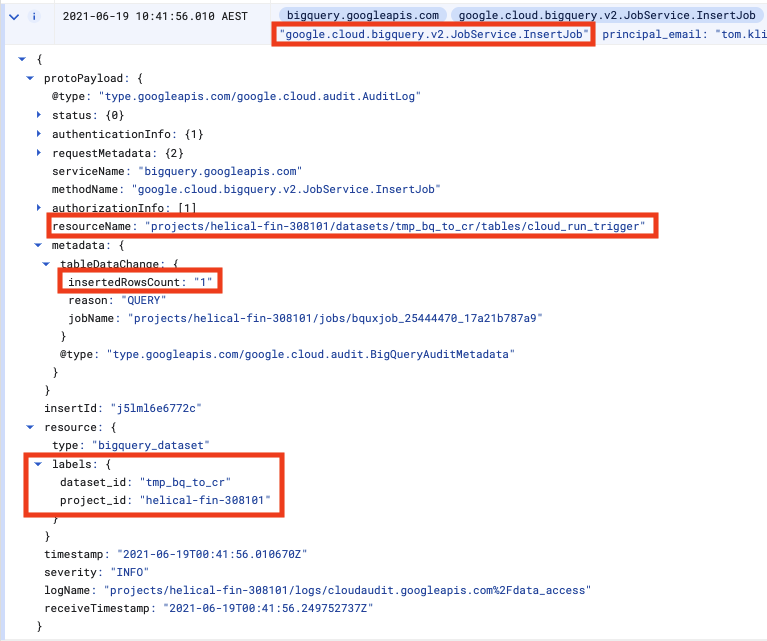
Now, in another browser tab let's navigate to BQ Audit Events and look for our INSERT INTO event:

BQ-insert-event

There will be several audit logs for any given BQ action. Only after a query is parsed does BQ know which table we want to interact with, so the initial log will, for e.g., not have the table name.

We don't want any old audit log, so we need to ensure we look for a unique set of attributes that clearly identify our action, such as in the diagram above.

In the case of inserting rows, the attributes are a combination of

  • The method is google.cloud.bigquery.v2.JobService.InsertJob
  • The name of the table being inserted to is the protoPayload.resourceName
  • The dataset id is available as resource.labels.dataset_id
  • The number of inserted rows is protoPayload.metadata.tableDataChanged.insertedRowsCount

Time for some code

Now that we've identified the payload that we're looking for, we can write the action for Cloud Run. We've picked Python and Flask to help us in this instance. (full code is on GitHub).

First, let's filter out the noise and find the event we want to process

@app.route('/', methods=['POST'])
def index():
# Gets the Payload data from the Audit Log
content = request.json
try:
ds = content['resource']['labels']['dataset_id']
proj = content['resource']['labels']['project_id']
tbl = content['protoPayload']['resourceName']
rows = int(content['protoPayload']['metadata']
['tableDataChange']['insertedRowsCount'])
if ds == 'cloud_run_tmp' and \
tbl.endswith('tables/cloud_run_trigger') and rows > 0:
query = create_agg()
return "table created", 200
except:
# if these fields are not in the JSON, ignore
pass
return "ok", 200

Now that we've found the event we want, let's execute the action we need. In this example, we'll aggregate and write out to a new table created_by_trigger:

def create_agg():
client = bigquery.Client()
query = """
CREATE OR REPLACE TABLE tmp_bq_to_cr.created_by_trigger AS
SELECT
count_name, SUM(new_persons_vaccinated) AS n
FROM tmp_bq_to_cr.cloud_run_trigger
"""
client.query(query)
return query

The Dockerfile for the container is simply a basic Python container into which we install Flask and the BigQuery client library:

FROM python:3.9-slim
RUN pip install Flask==1.1.2 gunicorn==20.0.4 google-cloud-bigquery
ENV APP_HOME /app
WORKDIR $APP_HOME
COPY *.py ./
CMD exec gunicorn --bind :$PORT main:app

Now we Cloud Run

Build the container and deploy it using a couple of gcloud commands:

SERVICE=bq-cloud-run
PROJECT=$(gcloud config get-value project)
CONTAINER="gcr.io/${PROJECT}/${SERVICE}"
gcloud builds submit --tag ${CONTAINER}
gcloud run deploy ${SERVICE} --image $CONTAINER --platform managed

I always forget about the permissions

In order for the trigger to work, the Cloud Run service account will need the following permissions:

gcloud projects add-iam-policy-binding $PROJECT \
--member="serviceAccount:service-${PROJECT_NO}@gcp-sa-pubsub.iam.gserviceaccount.com"\
--role='roles/iam.serviceAccountTokenCreator'

gcloud projects add-iam-policy-binding $PROJECT \
--member=serviceAccount:${SVC_ACCOUNT} \
--role='roles/eventarc.admin'

Finally, the event trigger

gcloud eventarc triggers create ${SERVICE}-trigger \
--location ${REGION} --service-account ${SVC_ACCOUNT} \
--destination-run-service ${SERVICE} \
--event-filters type=google.cloud.audit.log.v1.written \
--event-filters methodName=google.cloud.bigquery.v2.JobService.InsertJob \
--event-filters serviceName=bigquery.googleapis.com

Important to note here is that we're triggering on any Insert log created by BQ That's why in this action we had to filter these events based on the payload.

Take it for a spin

Now, try out the BigQuery -> Cloud Run trigger and action. Go to the BigQuery console and insert a row or two:

INSERT INTO tmp_bq_to_cr.cloud_run_trigger
VALUES('2021-06-18', 'Australia', 5, 25000)

Watch as a new table called created_by_trigger gets created! You have successfully triggered a Cloud Run action on a database event in BigQuery.

Enjoy!

· 3 min read
Jeffrey Aven

Azure Static WebApp

The Azure Static Web App feature is relatively new in the Azure estate which has recently become generally available, I thought I would take it for a test drive and discuss my findings.

I am a proponent of the JAMStack architecture for front end applications and a user of CD enabled CDN services like Netlify, so this Azure feature was naturally appealing to me.

Azure SWAs allow you to serve static assets (like JavaScript) without a origin server, meaning you don’t need a web server, are able to streamline content distribution and web app performance, and reduce the attack surface area of your application.

The major advantage to using is simplicity, no scaffolding or infra requirements and it is seamlessly integrated into your CI/CD processes (natively if you are using GitHub).

Deploying Static Web Apps in Azure

Pretty simple to setup, aside from a name and a resource group, you just need to supply:

  • a location (Azure region to be used for serverless back end APIs via Azure Function Apps) note that this is not a location where the static web is necessarily running
  • a GitHub or GitLab repo URL
  • the branch you wish to use to trigger production deployments (e.g. main)
  • a path to your code within your app (e.g. where your package.json file is located)
  • an output folder (e.g. dist) this should not exist in your repo
  • a project or personal access token for your GitHub account (alternatively you can perform an interactive OAuth2.0 consent if using the portal)

An example is shown here:

GitHub Actions

Using the consent provided (either using the OAuth flow or by providing a token), Azure Static Web Apps will automagically create the GitHub Actions workflow to deploy your application on a push or merge event to your repo. This includes providing scoped API credentials to Azure to allow access to the Static Web App resource using secrets in GitHub (which are created automagically as well). An example workflow is shown here:

Preview or Staging Releases

Similar to the functionality in analogous services like Netlify, you can configure preview releases of your application to be deployed from specified branches on pull request events.

Routes and Authorization

Routes (for SPAs) need to be provided to Azure by using a file named staticwebapp.config.json located in the application root of your repo (same level as you package.json file). You can also specify response codes and whether the rout requires authentication as shown here:

Pros

  • Globally distributed CDN
  • Increased security posture, reduced attack surface area
  • Simplified architecture and deployment
  • No App Service Plan required – cost reduction
  • Enables Continuous Deployment – incl preview/staging environments
  • TLS and DNS can be easily configured for your app

Cons

  • Serverless API locations are limited
  • Integration with other VCS/CI/CD systems like GitLab would need to be custom built (GitHub and Azure DevOps is integrated)

Overall, this is a good feature for deploying SPAs or PWAs in Azure.

if you have enjoyed this post, please consider buying me a coffee ☕ to help me keep writing!