· 8 min read
Chris Ottinger

Container images provide an ideal software packaging solution for DataOps and python based data pipeline workloads. Containers enable Data Scientists and Data Engineers to incorporate the latest packages and libraries without the issues associated with introducing breaking changes into shared environments. A Data Engineer or Data Scienctist can quickly release new functionality with the best tools available.

Container images provide safer developer environments but as the number of container images used for production workloads grow, a maintenance challenge can emerge. Whether using pip or poetry to manage python packages and dependencies, updating a container definition requires edits to the explicit package versions as well as to the pinned or locked versions of the package dependencies. This process can be error prone without automation and a repeatable CICD workflow.

A workflow pattern based on docker buildkit / moby buildkit multi-stage builds provides an approach that maintains all the build specifications in a single Dockerfile, while build tools like make provide a simple and consistent interface into the container build stages. The data pipeline challenges addresses with a multi-stage build pattern include:

  • automating lifecycle management of the Python packages used by data pipelines
  • integrating smoke testing of container images to weed out compatibility issues early
  • simplifying the developer experience with tools like make that can be used both locally and in CI/CD pipelines

The Dockerfile contains the definitions of the different target build stages and order of execution from one stage to the next. The Makefile wraps the Dockerfile build targets into a standard set of workflow activities, following a similar to $ config && make && make install

The DataOps Container Lifecycle Workflow

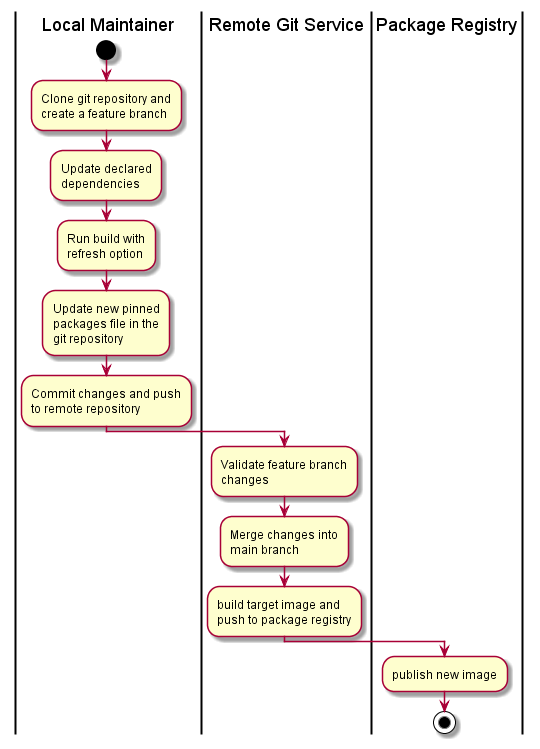
A typical dataops/gitops style workflow for maintaining container images includes actions in the local environment to define the required packages and produce the pinned dependency poetry.lock file or requirements.txt packages list containing the full set of pinned dependent packages.

Given and existing project in a remote git repository with a CI/CD pipeline defined, the following workflow would be used to update package versions and dependencies:

Multi-stage build workflow

The image maintainer selects the packages to update or refresh using a local development environment, working from a feature branch. This includes performing an image smoke-test to validate the changes within the container image.

Once refreshed image has been validated, the lock file or full pinned package list is commited back to the repository and pushed to the remote repository. The CI/CD pipeline performs a trial build and conducts smoke testing. On merge into the main branch, the target image is built, re-validated, and pushed to the container image registry.

The multi-stage build pattern can support both defining both the declared packages for an environment as well as the dependent packages, but poetry splits the two into distinct files, a pyproject.toml file containing the declated packages and a poetry.lock file that contains the full set of declared and dependent packages, including pinned versions. pip supports loading packages from different files, but requires a convention for which requirements file contains the declared packages and while contains the full set of pinned package versions produced by pip freeze. The example code repo contains examples using both pip and poetry.

The following example uses poetry in a python:3.8 base image to illustrate managing the dependencies and version pinning of python packages.

Multi-stage Dockerfile

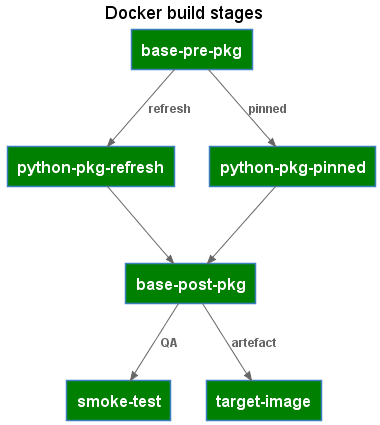
The Dockerfile defines the build stages used for both local refresh and by the CICD pipelines to build the target image.

Dockerfile Stages

The Dockerfile makes use of the docker build arguments feature to pass in whether the build should refresh package versions or build the image from pinned packages.

Build Stage: base-pre-pkg

Any image setup and pre-python package installation steps. For poetry, this includes setting the config option to skip the creation of a virtual environment as the container already provides the required isolation.

ARG PYTHON_PKG_VERSIONS=pinned
FROM python:3.8 as base-pre-pkg

RUN install -d /src && \
pip install --no-cache-dir poetry==1.1.13 && \
poetry config virtualenvs.create false
WORKDIR /src

Build Stage: python-pkg-refresh

The steps to generate a poetry.lock file containing the pinned package versions.

FROM base-pre-pkg as python-pkg-refresh
COPY pyproject.toml poetry.lock /src/
RUN poetry update && \
poetry install

Build Stage: python-pkg-pinned

The steps to install packages using the pinned package versions.

FROM base-pre-pkg as python-pkg-pinned
COPY pyproject.toml poetry.lock /src/
RUN poetry install

Build Stage: base-post-pkg

A consolidation build target that can refer to either the python-pkg-refresh or the python-pkg-pinned stages, depending on the docker build argument and includes any post-package installation steps.

FROM python-pkg-${PYTHON_PKG_VERSIONS} as base-post-pkg

Build Stage: smoke-test

Simple smoke tests and validation commands to validate the built image.

FROM base-post-pkg as smoke-test
WORKDIR /src
COPY tests/ ./tests
RUN poetry --version && \
python ./tests/module_smoke_test.py

Build Stage: target-image

The final build target container image. Listing the target-image as the last stage in the Dockerfile has the effect of also making this the default build target.

FROM base-post-pkg as target-image

Multi-stage Makefile

The Makefile provides a workflow oriented wrapper over the Dockerfile build stage targets. The Makefile targets can be executed both in a local development environment as well as via a CICD pipeline. The Makefile includes several variables that can either be run using default values, or overridden by the CI/CD pipeline.

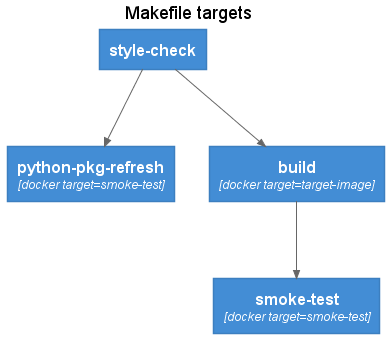
Makefile targets

Make Target: style-check

Linting and style checking of source code. Can include both application code as well as the Dockerfile itself using tools such as hadolint.

style-check:
hadolint ./Dockerfile

Make Target: python-pkg-refresh

The python-pkg-refresh target builds a version of the target image with refreshed package versions. A temporary container instance is created from the target image and the poetry.lock file is copied into the local file system. The smoke-test docker build target is used to ensure image validation is also performed. The temporary container as well as the package refresh image are removed after the build.

python-pkg-refresh:
@echo ">> Update python packages in container image"
docker build ${DOCKER_BUILD_ARGS} \
--target smoke-test \
--build-arg PYTHON_PKG_VERSIONS=refresh \
--tag ${TARGET_IMAGE_NAME}:$@ .
@echo ">> Copy the new poetry.lock file with updated package versions"
docker create --name ${TARGET_IMAGE_NAME}-$@ ${TARGET_IMAGE_NAME}:$@
docker cp ${TARGET_IMAGE_NAME}-$@:/src/poetry.lock .
@echo ">> Clean working container and refresh image"
docker rm ${TARGET_IMAGE_NAME}-$@
docker rmi ${TARGET_IMAGE_NAME}:$@

Make Target: build

The standard build target using pinned python package versions.

build:
docker build ${DOCKER_BUILD_ARGS} \
--target target-image \
--tag ${TARGET_IMAGE_NAME}:${BUILD_TAG} .

Make Target: smoke-test

Builds an image and peforms smoke testing. The smoke-testing image is removed after the build.

smoke-test:
docker build ${DOCKER_BUILD_ARGS} \
--target smoke-test \
--tag ${TARGET_IMAGE_NAME}:$@ .
docker rmi ${TARGET_IMAGE_NAME}:$@

Conclusion

The toolchain combination of multi-stage container image builds with make provides a codified method for the lifecycle management of the containers used in data science and data engineering workloads.

The maintainer:

git checkout -b my-refresh-feature
make python-pkg-refresh
make smoke-test
git add pyproject.toml poetry.lock
git commit -m "python package versions updated"
git push

The CICD pipeline:

make build
make smoke-test
docker push <target-image>:<build-tag>
info

You can find the complete source code for this article at https://gitlab.com/datwiz/multistage-pipeline-image-builds
· 3 min read
Yuncheng Yang

This article demonstrates how to use the Snowflake REST API to retrieve data for a web application using TypeScript, in this case we are using keypair authentication with Snowflake.

Overview

Snowflake’s SQL API allows you to access snowflake objects using SQL via a REST API request, this allows for easy integration with your applications and deployment pipelines. You can use the API to execute most DDL and DML statements.

There are some limitations you need to be aware of however, for example interactions with stages (using PUT and GET aren’t supported via the Snowflake API) or stored procedure operations (using CALL), you can read more on this here.

Endpoints

There are three endpoints provided:

  • /api/v2/statements/
  • /api/v2/statement/<statementHandle>
  • /api/v2/statements/<statementHandle/cancel

We will be looking at the first two in this article.

Authentication Methods

There are two types of Authentication methods for the API, OAuth and Key Pair. For OAuth method, you can choose to use X-Snowflake-Authorization-Token-Type header, if this header is not present, Snowflake assumes that the token in the Authorization header is an OAuth token. For Key Pair method, the JWT token will be in the Authorization header as Bearer <your token>.

Let’s walk through how to generate and use the JWT.

Generating the JWT

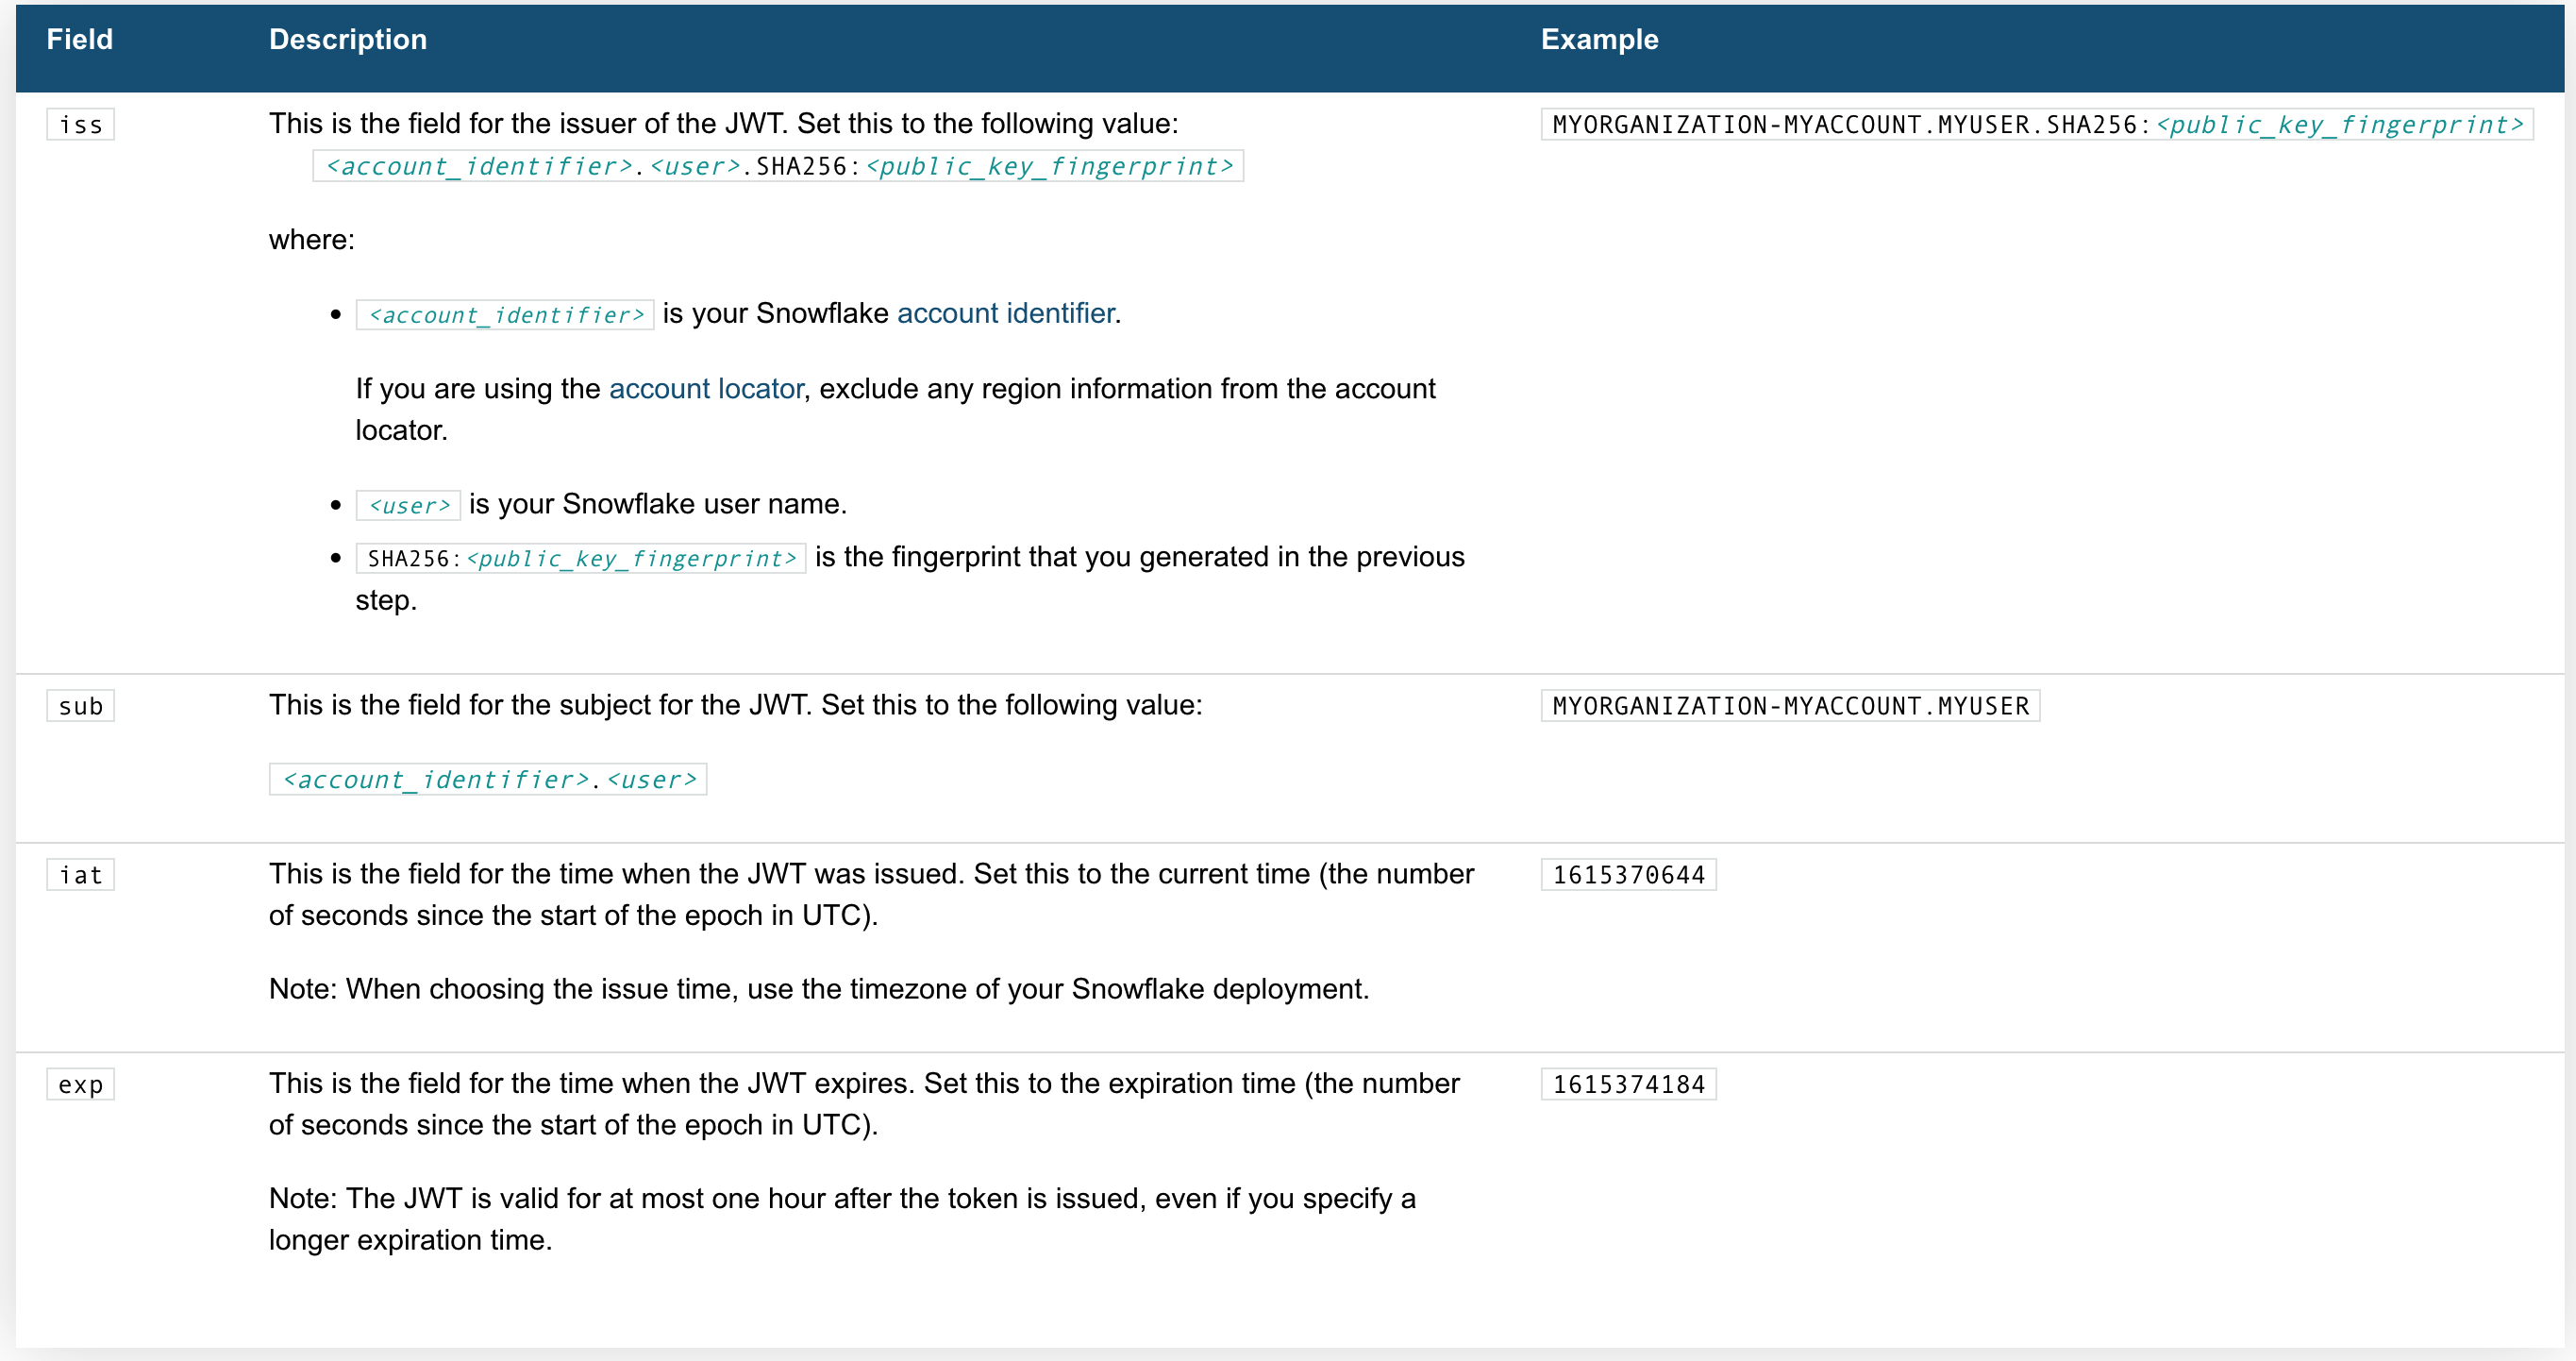
Here's whats needed:

Snowflake JWT

the Code

Request Body

Now we need a request body:

Submitting the Request

We will need to include the region and account identifier, for instance if your account identifier includes a region (e.g. xy12345.us-east2.aws.snowflakecomputing.com).

Response Handling

When making a SELECT query, there are three things worth noting:

  1. rowType fields in the resultSetMetaData represent the columns
  2. data without column names is in the format of string[][]
  3. partitionInfo is an array of object representing different partitions

For more information see Handling Responses from the SQL API - Snowflake Documentation.

Parsing data

Here is a Typescript code snippet demonstrating parsing return data:

Handling multiple partitions

Large result sets are paginated into partitions, each partition is a set of rows.

note

Note that the pages (referred to as partitions) are NOT based on row count, instead they are based on the compressed batch size, so they will not be uniform in terms of the number of rows.

To get a partition, send a GET request with Url https://<accountIdentifier>.snowflakecomputing.com/api/v2/statements/?partition=<partitionId>.

Thanks!

· 2 min read
Jeffrey Aven

Open API specifications can get quite large, especially for providers with upwards of 500 routes or operations.

The challenge is to create standalone documents scoped by a service or path within the parent API specification and include only the components (schemas, responses, etc.) that pertain to operations included in the child document.

When I went looking for library or utility to do this, I couldn’t find one... so I have developed one myself.

It's a simple command (nodejs based but can be run in a bash terminal or from the Windows command line) which requires a few options, including:

  • the provider name (e.g. github)
  • a provider version which is a version you set - allowing you to make minor modifications to the output documents (e.g. v0.1.0)
  • a service discriminator which is a JSONPath expression to identify a service name within each route in the parent file, this is used to assign operations to services in separate documents (e.g. '$["x-github"].category')
  • an output directory (e.g. ./dev)

and of course, the openapi spec document you are splitting up.

an example is shown here:

openapi-doc-util split \
-n github \
-v v0.1.0 \
-s '$["x-github"].category' \
-o ./dev \
ref/github/api.github.com.yaml

Help for the command is available using openapi-doc-util split.

The net result is 59 self-contained, service scoped documents, containing only the components referenced by routes in the service document.

You can access this utility via NPMJS or via GitHub.

Splitting up a large open API spec document, is the first stage in developing a StackQL provider which we will discuss next time!

if you have enjoyed this post, please consider buying me a coffee ☕ to help me keep writing!

· 4 min read
Jeffrey Aven

Structured Streaming in Spark provides a powerful framework for stream processing an analysis, such as streaming transformations, stateful streaming or sliding window operations.

Kafka is a common streaming source and sink for Spark Streaming and Structured Streaming operations. However, there may be situations where a data warehouse (such as Snowflake) is a more appropriate target for streaming operations, especially where there is a reporting or long-term storage requirement on the data derived from the streaming source.

This article will demonstrate just how easy this is to implement using Python.

Design

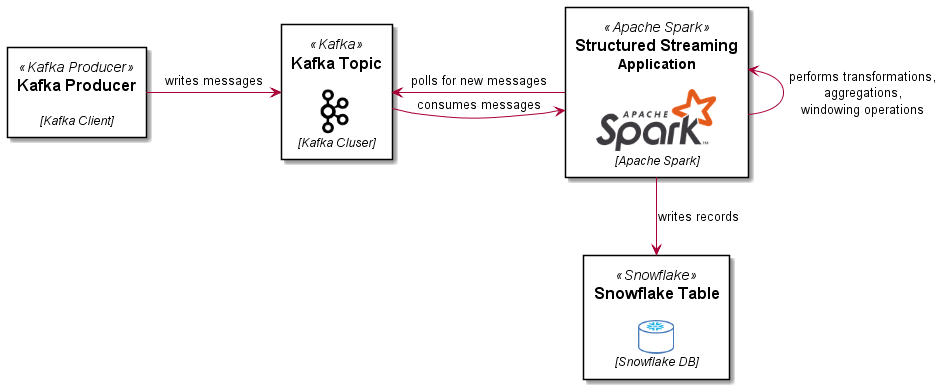
The following diagram illustrates the ingestion design for this example:

Spark Structured Streaming using Kafka and Snowflake

Snowflake Setup

Some prerequisites for Snowflake:

  1. You will need to create a user (or use an existing user), in either case the user will need to be identified by a private key. You will need to generate a key pair as follows:
openssl genrsa 2048 | openssl pkcs8 -topk8 -inform PEM -out rsa_key.p8 -nocrypt
openssl rsa -in rsa_key.p8 -pubout -out rsa_key.pub

copy the contents of the rsa_key.pub file, remove the -----BEGIN PUBLIC KEY----- and -----END PUBLIC KEY----- strings, then remove the line breaks to form one string, use this string as the RSA_PUBLIC_KEY in a CREATE USER or ALTER USER statement in Snowflake, like:

ALTER USER youruser SET RSA_PUBLIC_KEY='MIIBI...';
  1. Now setup the target database, schema and table you will use to write out your stream data (the schema for the table must match the schema for the Data Stream you will use the DataStreamWriter to emit records to Snowflake

The user you will be using (that you setup the key pair authentication for) will need to be assigned a default role to which the appropriate write permissions are granted to the target objects in Snowflake. You will also need to designate a virtual warehouse (which your user must have USAGE permissions to.

The Code

Now that we have the objects and user setup in Snowflake, we can construct our Spark application.

First, you will need to start your Spark session (either using pyspark or spark-submit) including the packages that Spark will need to connect to Kafka and to Snowflake.

The Snowflake packages include a JDBC driver and the Snowflake Connector for Spark, see Snowflake Connector for Spark.

An example is shown here (package versions may vary depending upon the version of Spark you are using):

pyspark \
--packages \
net.snowflake:snowflake-jdbc:3.13.14,\
net.snowflake:spark-snowflake_2.12:2.10.0-spark_3.1,\
org.apache.spark:spark-sql-kafka-0-10_2.12:3.2.1

Now that we have a spark session with the necessary packages, lets go...

# import any required functions, set the checkpoint directory, and log level (optional)
from pyspark.sql.functions import split
spark.sparkContext.setLogLevel("ERROR")
spark.conf.set("spark.sql.streaming.checkpointLocation", "file:///tmp")

setup connection options for Snowflake by creating an sfOptions dictionary

sfOptions = {
"sfURL" : sfUrl,
"sfUser" : "avensolutions",
"pem_private_key": private_key,
"sfDatabase" : "SPARK_SNOWFLAKE_DEMO",
"sfSchema" : "PUBLIC",
"sfWarehouse" : "COMPUTE_WH",
"streaming_stage" : "mystage"
}

set a variable for the Snowflake Spark connector

SNOWFLAKE_SOURCE_NAME = "net.snowflake.spark.snowflake"

read messages from Kafka:

lines = spark \
.readStream \
.format("kafka") \
.option("kafka.bootstrap.servers", "kafkabroker:9092") \
.option("subscribe", "weblogs") \
.load()

perform necessary transformations (the fields and data types in the resultant data structure must match the target table you created in Snowflake:

log_recs = lines.select(
split(lines.value.cast("string"), " ").alias("data")
)

log_data = log_recs.selectExpr(
"CAST(data[0] as string) as date",
"CAST(data[1] as string) as time",
"CAST(data[2] as string) as c_ip",
"CAST(data[3] as string) as cs_username",
"CAST(data[4] as string) as s_sitename",
"CAST(data[5] as string) as s_computername",
"CAST(data[6] as string) as s_ip",
"CAST(data[7] as int) as s_port",
"CAST(data[8] as string) as cs_method",
"CAST(data[9] as string) as cs_uri_stem",
"CAST(data[10] as string) as cs_uri_query",
"CAST(data[11] as int) as sc_status",
"CAST(data[12] as int) as time_taken",
"CAST(data[13] as string) as cs_version",
"CAST(data[14] as string) as cs_host",
"CAST(data[15] as string) as User_Agent",
"CAST(data[16] as string) as Referer",
)

write to Snowflake!

query = log_data\
.writeStream\
.format(SNOWFLAKE_SOURCE_NAME) \
.options(**sfOptions) \
.option("dbtable", "WEB_LOGS") \
.trigger(processingTime='30 seconds') \
.start()

query.awaitTermination()
info

Note that I have included the processingTime trigger of 30 seconds (this is akin to the batchInterval in the DStream API), you should tune this to get a balance between batch sizes to ingest into Snowflake (which will benefit from larger batches) and latency.

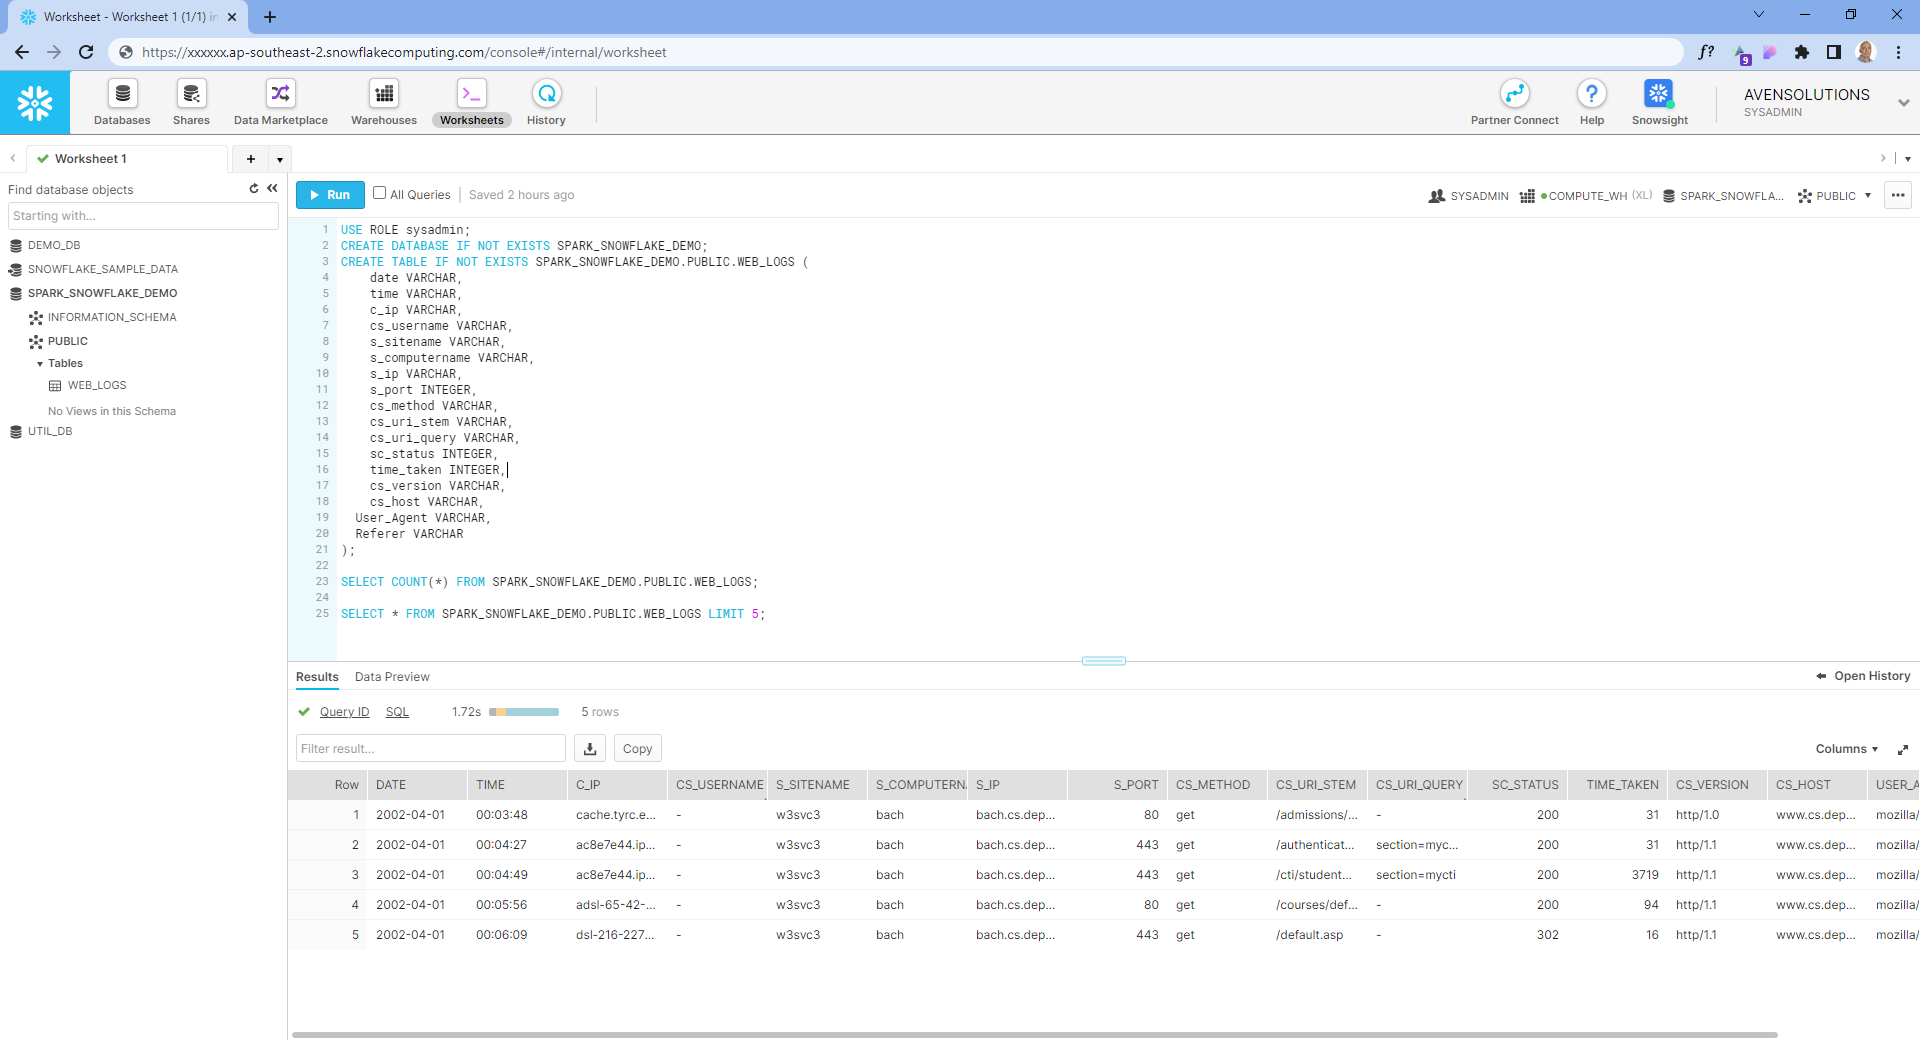
The Results

Spark Structured Streaming into Snowflake

Enjoy!

if you have enjoyed this post, please consider buying me a coffee ☕ to help me keep writing!

· 3 min read
Jeffrey Aven

This article demonstrates a simple command line utility to login to an authorization server (Okta in this case) using a PKCE (Proof Key for Code Exchange) flow. This is the preferred flow for public clients (such as Single Page Applications).

The code for this article is available on GitHub

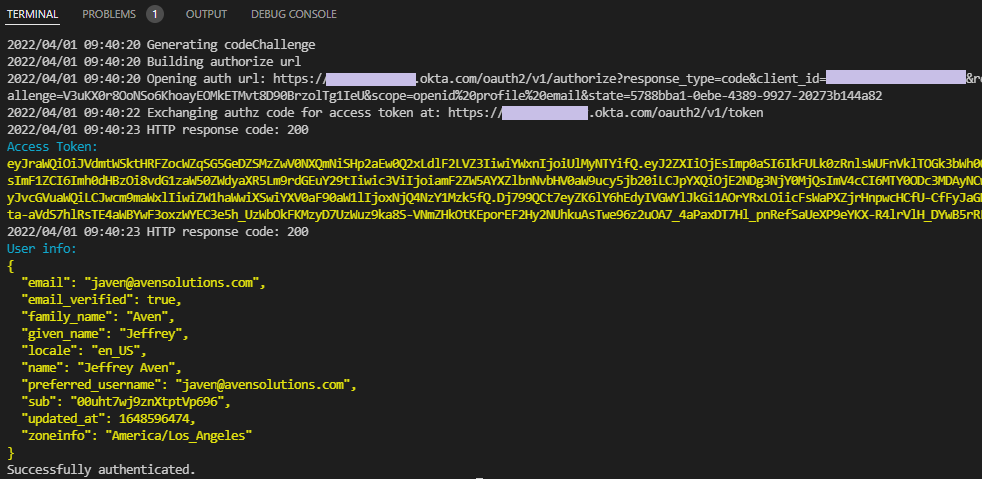
Example

Okta PKCE cli login example

Overview

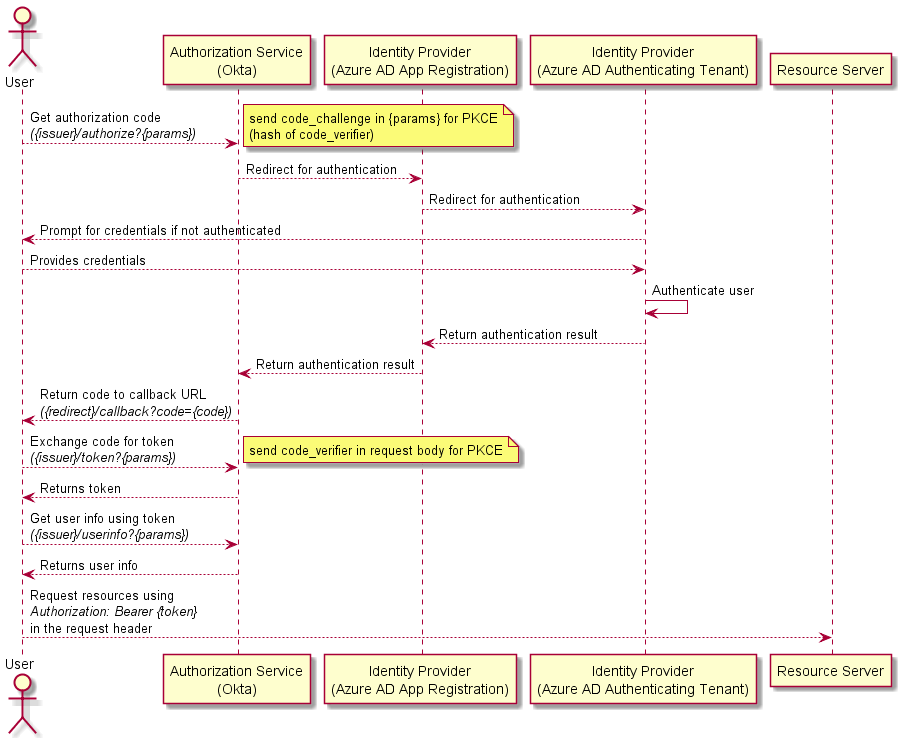
This application can be used to illustrate the authorization/authentication flow discussed in Simple SSO with an external IdP using Active Directory and Okta. A flow which is pictured here:

PKCE Authorization t Okta using an AD IdP

Steps

The steps involved in the implementation of a PKCE login flow are as follows:

Generate a code_challenge

To implement a PKCE flow, you first need to generate a Code Verifier (which is a random value you create), the Code Verifier is then hashed using a SHA256 algorithm. The hash is then used as the Code Challenge. An example function to generate a code challenge is shown below:

For more information see Use PKCE to Make Your Apps More Secure.

Build the authorize url

The authorize url is used to initiate the authorization flow with the authorization server. An example function to construct the authorize url is shown below:

Get the authorization code via redirect uri

The redirecturi parameter supplied in the authorize url is used to retrieve the authorization code from the authorization server. In order to get this code using a front end flow, you need to define a handler that will get the authorization code, call the token endpoint, and close the HTTP server, as shown here:

Exchange the code for an access token

The access token is what you ultimatly want, as this is the token that will be used to access protected resources. An example function to exchange the authorization code for an access token is shown below:

(Optional) Get the user profile

The access token can be used to get the user profile, this is done by calling the userinfo endpoint using the token. An example function to get the user profile is shown below:

with inspiration from...

if you have enjoyed this post, please consider buying me a coffee ☕ to help me keep writing!