15 posts tagged with "googlecloudplatform"

View All Tags

· 3 min read
Jeffrey Aven

Slack GCS DLP

This is a follow up to a previous blog, Google Cloud Storage Object Notifications using Slack in which we used Slack to notify us of new objects being uploaded to GCS.

In this article we will take things a step further, where uploading an object to a GCS bucket will trigger a DLP inspection of the object and if any preconfigured info types (such as credit card numbers or API credentials) are present in the object, a Slack notification will be generated.

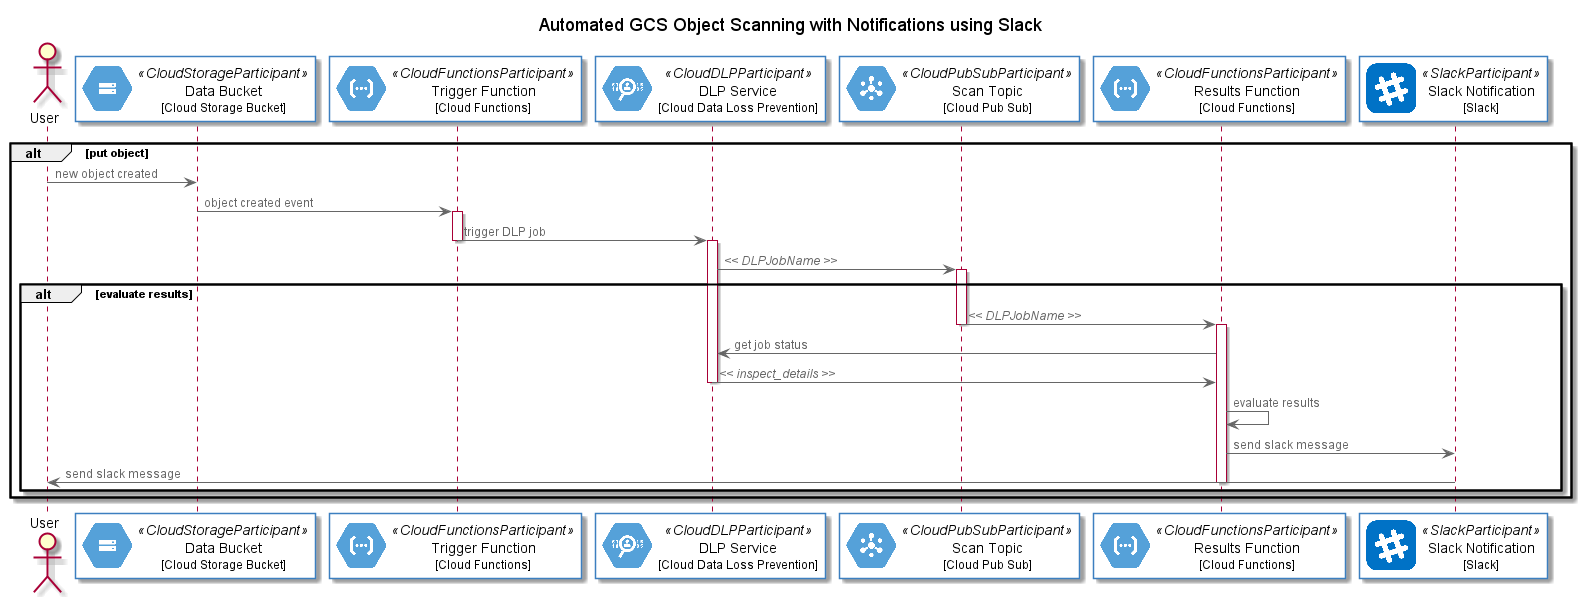
As DLP scans are “jobs”, meaning they run asynchronously, we will need to trigger scans and inspect results using two separate Cloud Functions (one for triggering a scan [gcs-dlp-scan-trigger] and one for inspecting the results of the scan [gcs-dlp-evaluate-results]) and a Cloud PubSub topic [dlp-scan-topic] which is used to hold the reference to the DLP job.

The process is described using the sequence diagram below:

The Code

The gcs-dlp-scan-trigger Cloud Function fires when a new object is created in a specified GCS bucket. This function configures the DLP scan to be executed, including the DLP info types (for instance CREDIT_CARD_NUMBER, EMAIL_ADDRESS, ETHNIC_GROUP, PHONE_NUMBER, etc) a and likelihood of that info type existing (for instance LIKELY). DLP scans determine the probability of an info type occurring in the data, they do not scan every object in its entirety as this would be too expensive.

The primary function executed in the gcs-dlp-scan-trigger Cloud Function is named inspect_gcs_file. This function configures and submits the DLP job, supplying a PubSub topic to which the DLP Job Name will be written, the code for the inspect_gcs_file is shown here:

At this stage the DLP job is created an running asynchronously, the next Cloud Function, gcs-dlp-evaluate-results, fires when a message is sent to the PubSub topic defined in the DLP job. The gcs-dlp-evaluate-results reads the DLP Job Name from the PubSub topic, connects to the DLP service and queries the job status, when the job is complete, this function checks the results of the scan, if the min_likliehood threshold is met for any of the specified info types, a Slack message is generated. The code for the main method in the gcs-dlp-evaluate-results function is shown here:

Finally, a Slack webhook is used to send the message to a specified Slack channel in a workspace, this is done using the send_slack_notification function shown here:

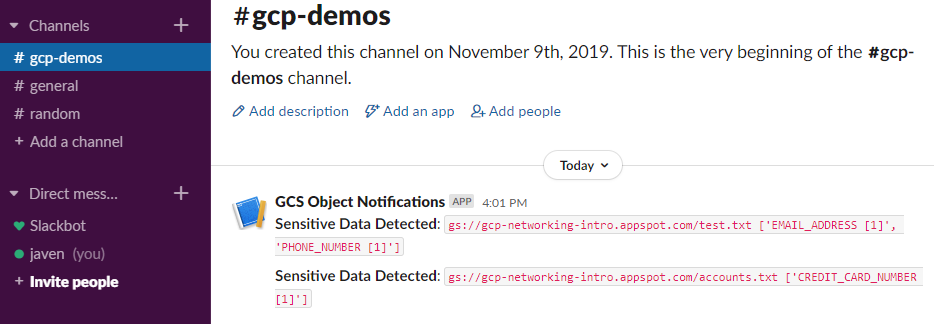
An example Slack message is shown here:

Slack Notification for Sensitive Data Detected in a Newly Created GCS Object

Full source code can be found at: https://github.com/gamma-data/automated-gcs-object-scanning-using-dlp-with-notifications-using-slack

if you have enjoyed this post, please consider buying me a coffee ☕ to help me keep writing!

· 9 min read
Daniel Hussey

Forseti Terraform

Terraform is a powerful tool for managing your Infrastructure as Code. Declare your resources once, define their variables per environment and sleep easy knowing your CI pipeline will take care of the rest.

But… one night you wake up in a sweat. The details are fuzzy but you were browsing your favourite cloud provider’s console - probably GCP ;) - and thought you saw a bucket had been created outside of your allowed locations! Maybe it even had risky access controls.

You go brush it off and try to fall back to sleep, but you can’t quite push the thought from your mind that somewhere in all that Terraform code, someone could be declaring resources in unapproved locations, and your CICD pipeline would do nothing to stop it. Oh the regulatory implications.

Enter Terraform Validator by Forseti

Terraform Validator by Forseti allows you to declare your Policy as Code, check compliance of your Terraform plans against said Policy, and automatically fail violating plans in a CI step. All without setting up servers or agents.

You’re going to learn how to enforce policy on GCP resources like BigQuery, IAM, networks, MySQL, Google Kubernetes Engine (GKE) and more. If you’re particularly crafty, you may be able to go beyond GCP.

Forseti’s suite of solutions are GCP focused and allow a wide range of live config validation, monitoring and more using the Policy Library we’re going to set up. These additional capabilities require additional infrastructure. But we’re going one step at a time, starting with enforcing policy during deployment.

Getting Started

Let’s assume you already have an established CICD pipeline that uses Terraform, or that you are content to validate your Terraform plans locally for now. In that case, we need just two things:

  1. A Policy Library
  2. Terraform Validator

It’s that simple! No new servers, agents, firewall rules, extra service accounts or other nonsense. Just add Policy Library, the Validator tool and you can enforce policy on your Terraform deployments.

We’re going to tinker with some existing GCP-focused sample policies (aka Constraints) that Forseti makes available. These samples cover a wide range of resources and use cases, so it is easy to adjust what’s provided to define your own Constraints.

Policy Library

First let's open up some of Forseti's pre-defined constraints. We’ll copy them into our own Git repository and adjust to create policies that match our needs. Repeatable and configurable - that’s Policy as Code at work.

Concepts

In the world of Forseti and in particular Terraform Validator, Policies are defined and understood via easy to read YAML files known as Constraints

There is just enough information in a Constraint file for to make clear its purpose and effect, and by tinkering lightly with a pre-written Constraint you can achieve a lot without looking too deeply into the inner workings . But there’s more happening than meets the eye.

Constraints are built on Templates - which are like forms with some extra bits waiting to be completed to make a Constraint. Except there’s a lot more hidden away that’s pretty cool if you want to understand it.

Think of a Template as a ‘Class’ in the OOP sense, and of a Constraint as an instantiated Template with all the key attributes defined.

E.g. A generic Template for policy on bucket locations and a Constraint to specify which locations are relevant in a given instance. Again, buckets and locations are just the basic example - the potential applications are far greater.

Now the real magic is that just like a ‘Class’, a Template contains logic that makes everything abstracted away in the Constraint possible. Templates contain inline Rego (ray-go), borrowed lovingly by Forseti from the Open Policy Agent (OPA) team.

Learn more about Rego and OPA here to understand the relationship to our Terraform Validator.

But let’s begin.

Set up your Policies

Create your Policy Library repository

Create your Policy Library repository by cloning https://github.com/forseti-security/policy-library into your own VCS.

This repo contains templates and sample constraints which will form the basis of your policies. So get it into your Git environment and clone it to local for the next step.

Customise sample constraints to fit your needs

As discussed in Concepts, Constraints are defined Templates, which make use of Rego policy language. Nice. So let’s take a sample Constraint, put it in our Policy Library and set the values to what we need. It’s that easy - no need to write new templates or learn Rego if your use case is covered.

In a new branch…

  1. Copy the sample Constraint storage_location.yaml to your Constraints folder.
$ cp policy-library/samples/storage_location.yaml policy-library/policies/constraints/storage_location.yaml
  1. Replace the sample location (asia-southeast1) in storage_location.yaml with australia-southeast1.
  spec:  
severity: high
match:
target: ["organization/*"]
parameters:
mode: "allowlist"
locations:
- australia-southeast1
exemptions: []
  1. Push back to your repo - not Forseti’s!
$ git push https://github.com/<your-repository>/policy-library.git

Policy review

There you go - you’ve customised a sample Constraint. Now you have your own instance of version controlled Policy-as-Code and are ready to apply the power of OPA’s Rego policy language that lies within the parent Template. Impressively easy right?

That’s a pretty simple example. You can browse the rest of Forseti’s Policy Library to view other sample Constraints, Templates and the Rego logic that makes all of this work. These can be adjusted to cover all kinds of use cases across GCP resources.

I suggest working with and editing the sample Constraints before making any changes to Templates.

If you were to write Rego and Templates from scratch, you might even be able to enforce Policy as Code against non-GCP Terraform code.

Terraform Validator

Now, let’s set up the Terraform Validator tool and have it compare a sample piece of Terraform code against the Constraint we configured above. Keep in mind you’ll want to translate what’s done here into steps in your CICD pipeline.

Once the tool is in place, we really just run terraform plan and feed the output into Terraform Validator. The Validator compares it to our Constraints, runs all the abstracted logic we don’t need to worry about and returns 0 or 2 when done for pass / fail respectively. Easy.

So using Terraform if I try to make a bucket in australia-southeast1 it should pass, if I try to make one in the US it should fail. Let’s set up the tool, write some basic Terraform and see how we go.

Setup Terraform Validator

Check for the latest version of terraform-validator from the official terraform-validator GCS bucket.

Very important when using tf version 0.12 or greater. This is the easy way - you can pull from the Terraform Validator Github and make it yourself too.

$ gsutil ls -r gs://terraform-validator/releases

Copy the latest version to the working dir

$ gsutil cp gs://terraform-validator/releases/2020-03-05/terraform-validator-linux-amd64 .

Make it executable

$ chmod 755 terraform-validator-linux-amd64

Ready to go!

Review your Terraform code

We’re going to make a ridiculously simple piece of Terraform that tries to create one bucket in our project to keep things simple.

# main.tf

resource "google_storage_bucket" "tf-validator-demo-bucket" {  
name          = "tf-validator-demo-bucket"
  location      = "US"
  force_destroy = true

  lifecycle_rule {
    condition {
      age = "3"
    }
    action {
      type = "Delete"
    }
  }
}

This is a pretty standard bit of Terraform for a GCS bucket, but made very simple with all the values defined directly in main.tf. Note the location of the bucket - it violates our Constraint that was set to the australia-southeast1 region.

Make the Terraform plan

Warm up Terraform.
Double check your Terraform code if there are any hiccups.

$ terraform init

Make the Terraform plan and store output to file.

$ terraform plan --out=terraform.tfplan

Convert the plan to JSON

$ terraform show -json ./terraform.tfplan > ./terraform.tfplan.json

Validate the non-compliant Terraform plan against your Constraints, for example

$ ./terraform-validator-linux-amd64 validate ./tfplan.tfplan.json --policy-path=../repos/policy-library/

TA-DA!

Found Violations:

Constraint allow_some_storage_location on resource //storage.googleapis.com/tf-validator-demo-bucket: //storage.googleapis.com/tf-validator-demo-bucket is in a disallowed location.

Validate the compliant Terraform plan against your Constraints

Let’s see what happens if we repeat the above, changing the location of our GCS bucket to australia-southeast1.

$ ./terraform-validator-linux-amd64 validate ./tfplan.tfplan.json --policy-path=../repos/policy-library/

Results in..

No violations found.

Success!!!

Now all that’s left to do for your Policy as Code CICD pipeline is to configure the rest of your Constraints and run this check before you go ahead and terraform apply. Be sure to make the apply step dependent on the outcome of the Validator.

Wrap Up

We’ve looked at how to apply Policy as Code to validate our Infrastructure as Code. Sounds pretty modern and DevOpsy doesn’t it.

To recap, we learned about Constraints, which are fully defined instances of Policy as Code. They’re based on YAML Templates that refer to the OPA policy language Rego, but we didn’t have to learn it :)

We created our own version controlled Policy Library.

Using the above learning and some handy pre-existing samples, we wrote policies (Constraints) for GCP infrastructure, specifying a whitelist for locations in which GCS buckets could be deployed.

As mentioned there are dozens upon dozens of samples across BigQuery, IAM, networks, MySQL, Google Kubernetes Engine (GKE) and more to work with.

Of course, we stored these configured Constraints in our version-controlled Policy Library.

  • We looked at a simple set of Terraform code to define a GCS bucket, and stored the Terraform plan to a file before applying it.
  • We ran Forseti’s Terraform Validator against the Terraform plan file, and had the Validator compare the plan to our Policy Library.
  • We saw that the results matched our expectations! Compliance with the location specified in our Constraint passed the Validator’s checks, and non-compliance triggered a violation.

Awesome. And the best part is that all this required no special permissions, no infrastructure for servers or agents and no networking.

All of that comes with the full Forseti suite of Inventory taking Config Validation of already deployed resources. We might get to that next time.

References:

https://github.com/GoogleCloudPlatform/terraform-validator https://github.com/forseti-security/policy-library https://www.openpolicyagent.org/docs/latest/policy-language/ https://cloud.google.com/blog/products/identity-security/using-forseti-config-validator-with-terraform-validator https://forsetisecurity.org/docs/latest/concepts/

· 12 min read
Jeffrey Aven

This article demonstrates creating a site to site IPSEC VPN connection between a GCP VPC network and an Azure Virtual Network, enabling private RFC1918 network connectivity between virtual networks in both clouds. This is done using a single PowerShell script leveraging Azure PowerShell and gcloud commands in the Google SDK.

Additionally, we will use Azure Private DNS to enable private access between Azure hosts and GCP APIs (such as Cloud Storage or Big Query).

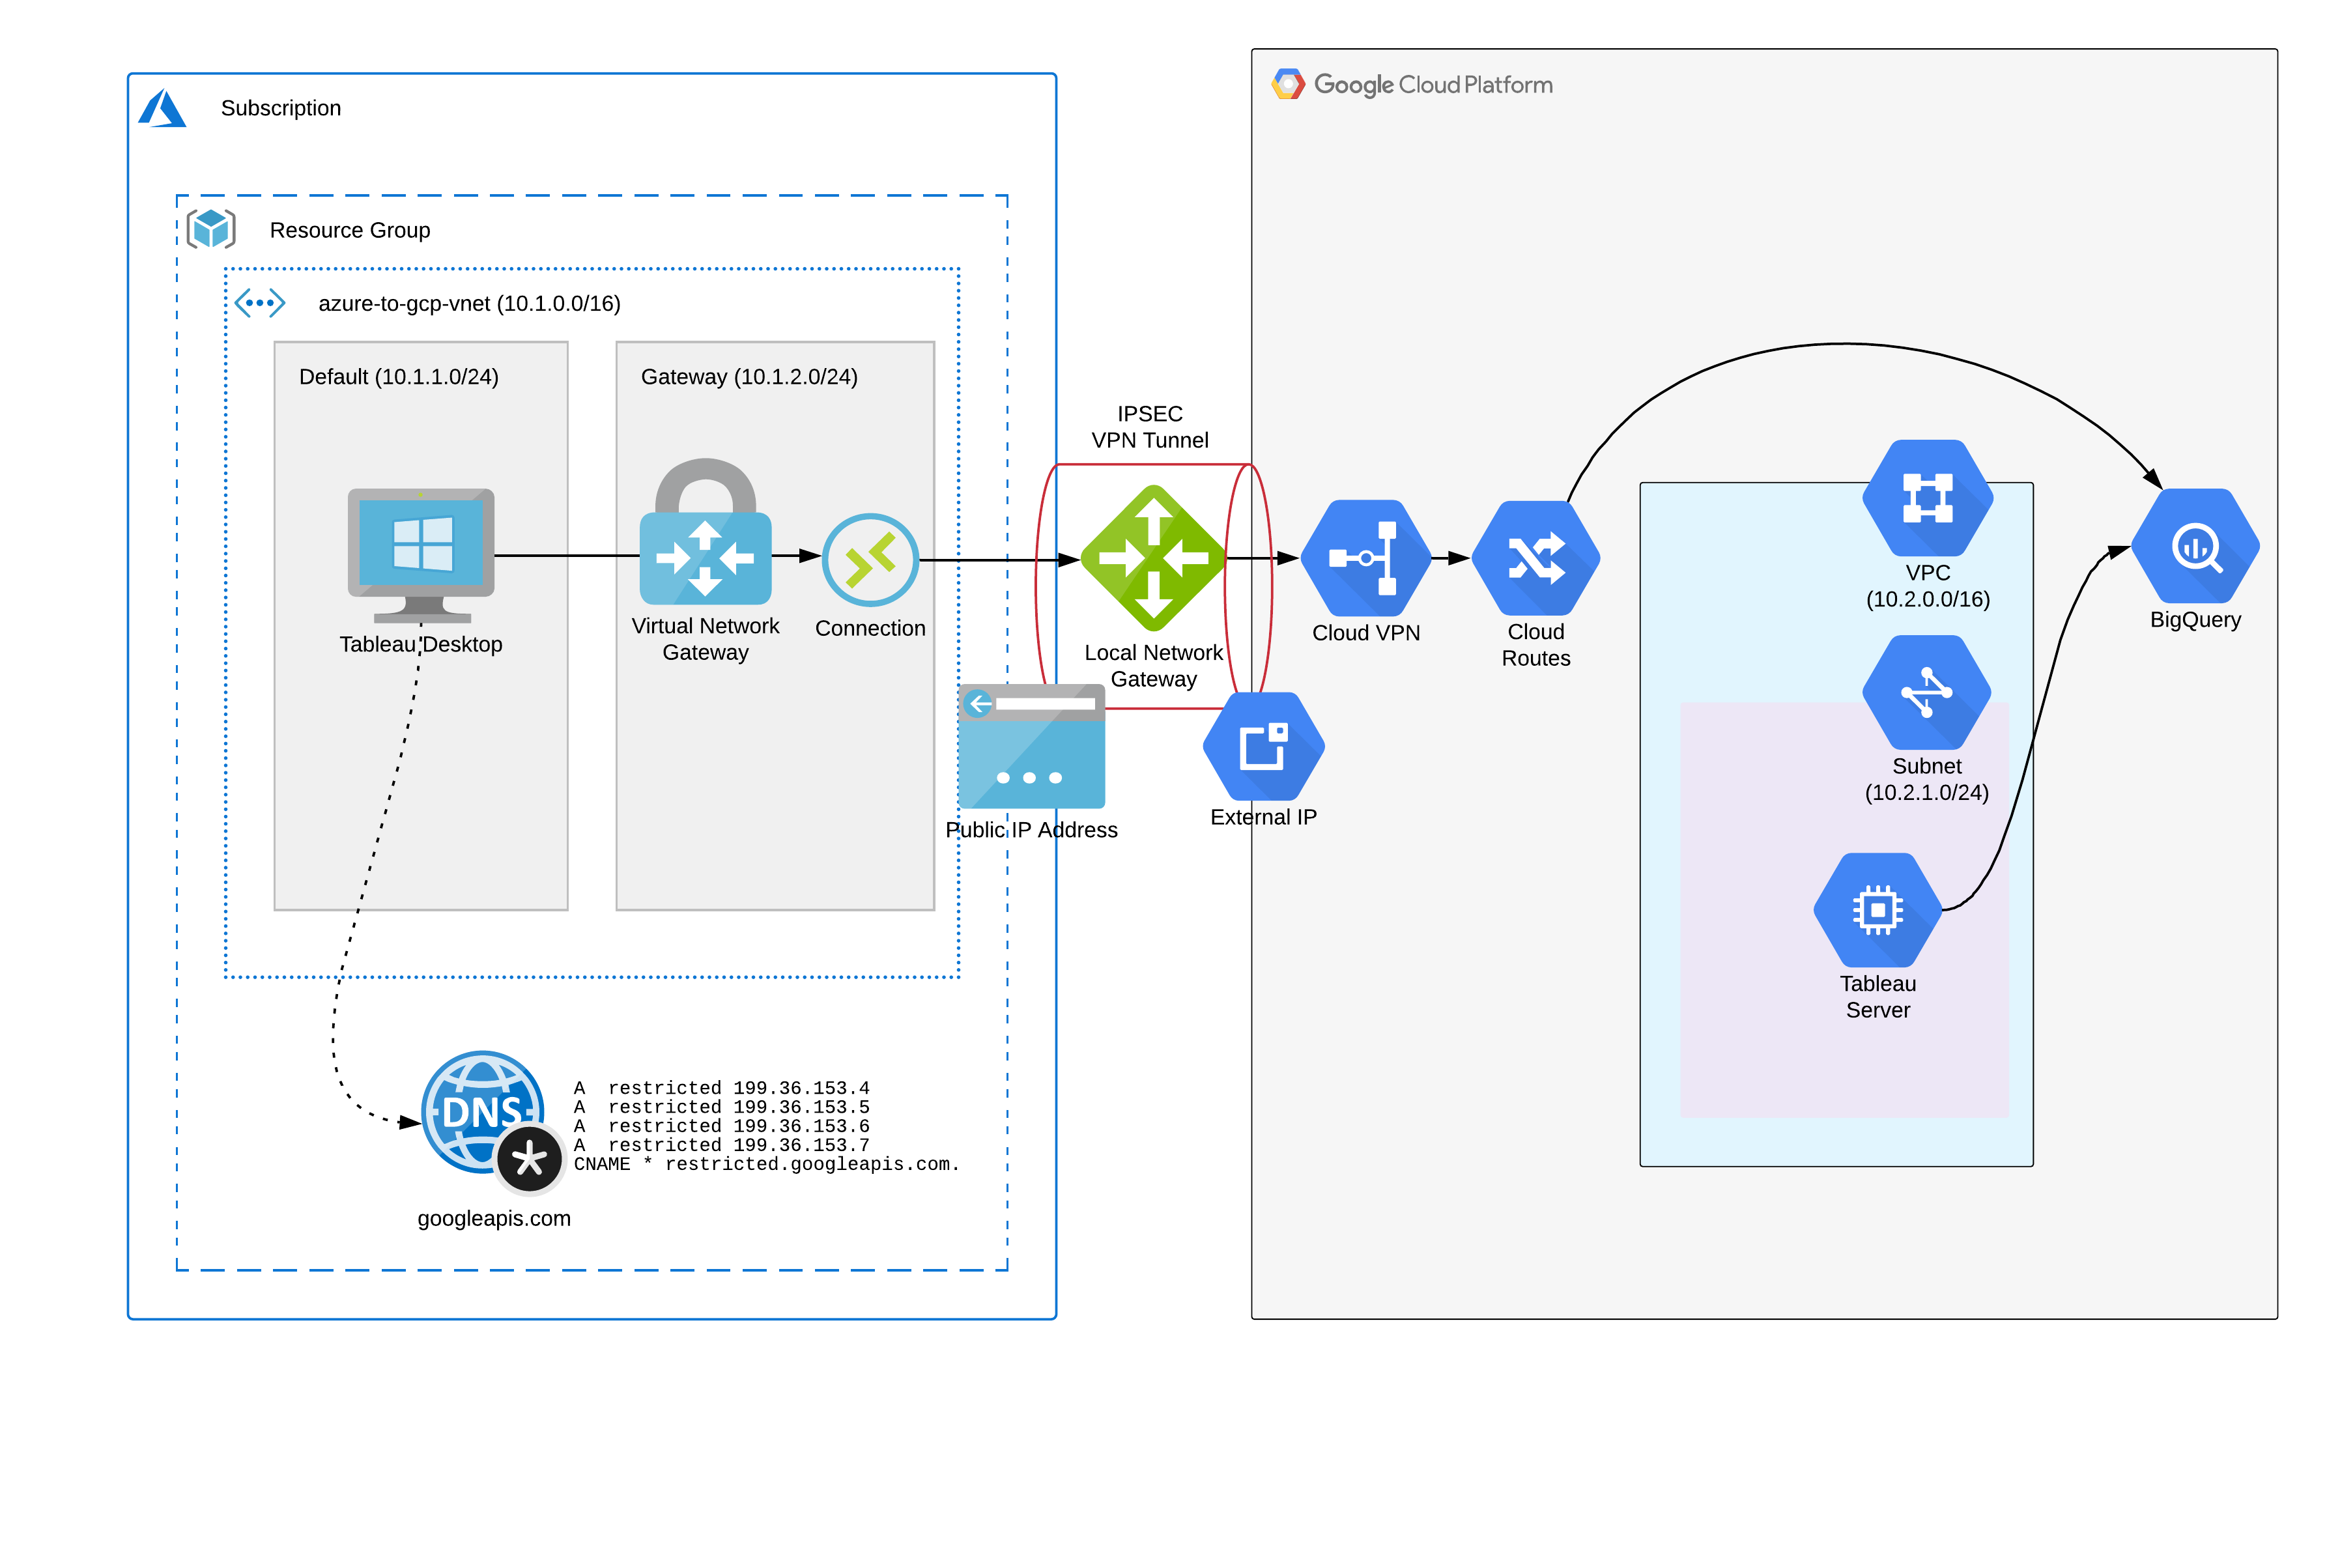
An overview of the solution is provided here:

Azure to GCP VPN Design

One note before starting - site to site VPN connections between GCP and Azure currently do not support dynamic routing using BGP, however creating some simple routes on either end of the connection will be enough to get going.

Let’s go through this step by step:

Step 1 : Authenticate to Azure

Azure’s account equivalent is a subscription, the following command from Azure Powershell is used to authenticate a user to one or more subscriptions.

Connect-AzAccount

This command will open a browser window prompting you for Microsoft credentials, once authenticated you will be returned to the command line.

Step 2 : Create a Resource Group (Azure)

A resource group is roughly equivalent to a project in GCP. You will need to supply a Location (equivalent to a GCP region):

New-AzResourceGroup `
-Name "azure-to-gcp" `
-Location "Australia Southeast"

Step 3 : Create a Virtual Network with Subnets and Routes (Azure)

An Azure Virtual Network is the equivalent of a VPC network in GCP (or AWS), you must define subnets before creating a Virtual Network. In this example we will create two subnets, one Gateway subnet (which needs to be named accordingly) where the VPN gateway will reside, and one subnet named ‘default’ where we will host VMs which will connect to GCP services over the private VPN connection.

Before defining the default subnet we must create and attach a Route Table (equivalent of a Route in GCP), this particular route will be used to route ‘private’ requests to services in GCP (such as Big Query).

# define route table and route to GCP private access
$azroutecfg = New-AzRouteConfig `
-Name "google-private" `
-AddressPrefix "199.36.153.4/30" `
-NextHopType "VirtualNetworkGateway"

$azrttbl = New-AzRouteTable `
-ResourceGroupName "azure-to-gcp" `
-Name "google-private" `
-Location "Australia Southeast" `
-Route $azroutecfg

# define gateway subnet
$gatewaySubnet = New-AzVirtualNetworkSubnetConfig `
-Name "GatewaySubnet" `
-AddressPrefix "10.1.2.0/24"

# define default subnet
$defaultSubnet = New-AzVirtualNetworkSubnetConfig `
-Name "default" `
-AddressPrefix "10.1.1.0/24" `
-RouteTable $azrttbl

# create virtual network and subnets
$vnet = New-AzVirtualNetwork `
-Name "azure-to-gcp-vnet" `
-ResourceGroupName "azure-to-gcp" `
-Location "Australia Southeast" `
-AddressPrefix "10.1.0.0/16" `
-Subnet $gatewaySubnet,$defaultSubnet

Step 4 : Create Network Security Groups (Azure)

Network Security Groups in Azure are stateful firewalls much like Firewall Rules in VPC networks in GCP. Like GCP, the lower priority overrides higher priority rules.

In the example we will create several rules to allow inbound ICMP, TCP and UDP traffic from our Google VPC and RDP traffic from the Internet (which we will use to logon to a VM in Azure to test private connectivity between the two clouds):

# create network security group
$rule1 = New-AzNetworkSecurityRuleConfig `
-Name rdp-rule `
-Description "Allow RDP" `
-Access Allow `
-Protocol Tcp `
-Direction Inbound `
-Priority 100 `
-SourceAddressPrefix Internet `
-SourcePortRange * `
-DestinationAddressPrefix * `
-DestinationPortRange 3389

$rule2 = New-AzNetworkSecurityRuleConfig `
-Name icmp-rule `
-Description "Allow ICMP" `
-Access Allow `
-Protocol Icmp `
-Direction Inbound `
-Priority 101 `
-SourceAddressPrefix * `
-SourcePortRange * `
-DestinationAddressPrefix * `
-DestinationPortRange *

$rule3 = New-AzNetworkSecurityRuleConfig `
-Name gcp-rule `
-Description "Allow GCP" `
-Access Allow `
-Protocol Tcp `
-Direction Inbound `
-Priority 102 `
-SourceAddressPrefix "10.2.0.0/16" `
-SourcePortRange * `
-DestinationAddressPrefix * `
-DestinationPortRange *

$nsg = New-AzNetworkSecurityGroup `
-ResourceGroupName "azure-to-gcp" `
-Location "Australia Southeast" `
-Name "nsg-vm" `
-SecurityRules $rule1,$rule2,$rule3

Step 5 : Create Public IP Addresses (Azure)

We need to create two Public IP Address (equivalent of an External IP in GCP) which will be used for our VPN gateway and for the VM we will create:

# create public IP address for VM
$vmpip = New-AzPublicIpAddress `
-Name "vm-ip" `
-ResourceGroupName "azure-to-gcp" `
-Location "Australia Southeast" `
-AllocationMethod Dynamic

# create public IP address for NW gateway
$ngwpip = New-AzPublicIpAddress `
-Name "ngw-ip" `
-ResourceGroupName "azure-to-gcp" `
-Location "Australia Southeast" `
-AllocationMethod Dynamic

Step 6 : Create Virtual Network Gateway (Azure)

The Virtual Network Gateway in Azure is the VPN Gateway equivalent in Azure which will be used to create a VPN tunnel between Azure and a GCP VPN Gateway. This gateway will be placed in the Gateway subnet created previously and one of the Public IP addresses created in the previous step will be assigned to this gateway.

# create virtual network gateway
$ngwipconfig = New-AzVirtualNetworkGatewayIpConfig `
-Name "ngw-ipconfig" `
-SubnetId $gatewaySubnet.Id `
-PublicIpAddressId $ngwpip.Id

# use the AsJob switch as this is a long running process
$job = New-AzVirtualNetworkGateway -Name "vnet-gateway" `
-ResourceGroupName "azure-to-gcp" `
-Location "Australia Southeast" `
-IpConfigurations $ngwipconfig `
-GatewayType "Vpn" `
-VpnType "RouteBased" `
-GatewaySku "VpnGw1" `
-VpnGatewayGeneration "Generation1" `
-AsJob

$vnetgw = Get-AzVirtualNetworkGateway `
-Name "vnet-gateway" `
-ResourceGroupName "azure-to-gcp"

Step 7 : Create a VPC Network and Subnetwork(s) (GCP)

A VPC network and subnet need to be created in GCP, the subnet defines the VPC address space. This address space must not overlap with the Azure Virtual Network CIDR. For all GCP steps it is assumed that the project is set for client config (e.g. gcloud config set project your_project) so it does not need to be specified for each operation. Private Google access should be enabled on all subnets created.

# creating VPC network and subnets
gcloud compute networks create "azure-to-gcp-vpc" `
--subnet-mode=custom `
--bgp-routing-mode=regional

gcloud compute networks subnets create "aus-subnet" `
--network "azure-to-gcp-vpc" `
--range "10.2.1.0/24" `
--region "australia-southeast1" `
--enable-private-ip-google-access

Step 8 : Create an External IP (GCP)

An external IP address will need to be created in GCP which will be used for the external facing interface of the VPN Gateway.

# create external IP
gcloud compute addresses create "ext-gw-ip" `
--region "australia-southeast1"

$gcp_ipaddr_obj = gcloud compute addresses describe "ext-gw-ip" `
--region "australia-southeast1" `
--format json | ConvertFrom-Json

$gcp_ipaddr = $gcp_ipaddr_obj.address

Step 9 : Create Firewall Rules (GCP)

VPC firewall rules will need to be created in GCP to allow VPN traffic as well as SSH traffic from the internet (which allows you to SSH into VM instances using Cloud Shell).

# create VPN firewall rules
gcloud compute firewall-rules create "vpn-rule1" `
--network "azure-to-gcp-vpc" `
--allow tcp,udp,icmp `
--source-ranges "10.1.0.0/16"

gcloud compute firewall-rules create "ssh-rule1" `
--network "azure-to-gcp-vpc" `
--allow tcp:22

Step 10 : Create VPN Gateway and Forwarding Rules (GCP)

Create a VPN Gateway and Forwarding Rules in GCP which will be used to create a tunnel between GCP and Azure.

# create cloud VPN 
gcloud compute target-vpn-gateways create "vpn-gw" `
--network "azure-to-gcp-vpc" `
--region "australia-southeast1" `
--project "azure-to-gcp-project"

# create forwarding rule ESP
gcloud compute forwarding-rules create "fr-gw-name-esp" `
--ip-protocol ESP `
--address "ext-gw-ip" `
--target-vpn-gateway "vpn-gw" `
--region "australia-southeast1" `
--project "azure-to-gcp-project"

# creating forwarding rule UDP500
gcloud compute forwarding-rules create "fr-gw-name-udp500" `
--ip-protocol UDP `
--ports 500 `
--address "ext-gw-ip" `
--target-vpn-gateway "vpn-gw" `
--region "australia-southeast1" `
--project "azure-to-gcp-project"

# creating forwarding rule UDP4500
gcloud compute forwarding-rules create "fr-gw-name-udp4500" `
--ip-protocol UDP `
--ports 4500 `
--address "ext-gw-ip" `
--target-vpn-gateway "vpn-gw" `
--region "australia-southeast1" `
--project "azure-to-gcp-project"

Step 10 : Create VPN Tunnel (GCP Side)

Now we will create the GCP side of our VPN tunnel using the Public IP Address of the Azure Virtual Network Gateway created in a previous step. As this example uses a route based VPN the traffic selector values need to be set at 0.0.0.0/0. A PSK (Pre Shared Key) needs to be supplied which will be the same key used when we configure a VPN Connection on the Azure side of the tunnel.

# get peer public IP address of Azure gateway
$azpubip = Get-AzPublicIpAddress `
-Name "ngw-ip" `
-ResourceGroupName "azure-to-gcp"

# create VPN tunnel
gcloud compute vpn-tunnels create "vpn-tunnel-to-azure" `
--peer-address $azpubip.IpAddress `
--local-traffic-selector "0.0.0.0/0" `
--remote-traffic-selector "0.0.0.0/0" `
--ike-version 2 `
--shared-secret << Pre-Shared Key >> `
--target-vpn-gateway "vpn-gw" `
--region "australia-southeast1" `
--project "azure-to-gcp-project"

Step 11 : Create Static Routes (GCP Side)

As we are using static routing (as opposed to dynamic routing) we will need to define all of the specific routes on the GCP side. We will need to setup routes for both outgoing traffic to the Azure network as well as incoming traffic for the restricted Google API range (199.36.153.4/30).

# create static route (VPN)
gcloud compute routes create "route-to-azure" `
--destination-range "10.1.0.0/16" `
--next-hop-vpn-tunnel "vpn-tunnel-to-azure" `
--network "azure-to-gcp-vpc" `
--next-hop-vpn-tunnel-region "australia-southeast1" `
--project "azure-to-gcp-project"

# create static route (Restricted APIs)
gcloud compute routes create apis `
--network "azure-to-gcp-vpc" `
--destination-range "199.36.153.4/30" `
--next-hop-gateway default-internet-gateway `
--project "azure-to-gcp-project"

Step 12 : Create a Local Gateway (Azure)

A Local Gateway in Azure is an object that represents the remote gateway (GCP VPN gateway).

# create local gateway
$azlocalgw = New-AzLocalNetworkGateway `
-Name "local-gateway" `
-ResourceGroupName "azure-to-gcp" `
-Location "Australia Southeast" `
-GatewayIpAddress $gcp_ipaddr `
-AddressPrefix "10.2.0.0/16"

Step 13 : Create a VPN Connection (Azure)

Now we can setup the Azure side of the VPN Connection which is accomplished by associating the Azure Virtual Network Gateway with the Local Network Gateway. A PSK (Pre Shared Key) needs to be supplied which is the same key used for the GCP VPN Tunnel in step 10.

# create connection
$azvpnconn = New-AzVirtualNetworkGatewayConnection `
-Name "vpn-connection" `
-ResourceGroupName "azure-to-gcp" `
-VirtualNetworkGateway1 $vnetgw `
-LocalNetworkGateway2 $azlocalgw `
-Location "Australia Southeast" `
-ConnectionType IPsec `
-SharedKey << Pre-Shared Key >> `
-ConnectionProtocol "IKEv2"

VPN Tunnel Established!

At this stage we have created an end to end connection between the virtual networks in both clouds. You should see this reflected in the respective consoles in each provider.

GCP VPN Tunnel to a Azure Virtual Network
Azure VPN Connection to a GCP VPC Network

Congratulations! You have just setup a multi cloud environment using private networking. Now let’s setup Google Private Access for Azure hosts and create VMs on each side to test our setup.

Step 14 : Create a Private DNS Zone for googleapis.com (Azure)

We will now need to create a Private DNS zone in Azure for the googleapis.com domain which will host records to redirect Google API requests to the Restricted API range.

# create private DNS zone
New-AzPrivateDnsZone `
-ResourceGroupName "azure-to-gcp" `
-Name "googleapis.com"

# Add A Records
$Records = @()
$Records += New-AzPrivateDnsRecordConfig `
-IPv4Address 199.36.153.4
$Records += New-AzPrivateDnsRecordConfig `
-IPv4Address 199.36.153.5
$Records += New-AzPrivateDnsRecordConfig `
-IPv4Address 199.36.153.6
$Records += New-AzPrivateDnsRecordConfig `
-IPv4Address 199.36.153.7

New-AzPrivateDnsRecordSet `
-Name "restricted" `
-RecordType A `
-ResourceGroupName "azure-to-gcp" `
-TTL 300 `
-ZoneName "googleapis.com" `
-PrivateDnsRecords $Records

# Add CNAME Records
$Records = @()
$Records += New-AzPrivateDnsRecordConfig `
-Cname "restricted.googleapis.com."

New-AzPrivateDnsRecordSet `
-Name "*" `
-RecordType CNAME `
-ResourceGroupName "azure-to-gcp" `
-TTL 300 `
-ZoneName "googleapis.com" `
-PrivateDnsRecords $Records

# Create VNet Link
New-AzPrivateDnsVirtualNetworkLink `
-ResourceGroupName "azure-to-gcp" `
-ZoneName "googleapis.com" `
-Name "dns-zone-link" `
-VirtualNetworkId $vnet.Id

Step 15 : Create a Virtual Machine (Azure)

We will create a VM in Azure which we can use to test the VPN tunnel as well as to test Private Google Access over our VPN tunnel.

# create VM
$az_vmlocaladminpwd = ConvertTo-SecureString << Password Param >> `
-AsPlainText -Force
$Credential = New-Object System.Management.Automation.PSCredential ("LocalAdminUser", $az_vmlocaladminpwd);

$nic = New-AzNetworkInterface `
-Name "vm-nic" `
-ResourceGroupName "azure-to-gcp" `
-Location "Australia Southeast" `
-SubnetId $defaultSubnet.Id `
-NetworkSecurityGroupId $nsg.Id `
-PublicIpAddressId $vmpip.Id `
-EnableAcceleratedNetworking `
-Force

$VirtualMachine = New-AzVMConfig `
-VMName "windows-desktop" `
-VMSize "Standard_D4_v3"

$VirtualMachine = Set-AzVMOperatingSystem `
-VM $VirtualMachine `
-Windows `
-ComputerName "windows-desktop" `
-Credential $Credential `
-ProvisionVMAgent `
-EnableAutoUpdate

$VirtualMachine = Add-AzVMNetworkInterface `
-VM $VirtualMachine `
-Id $nic.Id

$VirtualMachine = Set-AzVMSourceImage `
-VM $VirtualMachine `
-PublisherName 'MicrosoftWindowsDesktop' `
-Offer 'Windows-10' `
-Skus 'rs5-pro' `
-Version latest

New-AzVM `
-ResourceGroupName "azure-to-gcp" `
-Location "Australia Southeast" `
-VM $VirtualMachine `
-Verbose

Step 16 : Create a VM Instance (GCP)

We will create a Linux VM in GCP to test connectivity to hosts in Azure using the VPN tunnel we have established.

# create VM instance
gcloud compute instances create "gcp-instance" `
--zone "australia-southeast1-b" `
--machine-type "f1-micro" `
--subnet "aus-subnet" `
--network-tier PREMIUM `
--maintenance-policy MIGRATE `
--image=debian-9-stretch-v20200309 `
--image-project=debian-cloud `
--boot-disk-size 10GB `
--boot-disk-type pd-standard `
--boot-disk-device-name instance-1 `
--reservation-affinity any

Test Connectivity

Now we are ready to test connectivity from both sides of the tunnel.

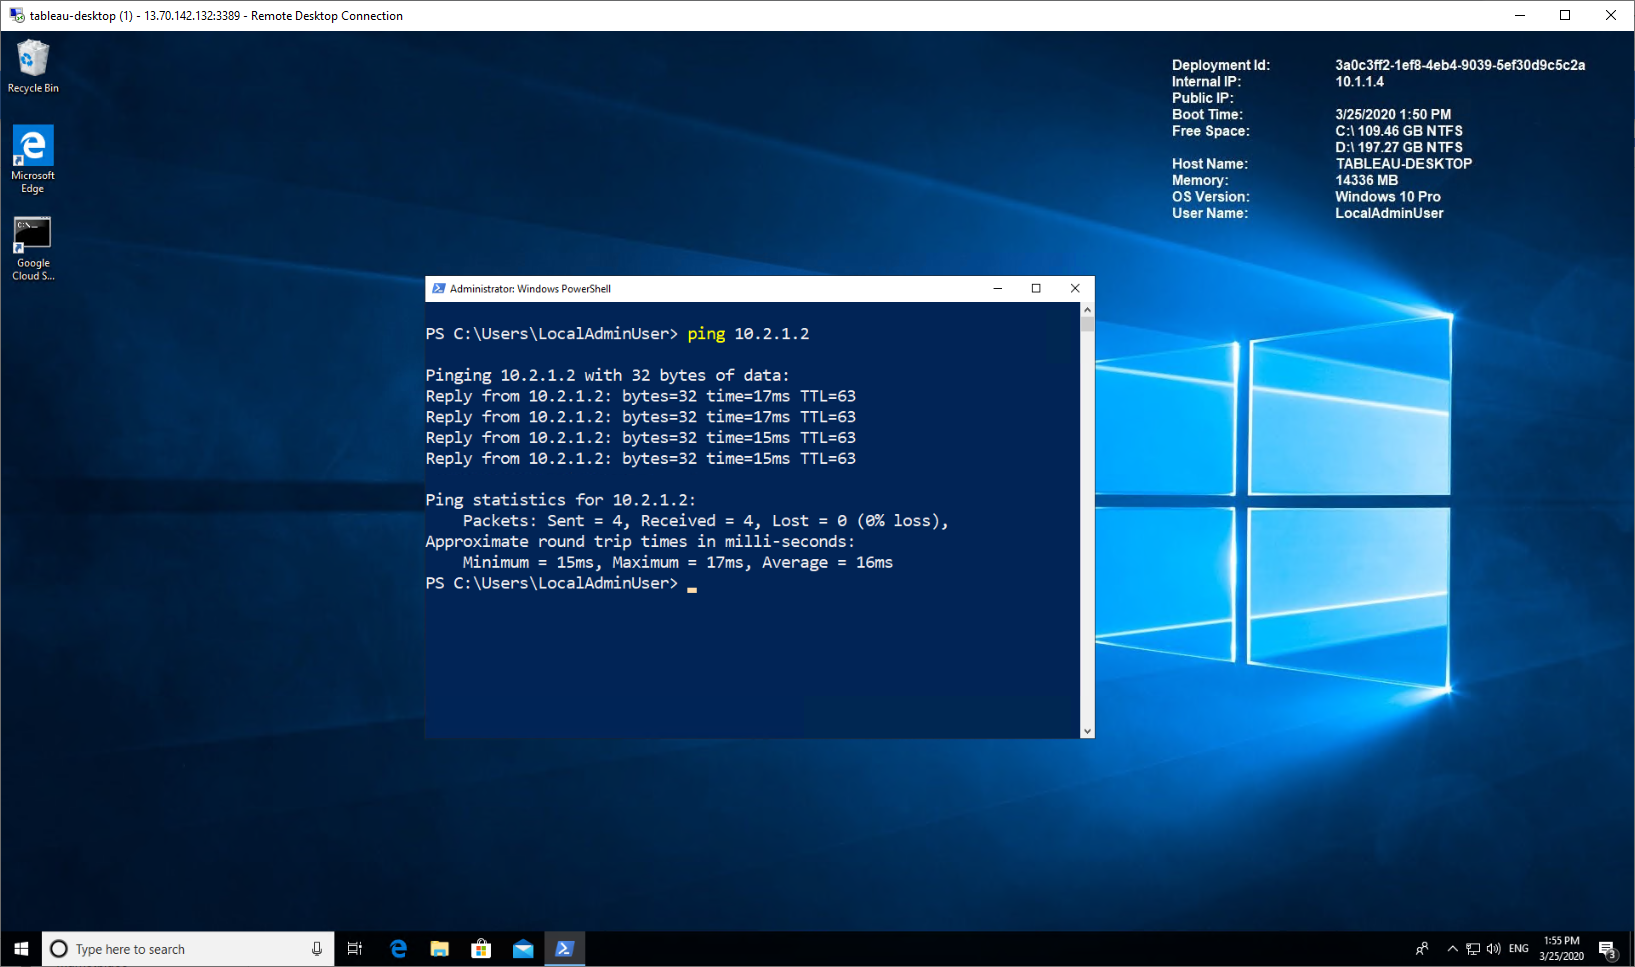
Azure to GCP

Establish a remote desktop (RDP) connection to the Azure VM created in Step 15. Ping the GCP VM instance using its private IP address.

Test Private IP Connectivity from Azure to GCP

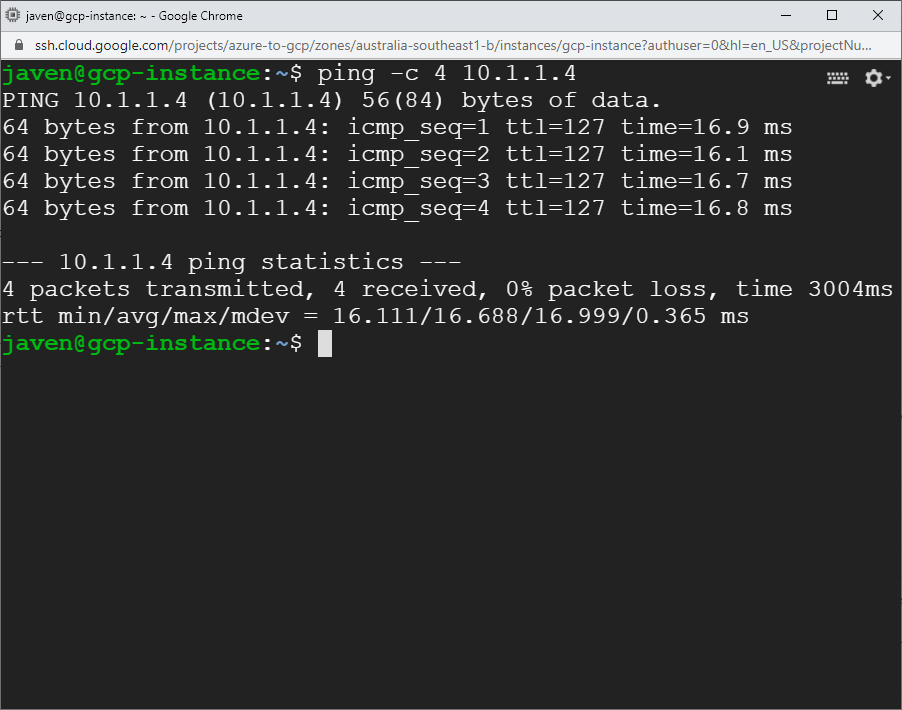
GCP to Azure

Now SSH into the GCP Linux VM instance and ping the Azure host using its private IP address.

Test Private IP Connectivity from GCP to Azure

Test Private Google Access from Azure

Now that we have established bi-directional connectivity between the two clouds, we can test private access to Google APIs from our Azure host. Follow the steps below to test private access:

  1. RDP into the Azure VM
  2. Install the Google Cloud SDK ( https://cloud.google.com/sdk/)
  3. Perform an nslookup to ensure that calls to googleapis.com resolve to the restricted API range (e.g. nslookup storage.googleapis.com). You should see a response showing the A records from the googleapis.com Private DNS Zone created in step 14.
  4. Now test connectivity to Google APIs, for example to test access to Google Cloud Storage using gsutil, or test access to Big Query using the bq command

Congratulations! You are now a multi cloud ninja!

if you have enjoyed this post, please consider buying me a coffee ☕ to help me keep writing!

· 6 min read
Jeffrey Aven

Apache Spark in GCP

In the previous post in this series Spark in the Google Cloud Platform Part 1, we started to explore the various ways in which we could deploy Apache Spark applications in GCP. The first option we looked at was deploying Spark using Cloud DataProc, a managed Hadoop cluster with various ecosystem components included.

In this post, we will look at another option for deploying Spark in GCP – a Spark Standalone cluster running on GKE.

Spark Standalone refers to the in-built cluster manager provided with each Spark release. Standalone can be a bit of a misnomer as it sounds like a single instance – which it is not, standalone simply refers to the fact that it is not dependent upon any other projects or components – such as Apache YARN, Mesos, etc.

A Spark Standalone cluster consists of a Master node or instance and one of more Worker nodes. The Master node serves as both a master and a cluster manager in the Spark runtime architecture.

The Master process is responsible for marshalling resource requests on behalf of applications and monitoring cluster resources.

The Worker nodes host one or many Executor instances which are responsible for carrying out tasks.

Deploying a Spark Standalone cluster on GKE is reasonably straightforward. In the example provided in this post we will set up a private network (VPC), create a GKE cluster, and deploy a Spark Master pod and two Spark Worker pods (in a real scenario you would typically have many Worker pods).

Once the network and GKE cluster have been deployed, the first step is to create Docker images for both the Master and Workers.

The Dockerfile below can be used to create an image capable or running either the Worker or Master daemons:

Note the shell scripts included in the Dockerfile: spark-master and spark-worker. These will be used later on by K8S deployments to start the relative Master and Worker daemon processes in each of the pods.

Next, we will use Cloud Build to build an image using the Dockerfile are store this in GCR (Google Container Registry), from the Cloud Build directory in our project we will run:

gcloud builds submit --tag gcr.io/spark-demo-266309/spark-standalone

Next, we will create Kubernetes deployments for our Master and Worker pods.

Firstly, we need to get cluster credentials for our GKE cluster named ‘spark-cluster’:

gcloud container clusters get-credentials spark-cluster --zone australia-southeast1-a --project spark-demo-266309

Now from within the k8s-deployments\deploy folder of our project we will use the kubectl command to deploy the Master pod, service and the Worker pods

Starting with the Master deployment, this will deploy our Spark Standalone image into a container running the Master daemon process:

To deploy the Master, run the following:

kubectl create -f spark-master-deployment.yaml

The Master will expose a web UI on port 8080 and an RPC service on port 7077, we will need to deploy a K8S service for this, the YAML required to do this is shown here:

To deploy the Master service, run the following:

kubectl create -f spark-master-service.yaml

Now that we have a Master pod and service up and running, we need to deploy our Workers which are preconfigured to communicate with the Master service.

The YAML required to deploy the two Worker pods is shown here:

To deploy the Worker pods, run the following:

kubectl create -f spark-worker-deployment.yaml

You can now inspect the Spark processes running on your GKE cluster.

kubectl get deployments

Shows...

NAME           READY   UP-TO-DATE   AVAILABLE   AGE
spark-master 1/1 1 1 7m45s
spark-worker 2/2 2 2 9s
kubectl get pods

Shows...

NAME                            READY   STATUS    RESTARTS   AGE
spark-master-f69d7d9bc-7jgmj 1/1 Running 0 8m
spark-worker-55965f669c-rm59p 1/1 Running 0 24s
spark-worker-55965f669c-wsb2f 1/1 Running 0 24s

Next, as we need to expose the Web UI for the Master process we will create a LoadBalancer resource. The YAML used to do this is provided here:

To deploy the LB, you would run the following:

kubectl create -f spark-ui-lb.yaml

NOTE This is just an example, for simplicity we are creating an external LoadBalancer with a public IP, this configuration is likely not be appropriate in most real scenarios, alternatives would include an internal LoadBalancer, retraction of Authorized Networks, a jump host, SSH tunnelling or IAP.

Now you’re up and running!

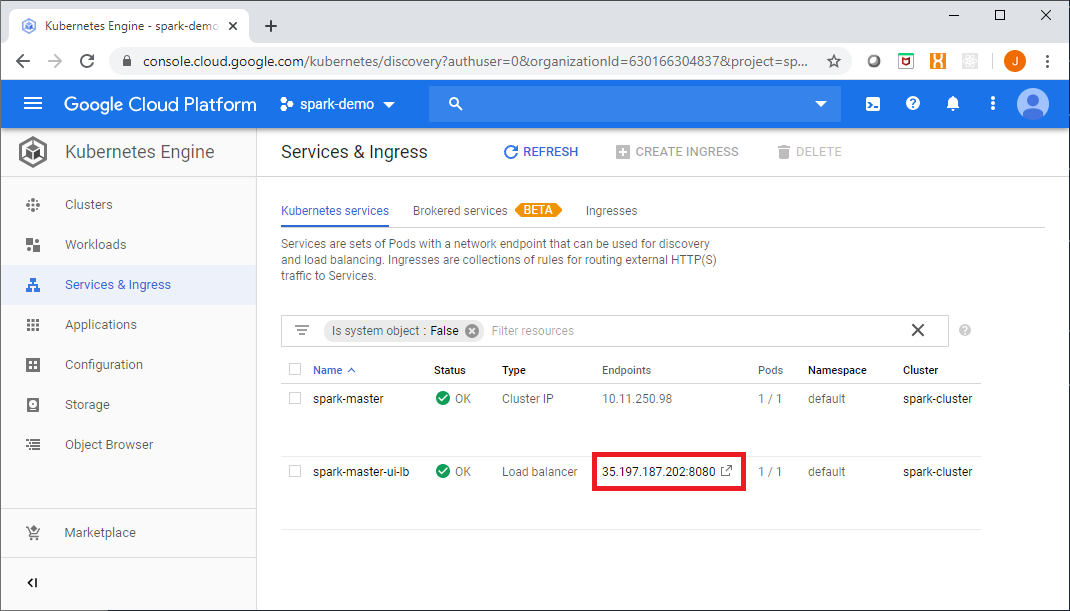
You can access the Master web UI from the Google Console link shown here:

Accessing the Spark Master UI from the Google Cloud Console

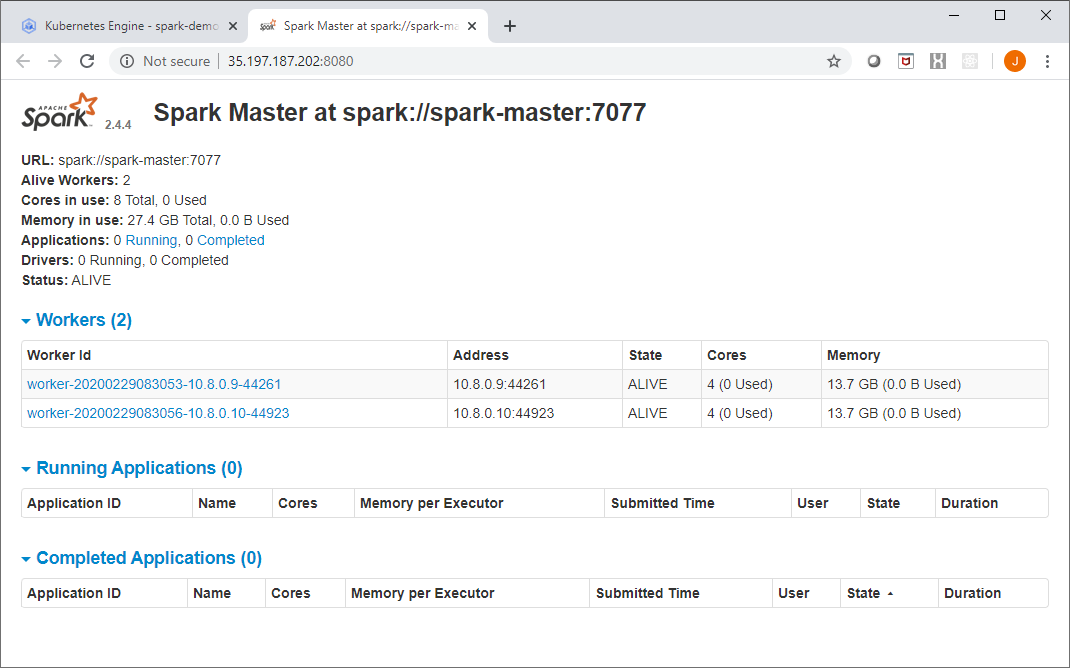
The Spark Master UI should look like this:

Spark Master UI

Next we will exec into a Worker pod, get a shell:

kubectl exec -it spark-worker-55965f669c-rm59p -- sh

Now from within the shell environment of a Worker – which includes all of the Spark client libraries, we will submit a simple Spark application:

spark-submit --class org.apache.spark.examples.SparkPi \
--master spark://10.11.250.98:7077 \
/opt/spark/examples/jars/spark-examples*.jar 10000

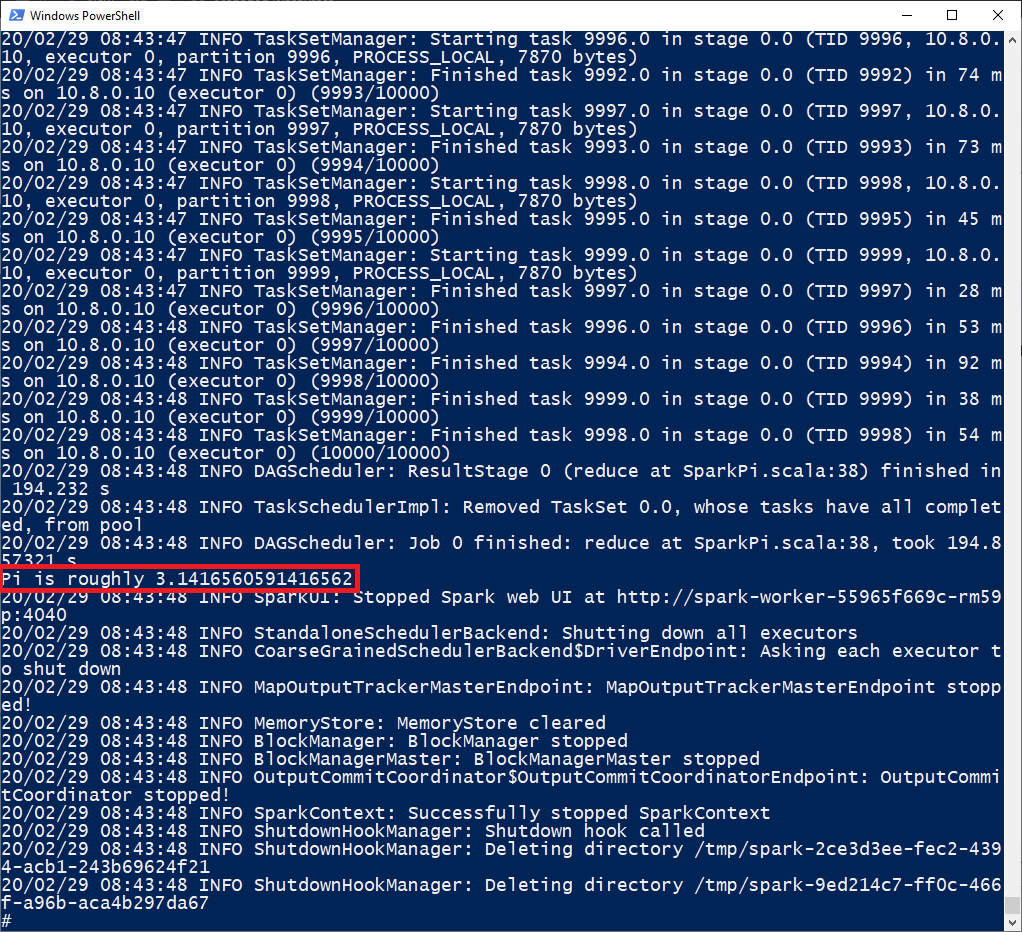
You can see the results in the shell, as shown here:

Spark Pi Estimator Example

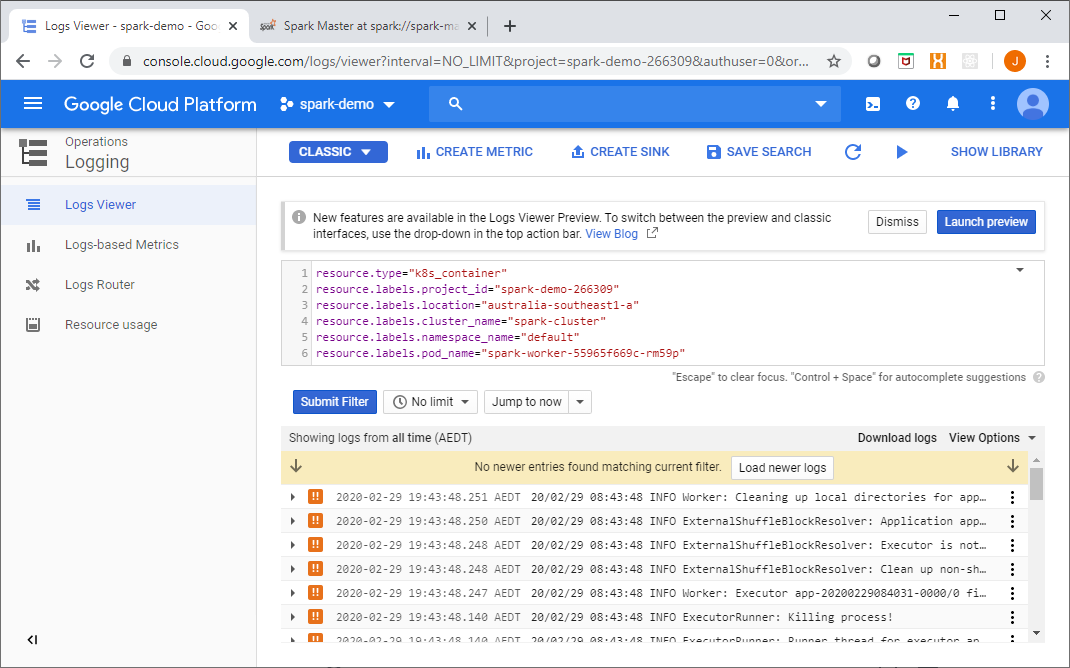
Additionally, as all of the container logs go to Stackdriver, you can view the application logs there as well:

Container Logs in StackDriver

This is a simple way to get a Spark cluster running, it is not without its downsides and shortcomings however, which include the limited security mechanisms available (SASL, network security, shared secrets).

In the final post in this series we will look at Spark on Kubernetes, using Kubernetes as the Spark cluster manager and interacting with Spark using the Kubernetes API and control plane, see you then.

Full source code for this article is available at: https://github.com/gamma-data/spark-on-gcp

The infrastructure coding for this example uses Powershell and Terraform, and is deployed as follows:

PS > .\run.ps1 private-network apply <gcp-project> <region>
PS > .\run.ps1 gke apply <gcp-project> <region>

if you have enjoyed this post, please consider buying me a coffee ☕ to help me keep writing!

· 6 min read
Jeffrey Aven

Apache Spark in GCP

I have been an avid Spark enthusiast since 2014 (the early days..). Spark has featured heavily in every project I have been involved with from data warehousing, ETL, feature extraction, advanced analytics to event processing and IoT applications. I like to think of it as a Swiss army knife for distributed processing.

Curiously enough, the first project I had been involved with for some years that did not feature the Apache Spark project was a green field GCP project which got me thinking… where does Spark fit into the GCP landscape?

Unlike the other major providers who use Spark as the backbone of their managed distributed ETL services with examples such as AWS Glue or the Spark integration runtime option in Azure Data Factory, Google’s managed ETL solution is Cloud DataFlow. Cloud DataFlow which is a managed Apache Beam service does not use a Spark runtime (there is a Spark Runner however this is not an option when using CDF). So where does this leave Spark?

My summation is that although Spark is not a first-class citizen in GCP (as far as managed ETL), it is not a second-class citizen either. This article will discuss the various ways Spark clusters and applications can be deployed within the GCP ecosystem.

Quick Primer on Spark

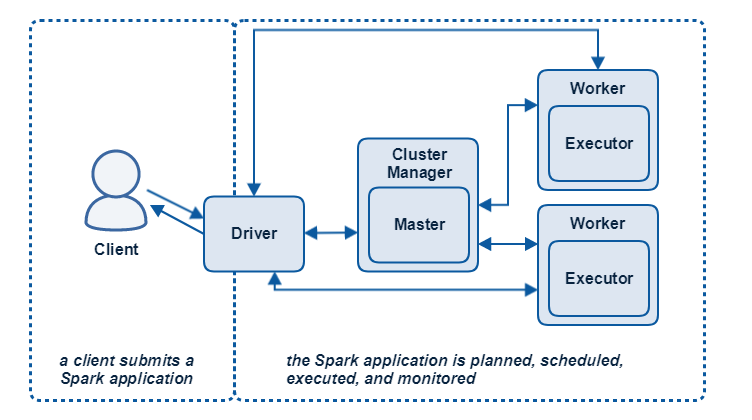
Every Spark application contains several components regardless of deployment mode, the components in the Spark runtime architecture are:

  • the Driver
  • the Master
  • the Cluster Manager
  • the Executor(s), which run on worker nodes or Workers

Each component has a specific role in executing a Spark program and all of the Spark components run in Java virtual machines (JVMs).

Spark Runtime Architecture

Cluster Managers schedule and manage distributed resources (compute and memory) across the nodes of the cluster. Cluster Managers available for Spark include:

  • Standalone
  • YARN (Hadoop)
  • Mesos
  • Kubernetes

Spark on DataProc

This is perhaps the simplest and most integrated approach to using Spark in the GCP ecosystem.

DataProc is GCP’s managed Hadoop Service (akin to AWS EMR or HDInsight on Azure). DataProc uses Hadoop/YARN as the Cluster Manager. DataProc clusters can be deployed on a private network (VPC using RFC1918 address space), supports encryption at Rest using Google Managed or Customer Managed Keys in KMS, supports autoscaling and the use of Preemptible Workers, and can be deployed in a HA config.

Furthermore, DataProc clusters can enforce strong authentication using Kerberos which can be integrated into other directory services such as Active Directory through the use of cross realm trusts.

Deployment

DataProc clusters can be deployed using the gcloud dataproc clusters create command or using IaC solutions such as Terraform. For this article I have included an example in the source code using the gcloud command to deploy a DataProc cluster on a private network which was created using Terraform.

Integration

The beauty of DataProc is its native integration into IAM and the GCP service plane. Having been a long-time user of AWS EMR, I have found that the usability and integration are in many ways superior in GCP DataProc. Let’s look at some examples...

IAM and IAP (TCP Forwarding)

DataProc is integrated into Cloud IAM using various coarse grained permissions use as dataproc.clusters.use and simplified IAM Roles such as dataproc.editor or dataproc.admin. Members with bindings to the these roles can perform tasks such as submitting jobs and creating workflow templates (which we will discuss shortly), as well as accessing instances such as the master node instance or instances in the cluster using IAP (TCP Forwarding) without requiring a public IP address or a bastion host.

DataProc Jobs and Workflows

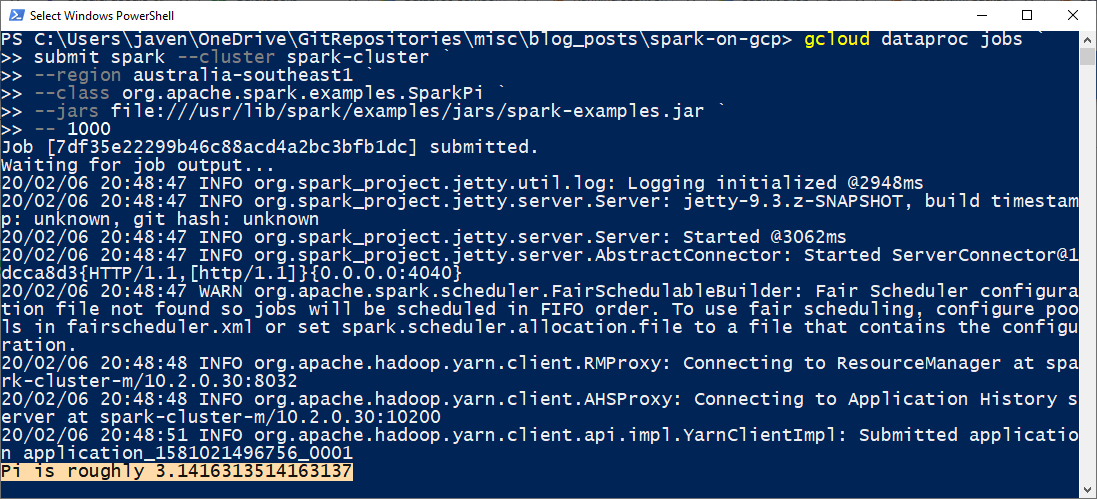
Spark jobs can be submitted using the console or via gcloud dataproc jobs submit as shown here:

Submitting a Spark Job using gcloud dataproc jobs submit

Cluster logs are natively available in StackDriver and standard out from the Spark Driver is visible from the console as well as via gcloud commands.

Complex Workflows can be created by adding Jobs as Steps in Workflow Templates using the following command:

gcloud dataproc workflow-templates add-job spark

Optional Components and the Component Gateway

DataProc provides you with a Hadoop cluster including YARN and HDFS, a Spark runtine – which includes Spark SQL and SparkR. DataProc also supports several optional components including Anaconda, Jupyter, Zeppelin, Druid, Presto, and more.

Web interfaces to some of these components as well as the management interfaces such as the Resource Manager UI or the Spark History Server UI can be accessed through the Component Gateway.

This is a Cloud IAM integrated gateway (much like IAP) which can allow access through an authenticated and authorized console session to web UIs in the cluster – without the need for SSH tunnels, additional firewall rules, bastion hosts, or public IPs. Very cool.

Links to the component UIs as well as built in UIs like the YARN Resource Manager UI are available directly from through the console.

Jupyter

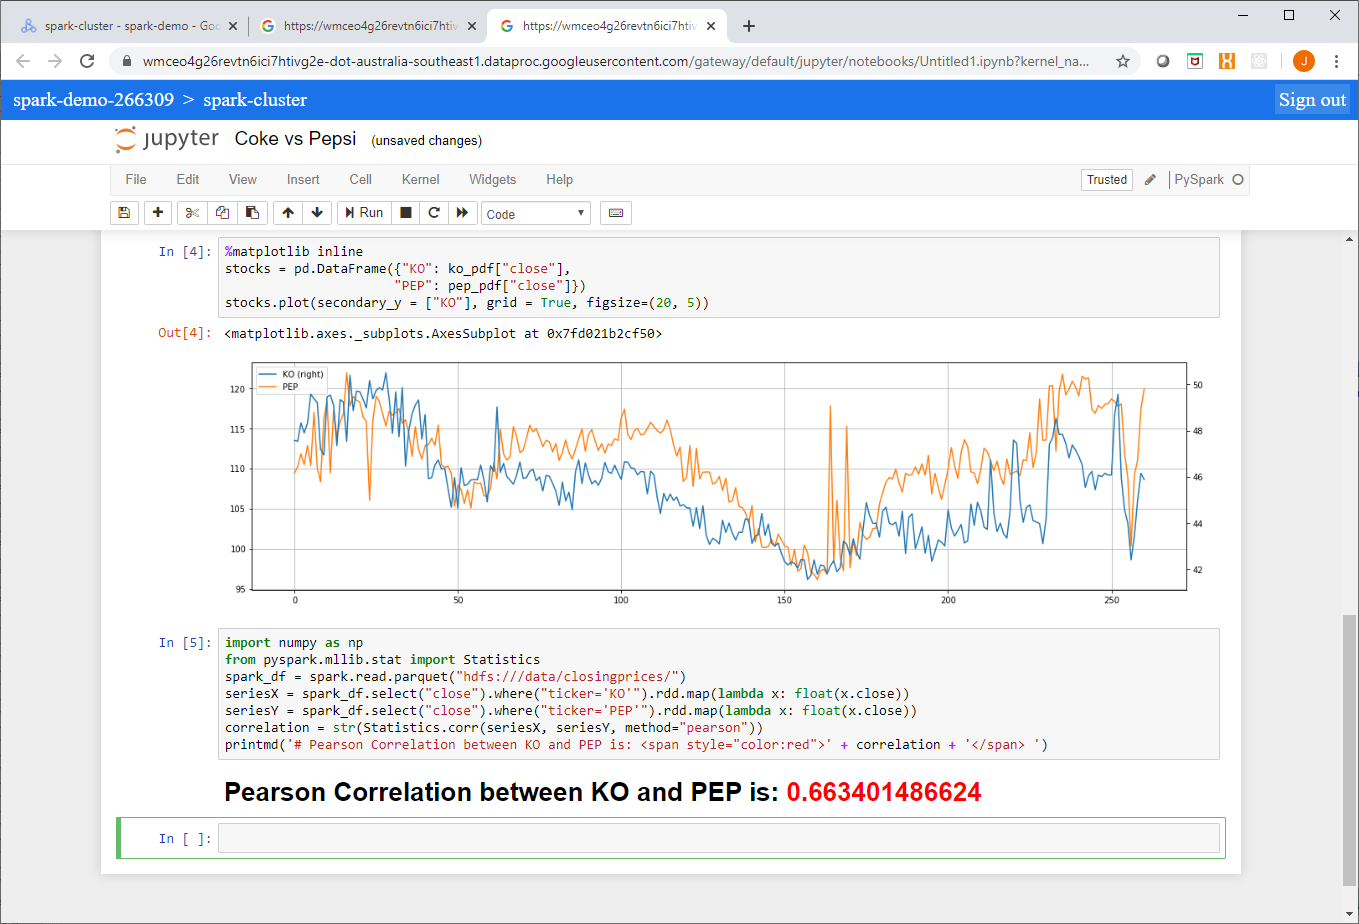
Jupyter is a popular notebook application in the data science and analytics communities used for reproducible research. DataProc’s Jupyter component provides a ready-made Spark application vector using PySpark. If you have also installed the Anaconda component you will have access to the full complement of scientific and mathematic Python packages such as Pandas and NumPy which can be used in Jupyter notebooks as well. Using the Component Gateway, Jupyer notebooks can be accessed directly from the Google console as shown here:

Jupyter Notebooks using DataProc

From this example you can see that I accessed source data from a GCS bucket and used HDFS as local scratch space.

Furthermore, notebooks are automagically saved in your integrated Cloud Storage DataProc staging bucket and can be shared amongst analysts or accessed at a later time. These notebooks also persist beyond the lifespan of the cluster.

Next up we will look at deploying a Spark Standalone cluster on a GKE cluster, see you then!

if you have enjoyed this post, please consider buying me a coffee ☕ to help me keep writing!